Hello! My name is Jeff and I'm new here on DIY Audio, so just wanted to start this thread off with a quick intro post. I'm setting out to build my own Hi-Fi setup with all DIY components and the first piece I'll be tackling will be my preamplifier.
I want to document my process through a thread as 1: I will have many many questions which I know I'll be able to get answered here, and 2: I find it super helpful to review detailed guides complete with photos when learning about these builds, so only fair I give some back. Please note that I am a complete novice to electrical engineering/circuit design, etc. so many of my questions will be "dumb questions". I have a basic understanding of what a resistor and a capacitor do, and know how to solder, but that's about it. Please be patient with me and if already resources exist, kindly point me in the right direction.
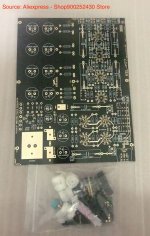
I am by trade an industrial designer, so designing consumer products is something that I have quite a bit of experience with, and building this preamp is going to be fun for me. It will be a custom-designed chassis that I will be producing via 3D printing. For the internals, I'm going to be using one of the Chinese KSL-M77 circuit-clone boards as a basis. I know the China clone products can be a bit controversial sometimes so I'd like to make it clear, I am not setting out to build a knockoff of or homage to the M77, rather using using one of these boards as a basis for my custom preamp. My result will be a very very different thing to the original, and I'm making no claims that it will be the same or some match to a genuine M77.
Why did I choose this board? Good question. I was originally considering to use one of the clones to the Marantz M7/Shigeru Wada circuit design which exist (I know those are two different things but they often get used interchangeably). While researching these I discovered the M77, and after reviewing it seemed like a superior design. As mentioned above, I am not very well-versed in electrical engineering, so I'm not able to look at the circuit diagram and understand too much about how it works. However, I do understand a few superiorities this design has:
I ordered a raw board from Aliexpress as I intend to solder in each of the electrical components myself. I feel like this will be a good thing for me to work on in the evenings over watching TV, and wanted to source my own high-quality (audio-grade where possible), name-brand components. Once I receive the board, the first thing I'll do will be to compile a BOM for review.

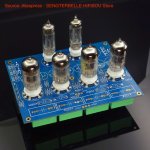
The other main reason that I wanted to get the un-propagated board is that I intend to assemble it a little differently than the standard configuration. Taking inspiration from some of the M7/Shigeru Wada clone boards I've seen online (see photo), I plan to mount many of the components (particularly large ones) to the underside of the board rather than the top. The goal is to mount the board high in the chassis, and have the tubes exposed outside of the enclosure like many high-end audio components do. I understand that mounting heat-sensitive components like capacitors underneath the board will be thermally sub-optimal, however I plan to design in heat-sinks surrounding them in order to assist with this, and ensure there is plenty of airflow in my design for the chassis.

So excited to get started on this, and hopeful for good advice from those who've built this board before. PCBs should arrive in a couple weeks. Stay tuned for updates!
Thanks!
I want to document my process through a thread as 1: I will have many many questions which I know I'll be able to get answered here, and 2: I find it super helpful to review detailed guides complete with photos when learning about these builds, so only fair I give some back. Please note that I am a complete novice to electrical engineering/circuit design, etc. so many of my questions will be "dumb questions". I have a basic understanding of what a resistor and a capacitor do, and know how to solder, but that's about it. Please be patient with me and if already resources exist, kindly point me in the right direction.
I am by trade an industrial designer, so designing consumer products is something that I have quite a bit of experience with, and building this preamp is going to be fun for me. It will be a custom-designed chassis that I will be producing via 3D printing. For the internals, I'm going to be using one of the Chinese KSL-M77 circuit-clone boards as a basis. I know the China clone products can be a bit controversial sometimes so I'd like to make it clear, I am not setting out to build a knockoff of or homage to the M77, rather using using one of these boards as a basis for my custom preamp. My result will be a very very different thing to the original, and I'm making no claims that it will be the same or some match to a genuine M77.
Why did I choose this board? Good question. I was originally considering to use one of the clones to the Marantz M7/Shigeru Wada circuit design which exist (I know those are two different things but they often get used interchangeably). While researching these I discovered the M77, and after reviewing it seemed like a superior design. As mentioned above, I am not very well-versed in electrical engineering, so I'm not able to look at the circuit diagram and understand too much about how it works. However, I do understand a few superiorities this design has:
- There are more tubes. Maybe they're excessive, and they'll definitely cost more $$$. But more = better right? (Maybe not but go with it anyway.)
- The volume potentiometer is integrated into the circuit itself. When reading about where to integrate the volume pot on a design which doesn't have one there seems to be some healthy debate about whether its best to attenuate on the input or output, with consensus stating optimally its somewhere in the middle. This appears to do that.
- Lines in and out don't share ground between L and R channels.
- Lastly, there's a built-in phono stage. So even though this build costs more, its one less component that I need to buy or build.
I ordered a raw board from Aliexpress as I intend to solder in each of the electrical components myself. I feel like this will be a good thing for me to work on in the evenings over watching TV, and wanted to source my own high-quality (audio-grade where possible), name-brand components. Once I receive the board, the first thing I'll do will be to compile a BOM for review.
The other main reason that I wanted to get the un-propagated board is that I intend to assemble it a little differently than the standard configuration. Taking inspiration from some of the M7/Shigeru Wada clone boards I've seen online (see photo), I plan to mount many of the components (particularly large ones) to the underside of the board rather than the top. The goal is to mount the board high in the chassis, and have the tubes exposed outside of the enclosure like many high-end audio components do. I understand that mounting heat-sensitive components like capacitors underneath the board will be thermally sub-optimal, however I plan to design in heat-sinks surrounding them in order to assist with this, and ensure there is plenty of airflow in my design for the chassis.
So excited to get started on this, and hopeful for good advice from those who've built this board before. PCBs should arrive in a couple weeks. Stay tuned for updates!
Thanks!
Attachments
How's the build going...
Hey Jeff,
Nice to meet you! I too am about to begin building this. My only previous experience of electronics was building the EAR clone posted on Lenco Heaven and that works great, and was great fun to put together but there was a ton of really helpful step by step help given. Been reading up on lots of background info on the M77 build (most of which does go over my head I must admit!). Just wondering how you are getting on with your build? I'm reading that people have found some issues with the components and the values on the PCB? I went for the unbuilt PCB and am buying my own capacitors.
Cheers
T