Not sure if there is a build log area, but here goes.
Driver: Rockville RVW1800P8
https://www.amazon.com/Rockville-RVW1800P8-Subwoofer-Woofer-Magnet/dp/B01DP0HKJK?th=1
AMP: GetSHOW 2400W Plate Amplifier with DSP: https://www.aliexpress.com/item/400...o.order_list.order_list_main.5.648c1802L916aM
(If it turns out its not as powerful as I expect, I will likely make it a passive speaker cabinet for now. I think plate amps are hard to gauge, if that is the case I will likely use a Crown amplifier instead. I based the enclosure loosely on the design here: https://www.loudspeakersplus.com/Articles.asp?ID=258
The enclosure is built to also accept other 18 inch drivers, mainly because I wanted to ensure I could actually figure out how to build a decent one before splurging on the RCF drivers I originally wanted. (RCF LF18X401)
Tomorrow after the original glue up for the front element is dry, I will start to assemble the box and put in the bracing. Stay tuned!
Build itself:
Attached is the cut list, with the final dimensions being 780x580x650. Port area is 540cm2 or 10x54cm.
The debt of the port is 37cm, or 34 internal. I could have made this slightly longer for a expected resonance of 35hz, but I think this is fine.
Its made to accept a much more powerful speaker, upwards of 1500w and 125 dB @ 1m (Calculated). I will make two of these to replace some old ELX200's that's disappointed me multiple times..
Besides the cutlist, I used a local sawmill, you also need to cut the baffle at 544 x 37 and a small support at 37x10 cm.
Handles? I will be purchasing some from Adam hall, and a speaker-con connector plate.
Attachments
Last edited:
I predict you will find that driver is the weak link... easy enough to prove just connect it to a rack amp of known performance, but I'm following along anyway.
I tested it quick before, and yeah it’s definitely not close to it’s rated performance… which amplifier would you recommend for subs? I’ve been eyeing the Crown XTi series
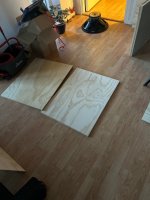
Update #1:
After a successful glue up of the front layer, I decided it was time to start cutting the hole in it. Easier said than done.
I didn't get a picture, but I sanded all edges to be joined together. The sawmill had left some burnmarks on the edges, I read online you should sand everything with 200 grit to get rid of any signs of burnt cuts, or really all glued surfaces. I didn't take any pictures of this, I'm sure you've seen sandpaper before.
Learning #1: Get a plug-in router, because my battery powered one chocked multiple times. If possible, cut only a sliver around the speaker, and use a jigsaw for the rest. I couldn't as I opted for double 18mm ply.
Learning #1.5: Write on the surfaces which you want front and back. The nice edge I made with the router for the speaker to sit in, ended up on the inside. Big mistake 🙁


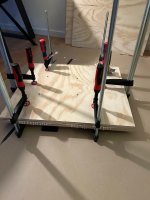
Following this success, I figured why wait. At this point I argued with myself whether to use screws or not, but since I didn't have enough clamps it was my only option. The 1 meter ones I had was only enough for one of the sides, meaning would have had to glue it over 3 times or more. The plywood wasn't horribly expensive, so if it turns out this was a mistake I guess I will have to make 3.
Learning #2: Get lots and lots of clamps...


The image above is its current state. Tomorrow I will start to cut the braces inside, which should be fun. I used outdoor screws with enamel coating to avoid rusting in damp conditions. I also used C3 glue all around.
While its definitely possible to make this on the ground like me, I would highly recommend getting at least a couple of sawhorses with a table top on it. My back is killing me.
Learning #3: Place work at waist level. Saves your back. (no-brainer really)
Thats it for today folks. Will update you when I start to put in the braces and glue on the bottom part. Am very excited to test it out.
Bare in mind that this is my first EVER speaker build, and more learnings will come.
After a successful glue up of the front layer, I decided it was time to start cutting the hole in it. Easier said than done.
I didn't get a picture, but I sanded all edges to be joined together. The sawmill had left some burnmarks on the edges, I read online you should sand everything with 200 grit to get rid of any signs of burnt cuts, or really all glued surfaces. I didn't take any pictures of this, I'm sure you've seen sandpaper before.
Learning #1: Get a plug-in router, because my battery powered one chocked multiple times. If possible, cut only a sliver around the speaker, and use a jigsaw for the rest. I couldn't as I opted for double 18mm ply.
Learning #1.5: Write on the surfaces which you want front and back. The nice edge I made with the router for the speaker to sit in, ended up on the inside. Big mistake 🙁
Following this success, I figured why wait. At this point I argued with myself whether to use screws or not, but since I didn't have enough clamps it was my only option. The 1 meter ones I had was only enough for one of the sides, meaning would have had to glue it over 3 times or more. The plywood wasn't horribly expensive, so if it turns out this was a mistake I guess I will have to make 3.
Learning #2: Get lots and lots of clamps...
The image above is its current state. Tomorrow I will start to cut the braces inside, which should be fun. I used outdoor screws with enamel coating to avoid rusting in damp conditions. I also used C3 glue all around.
While its definitely possible to make this on the ground like me, I would highly recommend getting at least a couple of sawhorses with a table top on it. My back is killing me.
Learning #3: Place work at waist level. Saves your back. (no-brainer really)
Thats it for today folks. Will update you when I start to put in the braces and glue on the bottom part. Am very excited to test it out.
Bare in mind that this is my first EVER speaker build, and more learnings will come.

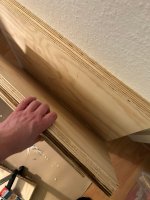
Learning #1 - Double-thick baffles are often easier routed first, then laminated.
Learning #2 - There are never enough clamps to laminate panels. Weight the panels with multiple 45 pound barbell plates. I would have gotten rid of my weight set years ago if it wasn‘t useful for assembling speakers.
Learning #2 - There are never enough clamps to laminate panels. Weight the panels with multiple 45 pound barbell plates. I would have gotten rid of my weight set years ago if it wasn‘t useful for assembling speakers.
Update 2#
Today was hard, had a lot of plans, and felt I rushed it a bit. Maybe some of it could have waited, and this will be considered for the next build. Wood glue has quite some working time so no need to rush it..
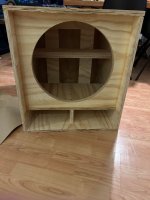
I was able to finish the basic structure, and now have a finished "box" so to speak, its ready to accept the driver and wires. Before I build the amplifier a box to sit in, I will be testing it with a small hole and some bare wires into terminals.
I am also not super amazed by the "square" part, it is a tiny bit wobbly. Im not sure if this is because some of the parts was not cut straight, or if some of the pieces are a bit on the warped side. After sandwiching them together, it's not really a problem.
Braces was sort of randomly placed, not sure if there are any calculations to consider? My main goal is to get a box with low resonance, and something that won't crack if someone stands on it.
Next steps: I will finish the build tomorrow, if the weather is nice maybe bring it outside. I also hope to program the DSP, but hard to do in a living room. You really need to push it to max, set the limiter etc.


Learning #4: Perfection takes time. I knew this already, but silly mistake, cant rush woodworking.
Learning #5: Even if a dry fit works, find a method of checking for square. (Suggestions welcome)
Today was hard, had a lot of plans, and felt I rushed it a bit. Maybe some of it could have waited, and this will be considered for the next build. Wood glue has quite some working time so no need to rush it..
I was able to finish the basic structure, and now have a finished "box" so to speak, its ready to accept the driver and wires. Before I build the amplifier a box to sit in, I will be testing it with a small hole and some bare wires into terminals.
I am also not super amazed by the "square" part, it is a tiny bit wobbly. Im not sure if this is because some of the parts was not cut straight, or if some of the pieces are a bit on the warped side. After sandwiching them together, it's not really a problem.
Braces was sort of randomly placed, not sure if there are any calculations to consider? My main goal is to get a box with low resonance, and something that won't crack if someone stands on it.
Next steps: I will finish the build tomorrow, if the weather is nice maybe bring it outside. I also hope to program the DSP, but hard to do in a living room. You really need to push it to max, set the limiter etc.
Learning #4: Perfection takes time. I knew this already, but silly mistake, cant rush woodworking.
Learning #5: Even if a dry fit works, find a method of checking for square. (Suggestions welcome)
Attachments
Yeah will try that, if cut the same, same center, should be fine to cut individually. Thanks!Learning #1 - Double-thick baffles are often easier routed first, then laminated.
Learning #2 - There are never enough clamps to laminate panels. Weight the panels with multiple 45 pound barbell plates. I would have gotten rid of my weight set years ago if it wasn‘t useful for assembling speakers.
Update 3#
Today is a blessed day, I was able to finish it to a usable level. Yes there are still some parts that needs to be fixed, mainly building the amp module into it etc. I also didn't perform any measurements yet, neighbors are finicky...
As mentioned below, the bottleneck is definitely the woofer. I made two recordings, one at over excursion and one at reasonable levels.
It does seem like the amplifier module has plenty of juice, so I don't think that will be an issue.
There is some rattling, I think its distortion as mentioned above.
Still to come: Insulation of the box, handles, feet and wheels. Stay tuned!
I had the DB meter between 1-1.5 meters from the cabinet.
Today is a blessed day, I was able to finish it to a usable level. Yes there are still some parts that needs to be fixed, mainly building the amp module into it etc. I also didn't perform any measurements yet, neighbors are finicky...
As mentioned below, the bottleneck is definitely the woofer. I made two recordings, one at over excursion and one at reasonable levels.
It does seem like the amplifier module has plenty of juice, so I don't think that will be an issue.
There is some rattling, I think its distortion as mentioned above.
Still to come: Insulation of the box, handles, feet and wheels. Stay tuned!
I predict you will find that driver is the weak link... easy enough to prove just connect it to a rack amp of known performance, but I'm following along anyway.
I had the DB meter between 1-1.5 meters from the cabinet.
Attachments
Did you have a HP filter set at about box tuning on those tests? The drivers is jumping pretty good in one of those videos so the rattling noise could be it hitting xlim.
Another thought... how is the driver mounted? Hopefully not with wood screws, at this power level the driver needs to be bolted in.
Another thought... how is the driver mounted? Hopefully not with wood screws, at this power level the driver needs to be bolted in.
Yeah driver was maxed, and is the weak point here, amplifier seems to have plenty of headroom, so will try to upgrade it later if required.Did you have a HP filter set at about box tuning on those tests? The drivers is jumping pretty good in one of those videos so the rattling noise could be it hitting xlim.
Another thought... how is the driver mounted? Hopefully not with wood screws, at this power level the driver needs to be bolted in.
It’s installed with the below and m6 screws
Attachments
Trace, after having installed some poly-fill in the box, I know its not strictly necessary for ported boxes, but it did take away some of that empty box sound. Boomy sounds.
The EQ is not too bad, having only added a 3db drop at 90 and 50hz, and added a low pass and high pass.
Overall happy with the sound. Output is not ideal I would say, so I ordered a new pair of woofers: RCF LF18X401
This should pair nicely with the box, and also give quite a bit more output.
Update. It seems to be very powerful with the new RCF woofer, pushing much more volume and actually reaching clipping on the amp with the speaker still having more headroom.
Now that I've build it, I am working on a version 2 already, to hopefully bring down some of the resonance. I think I made the ports too small, not chafing or noise wise, but tuning wise it could be better. I fight the DSP to manage the peaks at 90-100 at louder levels, making it sound quite hollow. I set a very low pass at 80hz to try to manage this, but not ideal for certain tops.
The new unit will be 700x700x560, so slightly smaller, but with a much improved port hopefully. I hope to reach a tune of 33-34hz this time. More though will also be made for the bracing inside. Stay tuned for that.
As mentioned you need to have a high pass filter in place about at 35hz and at least 18 db per octave. Far less stress on the speaker and the amp. It will sound better.
The high pass is not the same thing as a limiter.
It doesn't matter what the speaker brand is, there needs to be one in place.
The high pass is not the same thing as a limiter.
It doesn't matter what the speaker brand is, there needs to be one in place.
But do you really want to remove all the <30 hz?As mentioned you need to have a high pass filter in place about at 35hz and at least 18 db per octave. Far less stress on the speaker and the amp. It will sound better.
The high pass is not the same thing as a limiter.
It doesn't matter what the speaker brand is, there needs to be one in place.
If you want to keep the driver within Xmax at high levels, definitely YES! Below Fs the speaker increasingly sees the port as just a big old hole in the box and excursion goes through the roof as the actual acoustic output decreases. It's lose-lose.But do you really want to remove all the <30 hz?
Interesting, I will try to narrow the band a bitIf you want to keep the driver within Xmax at high levels, definitely YES! Below Fs the speaker increasingly sees the port as just a big old hole in the box and excursion goes through the roof as the actual acoustic output decreases. It's lose-lose.
This is what the excursion looks like in a simple ported enclosure; the deep dip being at port tuning frequency whilst the output is rolling off at 24dB/octave:

Last edited:
The exact frequency isn't set in stone - you can go a little lower, but watch for over-excursion. It depends partly on the type of music you are playing. EDM or home theatre are very different to Beethoven or The Carpenters...I see, I will add a highpass at 35 hz, thanks!
- Home
- Live Sound
- PA Systems
- Build log 18" subwoofer enclosure