 I'm not a very passionate apologist for Bryston since I haven't compared them face-to-face with anything, and I don't really care that much about any commercial amps. Those 4B's are just great DIY chassis & heatsinks to me now, pleading to be retrofitted for my own personal amusement and gratification.
I am excited about the the amplifiers that culminate from the designers that frequent this forum though, and I wish I knew enough to build them all. But I'm just learning this transistor stuff, and it's a steep learning curve for a 47 y/o that hated math. But some of it's sinking in slowly.
Awful-tones. 😀 We called them Aura-Phones. And I'm with you regarding the NS10M's (I don't recall ever seeing or using a non-M).
I'd like to hook up some auratones to a 4B and see if I can get them to blow smoke rings.

And one studio I worked at a lot had big honkin JBLs, and they were indeed woofy-honky things. I really liked the Meyer and Genelec monitors, though and a pair of MTM's we had but I don't recall who made them. They were a bit crispy so we used them to mix vocals that we wanted warm sounding. It saved us from the constant urge to boost the treble on vocal tracks.
..Todd
Hi Todd,
Just different areas we worked in.
An easy way to recognize an NS-10. It's the one with tissue taped over the tweeter. The NS-10M is a modified NS-10 for near field monitoring with no wall behind the speaker. 😉
The only other thing to watch for on the 4B chassis is the front panel. The chassis would rip along the front side. Check yours and do some work there if you see this. Some angle aluminum sold in hardware stores will fix that problem.
-Chris
Just different areas we worked in.
An easy way to recognize an NS-10. It's the one with tissue taped over the tweeter. The NS-10M is a modified NS-10 for near field monitoring with no wall behind the speaker. 😉
We're both youngsters! I'm only 48. This is a great place to learn for sure.But I'm just learning this transistor stuff, and it's a steep learning curve for a 47 y/o that hated math. But some of it's sinking in slowly.
The only other thing to watch for on the 4B chassis is the front panel. The chassis would rip along the front side. Check yours and do some work there if you see this. Some angle aluminum sold in hardware stores will fix that problem.
-Chris
anatech said:
The only other thing to watch for on the 4B chassis is the front panel. The chassis would rip along the front side. Check yours and do some work there if you see this.
-Chris
Yup, These are road warriors. Already fixed. Aluminum? Nah, inch and a half angle-iron brackets!
What brand tissue did you use? We were a Scotties Little Softies shop.

..Todd
anatech said:........We're both youngsters! I'm only 48.......
-Chris
So am I!
1959.. a jolly good year.
quasi said:1959.. a jolly good year.
1960 for me. But with the time zone difference between our hemispheres, and exchange rate in effect at the time, we're probably the same age.

..Todd
Hi Todd,
LOL!
That won't work for me dude! You are between my brother and I in age.
'59 was an excellent year Con, look - no rust!
-Chris
LOL!
That won't work for me dude! You are between my brother and I in age.
'59 was an excellent year Con, look - no rust!
-Chris
PCB advice needed
Okay, I need some advice. I'm not quite sure how best to handle this part...
The Quasi NBIP PCB's I'm laying out will fit a Bryston 4B chassis, as a drop-in replacement for the Bryston PCB's (along with appropriate output device replacements of course). But here's the problem. I'm making single-sided boards. Brystons were double-sided and the TO-3 sockets mounted on the inside of heatsink soldered directly to the PCB. On my boards, that would end up being the component-side of the board, so no solder pads there.
Should I ...
a) put pads on the solder-side for attaching the TO-3 sockets, and learn to solder around corners;
b) put pads on the edge of the PCB to feed leads behind for soldering directly to the sockets;
c) Get rid of the sockets and solder leads to the output device pins;
d) some other idea you tell me about;
Thanks!
..Todd
RE PCB problem
Hi Taj,
You could try using PCB solder sleeves; http://www.tarapath.com.au/products.cfm?CID=2333. I've never used them but I believe you crimp them in a PCB hole then you can solder both sides. Not sure how much these cost.
Or
you could find some small
copper / brass eyelets (like they use in shoes for the laces) and do the same thing.
Or
You could pass some stiff wire through the holes first and bend it 90 degrees on both sides of the PCB, cut and solder one end to the trackside pads. Then pass all transistor legs through the same holes and solder the other side. Because the wire is bent at 90 degrees it should stay put.
Cheers
Q
Thanks Con! Very good ideas.
After having thought about it more, I think I will just put pads near one edge and run short leads behind to the sockets, which are fairly close. The main reason is simply to avoid the track routing restrictions imposed by those TO-3 transistor pad locations -- which are VERY inconvenient for a single-sided board. Trying to layout tracks around them caused me much gnashing of hair and pulling of teeth. With those pads out of the way, I'm free to use the space more effectively.
Here's another question... How did you mount T8 onto the output heatsink? It's a TO-92 package isn't it? Would longer leads affect its operation?
..Todd
Hi Taj,
I think I missed you thread before and when I try to look at your pcb today, it isn't there anymore. Can you please post it again?
I think I missed you thread before and when I try to look at your pcb today, it isn't there anymore. Can you please post it again?
I'm not happy with the first one I did. I'm still working on it and I'll post it when it's ready for public tweaking.
..Todd
..Todd
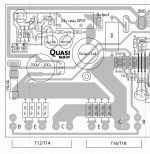
Okay, here's the [current] fruit of my labour. What do you think Mr. Q? Does it get the Quasi seal of approval? Or did I commit some heinous PCB layout faux pas?
http://members.shaw.ca/toddj/Quasi/nbip-4B-PCB-layout.pdf
By the way, I changed the footprint of many of the film caps to suit my taste for polypropylene, of which I seem to have amassed a considerable collection.
..Todd
http://members.shaw.ca/toddj/Quasi/nbip-4B-PCB-layout.pdf
By the way, I changed the footprint of many of the film caps to suit my taste for polypropylene, of which I seem to have amassed a considerable collection.
..Todd
And here's the tracks alone, naked.
http://members.shaw.ca/toddj/Quasi/nbip-4B-PCB-tracks.pdf
..Todd
http://members.shaw.ca/toddj/Quasi/nbip-4B-PCB-tracks.pdf
..Todd
And here's a diagram of how it would ultimately fit into the 4B chassis. I think I read somewhere that a BD139 would work for T8, if that's the case, it will fit nicely into the location shown on the diagram, connected by leads to the back of the PCB, as all the output devices are.
http://members.shaw.ca/toddj/Quasi/BRYSTON HEATSINK.pdf
..Todd
http://members.shaw.ca/toddj/Quasi/BRYSTON HEATSINK.pdf
..Todd
taj said:Okay, here's the [current] fruit of my labour. What do you think Mr. Q? Does it get the Quasi seal of approval? Or did I commit some heinous PCB layout faux pas?
http://members.shaw.ca/toddj/Quasi/nbip-4B-PCB-layout.pdf
By the way, I changed the footprint of many of the film caps to suit my taste for polypropylene, of which I seem to have amassed a considerable collection.
..Todd
Hi Todd,
I like the layout and I also like the placing inside the case. There are 3 maybe 4 errors though.
1. The two 470r resistors are shorted out. These should have seperate feeds to the emitters of T2 & T3.
2. Similarly the emitters of T2 & T3 are also shorted.
3. The collector of T8 should go to the collector of T6. At the moment it doesn't go anywhere.
Maybe 4. It looks as though you have a bolt inside the speaker output coil. This is a no-no particularly if it is a steel bolt. You should either remove it, shift the coil or use a brass one (make sure it's really brass).
Otherwise nice work and well thought out.
Cheers
Q


- Status
- Not open for further replies.
- Home
- Amplifiers
- Solid State
- Bryston to Quasi