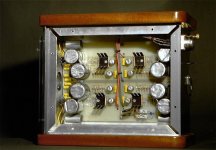
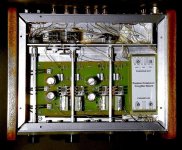
...this is the underside. A 3mm panel divides the two areas.
The small circuit on the upper right is a small soft-start (or inrush protection). Another thread gives more details and a link.
http://www.diyaudio.com/forums/showthread.php?s=&threadid=5142&perpage=15&pagenumber=4
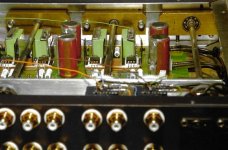
The power supply is dual-mono, each one using two ransformers, two diode bridges for each channel; this arrangement is detailed in the original BOSOZ article by NP. Total cap bank for both channels is slightly over 22.000uf.
The small circuit on the upper right is a small soft-start (or inrush protection). Another thread gives more details and a link.
http://www.diyaudio.com/forums/showthread.php?s=&threadid=5142&perpage=15&pagenumber=4
The power supply is dual-mono, each one using two ransformers, two diode bridges for each channel; this arrangement is detailed in the original BOSOZ article by NP. Total cap bank for both channels is slightly over 22.000uf.
Attachments
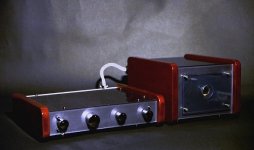
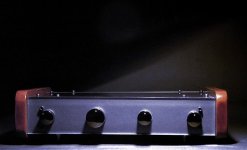
This is the preamp front, from left to right: input selector, volume,
recording selector, output selector. The output selector lets the
signal out either on balanced connectors, unbalanced,
and (also unbalanced) to three serie of RCA, for high-mid-bass
multiamplification. Inside there is a daughter bord (see later) that
can host a passive crossover.
The chassis of the preamp (and the power supply too) is a sandwich of 3mm aluminium and 6mm plexiglass. The underside of the plexiglass is blu-violet metallized paint. I liked the contrast of the mahogany sides and blue.
Attachments
Roberto,
I think you may have just taken top honours for chassis for a
BoSoZ..... very very nice. Looks like the race is on !!!!!
W.
I think you may have just taken top honours for chassis for a
BoSoZ..... very very nice. Looks like the race is on !!!!!
W.
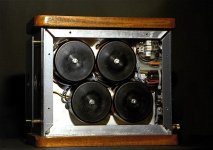
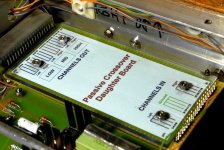
And a detail of it. The pins connects to passive crossover boards you build aside and then plug in. Depending of what you put on them (components height) you may stack two of them. If you need just a 2way crossover, simply don't use those pins.
Attachments
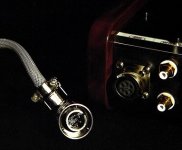
The gear pot connection, also shown with a different pic in the thread http://www.diyaudio.com/forums/showthread.php?s=&threadid=5790&pagenumber=2
Maybe this was the trickiest part, from a mechanical point of view.
Maybe this was the trickiest part, from a mechanical point of view.
Attachments
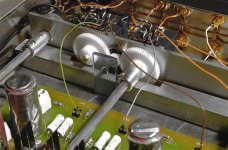
Space was barely enough... here you see pots axes going right between mosfets. I had some ball-bearing left and I use them to support the axes, this gives a tight hold on the axe with a zero friction effect. On the right you see the brass holders. Also visible is a copper bar where the (isolated) mosfet sits. At the time seemed a good idea to have both mosfets thermically connected... still is, but the container is so small that that would have occurred anyhow.
Attachments
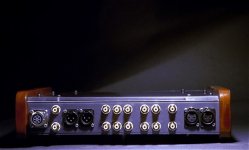
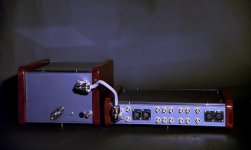
...and the back, all together. This preamp relly shines on sound.
Difference between a direct connection to a valve amp and through the BOSOZ gives parity on every parameter, except dynamics: The BOSOZ really gives a kick in. This is on unbalanced out... as soon as the monoblock SOZs are ready we'll see what's this beast is up too.
The BOSOZ article was sitting on my shelf for a couple of years... and I peered at it time to time... had other projects going on... now I'm very happy with it and has been a lot of fun, building it.
Here seems the right place to thank Nelson too. I like to thank him for the sense of humor that peers through his posts, his site, and... his willingness and time spent to share his work.
This is all folks...😀
Roberto Amato
Attachments
Roberto ... again, that's beautiful stuff! If you guys are going to build such beautiful things, you might get Nelson Pass concerned ... if you know what I mean.
By the way, why does some of the capacitors looks so beaten up?
Has anybody asked you for help in machining those L metal sheets with the 3 gears on it yet? I want one!
By the way, why does some of the capacitors looks so beaten up?
Has anybody asked you for help in machining those L metal sheets with the 3 gears on it yet? I want one!
I was just admiring my latest amp, until I read your post. Dirty Jesus it looks really nice. But what gave you the idea of using the plexiglass with the blue underside? I've never seen that before, although it's a great idea.
Not at all!! This is mostly fun, I don't do this for a living, Nelson does. This is all the difference there could be. Many people asked me to build for them. While I give a hand, sometimes two, I always turned them down. It took almost 6 month and a great deal of my spare time to build this. How much should I ask?? And nobody is giving me back my time. This is why I much appreciate Nelson's time. It's invaluable.fcel said:Roberto ... again, that's beautiful stuff! If you guys are going to build such beautiful things, you might get Nelson Pass concerned ... if you know what I mean.
I'm answering to Skaara too. There is anti-vibration material on them, even on caps top. Is made by an aluminium foil and a chewing-gum like soft and sticky material underneath. But does it work?? Well, let's say it does not hurt anything; it dries up the sound a bit, but I like it, so it's ok. It's a side-effect of audiophile paranoia, you know... 😀
By the way, why does some of the capacitors looks so beaten up?
If you were a little closer I could give you a hand. That has to be done on a unit-by-unit arrangement. Remember that the turning axe has to go to the front of the amp, to the knob. So positioning and height is not trivial. Patience helps a lot... 😉
Has anybody asked you for help in machining those L metal sheets with the 3 gears on it yet? I want one!
ciao,
Roberto
I didn't see it before either. Two reasons. For once, the paint under can't be possibly scratched, you may mop your amp easily, with normal home cleaning stuff... I was tired of paint scratches. Moreover, having the paint under 6mm of clear plastic gives a depth and a shine no other method does... at least reasonably available to Diyers. Secondly the sandwich between plexiglass (don't use policarbonate, too soft to obtain clean cuts) and aluminium gives a very dumb material, absorbing very well all kind of vibrations.JoeBob said:I was just admiring my latest amp, until I read your post. Dirty Jesus it looks really nice. But what gave you the idea of using the plexiglass with the blue underside? I've never seen that before, although it's a great idea.
I didn't know if this would work... the paint (car spray paint) could not look so good seen from the opposite side, the solvent in the paint could melt the plastic... any error could not be covered with additional layers... but with a light hand it worked. Beware that not all colors may work well, silver paint looks dull grey, for example. Give it a try.
ciao,
Roberto
You Italians really like wood, aren't you? The unit has a style of it's own and could be perfect match for Sonus Faber speakers.😉 Beautiful indeed.
One question: why is the AC socket at the angle?
One question: why is the AC socket at the angle?
- Status
- Not open for further replies.
- Home
- Amplifiers
- Pass Labs
- Blue BOSOZ