Hi,
I have a cambridge audio A500 amp
for time to time with over use it use to blow the internal glass fuses
recently after the fuses went i replaced them and on powering up the amp they instantly went again.
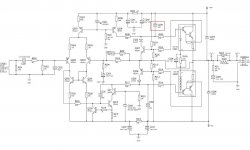
On closer inspection i spotted a capacitor (small ceramic cap) which i assume has blown. It had a kinda green corrosion all down one of the legs of it.
Ive attached a schematic of which capacitor it is. (Boxed in red)
Would absence of this capacitor cause instant fuse blowing or have i done further damage to the amp?
thanks
I have a cambridge audio A500 amp
for time to time with over use it use to blow the internal glass fuses
recently after the fuses went i replaced them and on powering up the amp they instantly went again.
On closer inspection i spotted a capacitor (small ceramic cap) which i assume has blown. It had a kinda green corrosion all down one of the legs of it.
Ive attached a schematic of which capacitor it is. (Boxed in red)
Would absence of this capacitor cause instant fuse blowing or have i done further damage to the amp?
thanks
Attachments
The capacitor is to aid stability, you can leave it out at your peril. If it has failed short circuit (from your description and the schematic it sounds like a tantalum, which do fail short) then it will be forcing the output stage to be permenantly swung to the positive rail.
Green corrosion sounds like theres the possibility some liquid has gotten on it! I doubt it's tantalum at 47pF, more likely just a regular ceramic. These don't really leak, but they can go short.
Replace it, or the amp might become unstable which will make it oscillate and damage both the amp and your speakers.
If you can afford a bit of expenditure replace the caps with mica ones such as Rapid part 12-0404. If you're happy to stick what was there back, something like Rapid 08-0485 will do.
Replace it, or the amp might become unstable which will make it oscillate and damage both the amp and your speakers.
If you can afford a bit of expenditure replace the caps with mica ones such as Rapid part 12-0404. If you're happy to stick what was there back, something like Rapid 08-0485 will do.
Hi brittney,
If the fuse goes that quickly, I'd suspect shorted rectifiers or output(s). If that capacitor is ceramic or a film type it's unlikely that it is shorted. That can happen, but it's rare. Another thing that can happen is that a filter capacitor may short. Again rare, but it can happen.
Take your ohm meter and measure each diode or rectifier bridge. Look for a normal diode drop or a rising resistance (filter caps charging). Once charged, a filter cap should measure almost infinite resistance (open).
To test for shorted outputs, a quick and easy way is to measure from the speaker output (like R224) and each supply rail. You are looking for a very low resistance as a fault condition. You may read open, or a diode drop depending on your meter polarity.
You should also measure across your suspect capacitor just to rule it out as a problem. If that capacitor was glued on the top side, the corrosion may be due to the glue. Remove any glue that appears as dark brown. I always remove that stuff. It should be yellow and turns brown up to almost black. It becomes corrosive and conductive over time with heat. Nice eh?
-Chris
richie, so did I at first, but I have a PDF of the A500 schematic, so looked closer 🙂
I agree, if the fuses keep blowing, I wouldn't mind betting there is more going on than a simple faulty compensation capacitor. Those Sanken SAP devices don't seem to be all that reliable, at least not the way Cambridge use them! Dead outputs seems to be the most common mode of failure on their amps employing them.
I agree, if the fuses keep blowing, I wouldn't mind betting there is more going on than a simple faulty compensation capacitor. Those Sanken SAP devices don't seem to be all that reliable, at least not the way Cambridge use them! Dead outputs seems to be the most common mode of failure on their amps employing them.
i, have seen many of these amps with the same sort of problems, and in a nutshell the output transistors of one or both channels have bit the dust, the easiest thing to do with them is replace all transistors (theres not that many and the only slightly dear ones to buy are the sap15's of which rapid are by far the cheapest) the pot and the 10uf cap genrally need replacing as well, also check properly to see if there are any burned resistors.
If you manage to get this fixed, you may want to set the idle current alittle lower than cambridge recommend, possibly around 8mv instead of 13mv it may just last a little longer next time
chris
If you manage to get this fixed, you may want to set the idle current alittle lower than cambridge recommend, possibly around 8mv instead of 13mv it may just last a little longer next time
chris
reddish, i've a feeling its down to the poor quality "folded sheet metal" heatsink that Cambridge seem to use a lot. Arcam have built a few amps with these Sankens but they use a more substantial solid aluminium heatsink.
Hi Chris,
What you are suggesting is called "shotgun" service. I don't agree with this method at all. If a technician is unskilled, then this looks attractive. However, an unskilled technician would probably damage many traces and pads while soldering. Not a good plan at all.
In the end, any intelligent technician can work this through and replace only those components that require replacement. I agree that if you find one output bad, the rest in that channel should go. The drivers should also be changed out and the bias components checked, but not both channels unless the other side is damaged also.
Finally, leave the bias currents at the recommended level. Running speakers at a good level will heat up the heat sink far more than the bias will. You are worrying about a "non-issue". Of course, increasing the bias level is often just plain silly and may create a thermal runaway condition.
Hi brittney,
When replacing power transistors, the heat sink and insulators should be cleaned completely. New insulators are recommended. New grease should be applied in a thin, even coat (a #2 artist's paint brush works well). When tightening the parts, take care not to apply too much pressure. You should see a small amount of grease come out from under the part. Take care to avoid heat sink grease intended for computer CPU heat sinks. Some of it is conductive.
If you are really not sure what to do, a good audio technician should repair this for you. Just be honest with yourself and your abilities. If you are comfortable doing the repair, consider adding some more heat sink, or replacing the existing one with a larger unit. This will probably involve some metal work.
-Chris
- Status
- Not open for further replies.
- Home
- Amplifiers
- Solid State
- Blown capacitor question