PART 1
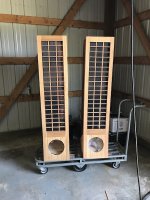
I just wanted to document what I’ve been calling my COVID project. However, my desire to build a pair of ESLs has been bubbling for about 10 years and I starting taking first steps in late January.
I heard my first pair of ESLs in probably early 2006 while I was in college. They were a set of ML Monoliths my best friend’s dad owned. We were both studying classical music. I’ll never forget the clarity of the sound, it was unlike anything I’ve ever heard. A while later, I ran across a pair of Mangepans another friend’s parents had. I had to know what was up with these speakers. There was a few people other there posting about building ESLs, and I think Charlie Mimbs had first brought up his blogspot website. As soon as I saw his beamsplitters, they had basically become my dream speakers. I followed his updates closely over the years. His skills, creativity, and craftsmanship are astounding.
I can’t remember what spurred the need to build these speakers all of a sudden over this last winter, but I got permission from the wife that if they looked nice enough I could keep them in the house. I reached out to Charlie in early January about the beam splitters with a goal to have them complete by September. He’s a nice and great guy. After a few conversations of him trying to convince me that the beam splitters were a ton of work he sent me his CAD files.
Wow. I was blown away just in the details of these CAD drawings. I studied them for hours. The ESLs that Charlie designs and builds are obviously an obsession of love, because everything is exacting in his drawings. It was almost mind bending to me. He wasn’t lying about the amount of work I was staring at, I honestly felt overwhelmed by it.
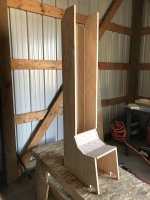
I’m not a cabinet maker, but I have a fair bit of shop space and a few tools. I had used a table saw a few times before mostly for ripping down boards or other minor tasks. My table saw isn’t super fancy, it’s a 1950s middle of the road Craftsman with a 1/2” auger and fence that doesn’t lock. I guess it was time to get intimate with this thing.


I believe Charlie has posted on his site that he thought it would take about 40 total hours to build these things. I’m not sure if that’s correct, maybe 40 hours if you exclude the panel layup, wire stretching, etc. I probably spent 40 hours on the table saw alone. With exception to panel lattice, every single piece is unique, and every single piece took me at least 6 cuts and all of the cuts required adjustments to the fence and blade angle and blade height.
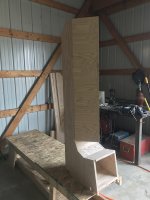
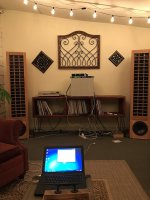
Putting the cabinets together was satisfying as I could start to see things take shape, but it was still decently slow. I think watching glue dry is like watching water boil, it just doesn’t until you leave it alone. I cheated quite a bit too and used a few nails. It took me about 3 months to build the two cabinets working very regularly on them.


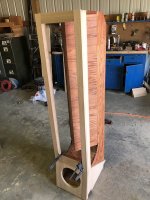
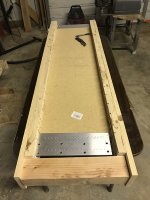
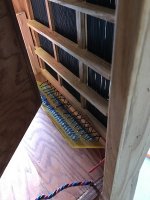
Next was to build these stators. I built Charlie’s wire stretching jig and planned to 3d print his ‘combs’ to space the wires. The stretching jig worked out really well but the amount of force put on the wires actually cracked the left side board. And I had a few issues with the small dowels wanting to pull out of the aluminum. Although I struggled a little bit, I was able to make it work with some monitoring. The guy I knew that had a 3d printer couldn’t figure out how to get his printer to print the files correctly, so I ended up using all thread rod as wire spacers which slowed things down quite a bit. There’s 24 lattice pieces to each stator and due to the struggles with the stretching jig I was having, I could only glue down one piece at a time and then had to wait an hour for the glue to dry before moving on to the next.
Stretching the mylar and putting the panels together was pretty straight forward. I used a licron crystal spray as my resistive coating and 3 different thicknesses and widths of mounting tape as Charlie recommended.
It was in the midst of the panel build that I ended up being in Montana for a few weeks for a COVID scare and my younger brother’s wedding, so I think it took about 3 more months to get the panels assembled, resistor circuit built, and assemble the power supply boards Charlie so graciously sent me. It was test time, will they make a noise?


I just wanted to document what I’ve been calling my COVID project. However, my desire to build a pair of ESLs has been bubbling for about 10 years and I starting taking first steps in late January.
I heard my first pair of ESLs in probably early 2006 while I was in college. They were a set of ML Monoliths my best friend’s dad owned. We were both studying classical music. I’ll never forget the clarity of the sound, it was unlike anything I’ve ever heard. A while later, I ran across a pair of Mangepans another friend’s parents had. I had to know what was up with these speakers. There was a few people other there posting about building ESLs, and I think Charlie Mimbs had first brought up his blogspot website. As soon as I saw his beamsplitters, they had basically become my dream speakers. I followed his updates closely over the years. His skills, creativity, and craftsmanship are astounding.
I can’t remember what spurred the need to build these speakers all of a sudden over this last winter, but I got permission from the wife that if they looked nice enough I could keep them in the house. I reached out to Charlie in early January about the beam splitters with a goal to have them complete by September. He’s a nice and great guy. After a few conversations of him trying to convince me that the beam splitters were a ton of work he sent me his CAD files.
Wow. I was blown away just in the details of these CAD drawings. I studied them for hours. The ESLs that Charlie designs and builds are obviously an obsession of love, because everything is exacting in his drawings. It was almost mind bending to me. He wasn’t lying about the amount of work I was staring at, I honestly felt overwhelmed by it.
I’m not a cabinet maker, but I have a fair bit of shop space and a few tools. I had used a table saw a few times before mostly for ripping down boards or other minor tasks. My table saw isn’t super fancy, it’s a 1950s middle of the road Craftsman with a 1/2” auger and fence that doesn’t lock. I guess it was time to get intimate with this thing.
I believe Charlie has posted on his site that he thought it would take about 40 total hours to build these things. I’m not sure if that’s correct, maybe 40 hours if you exclude the panel layup, wire stretching, etc. I probably spent 40 hours on the table saw alone. With exception to panel lattice, every single piece is unique, and every single piece took me at least 6 cuts and all of the cuts required adjustments to the fence and blade angle and blade height.
Putting the cabinets together was satisfying as I could start to see things take shape, but it was still decently slow. I think watching glue dry is like watching water boil, it just doesn’t until you leave it alone. I cheated quite a bit too and used a few nails. It took me about 3 months to build the two cabinets working very regularly on them.
Next was to build these stators. I built Charlie’s wire stretching jig and planned to 3d print his ‘combs’ to space the wires. The stretching jig worked out really well but the amount of force put on the wires actually cracked the left side board. And I had a few issues with the small dowels wanting to pull out of the aluminum. Although I struggled a little bit, I was able to make it work with some monitoring. The guy I knew that had a 3d printer couldn’t figure out how to get his printer to print the files correctly, so I ended up using all thread rod as wire spacers which slowed things down quite a bit. There’s 24 lattice pieces to each stator and due to the struggles with the stretching jig I was having, I could only glue down one piece at a time and then had to wait an hour for the glue to dry before moving on to the next.
Stretching the mylar and putting the panels together was pretty straight forward. I used a licron crystal spray as my resistive coating and 3 different thicknesses and widths of mounting tape as Charlie recommended.
It was in the midst of the panel build that I ended up being in Montana for a few weeks for a COVID scare and my younger brother’s wedding, so I think it took about 3 more months to get the panels assembled, resistor circuit built, and assemble the power supply boards Charlie so graciously sent me. It was test time, will they make a noise?
Attachments


PART 2
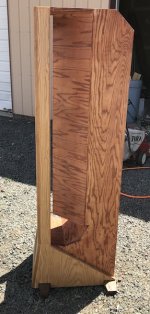
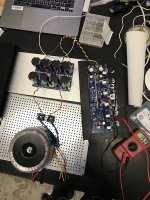
At this time I didn’t have a stereo amp so I ended up just using a little SE EL84 I had built into a cake pan to see if they would make noise. Lo and behold, they worked! I did a little fine tuning with advice from Charlie on the HV circuit to eliminate a bit of static noise. I may have not stretched the mylar as tight as I could have and lowering the bias voltage was the cure. I went with a Dayton Audio RS270P-8A 10” paper reference woofer as a recommendation, I’ve been pleased with them so far.
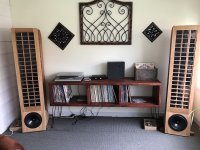
My wife approved that they were decently nice to look at so they were allowed into the house.


AMPS
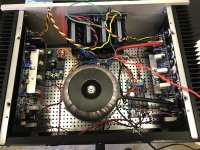
The speakers were built and it was only August, I was ahead of schedule. But now I needed some amps to drive these things. I wanted to mimic Charlie’s bi-amped setup as much as I could, but I also wanted to build these amps. I originally had dreams of driving the ELSs with tubes modeled after a design by Lynn Olson, who’s just 20 mins north of me, after I heard his Karna, but after looking at the price tag of the iron alone, I knew it wouldn’t be feasible right now. So I poked around the diyaudio forum a bit and ran across the Honey Badger diyAB amp. It seemed to fit the bill for what I needed and I could build two pairs in a short amount of time.
I’ve only built one amp before but I’ve done a fair share of soldering as I do hardware repairs on old Apple computers as a hobby. Putting together the all the boards from the diyaudiostore was a breeze. My hats are off to all the designers and folks in the diyaudio community that made the building of these amps so friendly.
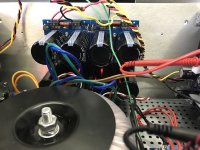
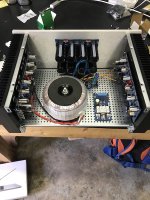
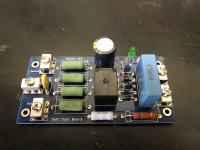
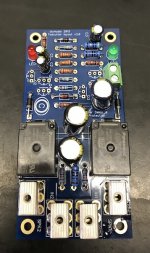
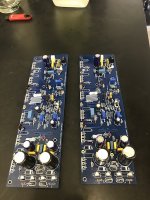
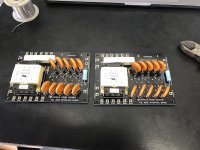
With the Honey Badgers, I basically built them ‘by the book’ that JojoD818 has written. I built two stereo amps using Antek trannies, built into 2 steel 4U chassis from DIYAS, with UPSs, Soft Start, and Speaker Turn On Delay boards. They are both essentially the same, but as I built them one after the other they aren’t identical.


With the minor exception to personal stupidity, I had 0 issues with any of the board builds. Assembling into the chassis took just as much time as soldering the boards.
Up until just recently Charlie Mimbs has said he was using a Behringer DCX2496 as his crossover, so I picked one up. I really like it and have set crossover frequencies to ~230hz at 48db curve. I also like the ability to control it from a laptop.
On my first HB amp, I’d been running with the bias at about 40mA so I set the second amp to the same. However, in the bi-amped setup where one HB was pushing highs, the other pushing lows, I actually blew a 10amp main fuse in the amp pushing the subs. I backed off the bias voltages a bit down to 25mA for that amp.


At this time I didn’t have a stereo amp so I ended up just using a little SE EL84 I had built into a cake pan to see if they would make noise. Lo and behold, they worked! I did a little fine tuning with advice from Charlie on the HV circuit to eliminate a bit of static noise. I may have not stretched the mylar as tight as I could have and lowering the bias voltage was the cure. I went with a Dayton Audio RS270P-8A 10” paper reference woofer as a recommendation, I’ve been pleased with them so far.
My wife approved that they were decently nice to look at so they were allowed into the house.
AMPS
The speakers were built and it was only August, I was ahead of schedule. But now I needed some amps to drive these things. I wanted to mimic Charlie’s bi-amped setup as much as I could, but I also wanted to build these amps. I originally had dreams of driving the ELSs with tubes modeled after a design by Lynn Olson, who’s just 20 mins north of me, after I heard his Karna, but after looking at the price tag of the iron alone, I knew it wouldn’t be feasible right now. So I poked around the diyaudio forum a bit and ran across the Honey Badger diyAB amp. It seemed to fit the bill for what I needed and I could build two pairs in a short amount of time.
I’ve only built one amp before but I’ve done a fair share of soldering as I do hardware repairs on old Apple computers as a hobby. Putting together the all the boards from the diyaudiostore was a breeze. My hats are off to all the designers and folks in the diyaudio community that made the building of these amps so friendly.
With the Honey Badgers, I basically built them ‘by the book’ that JojoD818 has written. I built two stereo amps using Antek trannies, built into 2 steel 4U chassis from DIYAS, with UPSs, Soft Start, and Speaker Turn On Delay boards. They are both essentially the same, but as I built them one after the other they aren’t identical.
With the minor exception to personal stupidity, I had 0 issues with any of the board builds. Assembling into the chassis took just as much time as soldering the boards.
Up until just recently Charlie Mimbs has said he was using a Behringer DCX2496 as his crossover, so I picked one up. I really like it and have set crossover frequencies to ~230hz at 48db curve. I also like the ability to control it from a laptop.
On my first HB amp, I’d been running with the bias at about 40mA so I set the second amp to the same. However, in the bi-amped setup where one HB was pushing highs, the other pushing lows, I actually blew a 10amp main fuse in the amp pushing the subs. I backed off the bias voltages a bit down to 25mA for that amp.
Attachments
FINAL
I’m extremely happy with the Honey Badgers paired with the Beam Splitters. I wish I could describe the extent of the sound stage, dynamics, and range, but as I had a musician friend once say, “writing about music is like dancing about architecture.” It would be impossible to describe.
So there it is, that’s my COVID project: the system I’ve been dreaming about for years has finally been built. A huge thank you to Charlie Mimbs, you’re a true inspiration. And also huge thank you for the diyaudio community who has brought my dream to reality.
Attachments

Awesome Build, I am so Excited and Thrilled to see another diy'er follow through with DIY ESL build !!! 🙂
Cheers !!! 🙂

jer 🙂
Cheers !!! 🙂
jer 🙂
Wow. Posts barely conveyed the enormous scope and great achievement of the builder.
Now you need recordings worthy of your gear. Percussion ensembles? Gamelan bands? Holst Band Suites?
B.
Now you need recordings worthy of your gear. Percussion ensembles? Gamelan bands? Holst Band Suites?
B.
Wow! You really did it!
Very few would have the perseverance to build those beam splitters (not even I would do it again).
Awesome job!
Charlie
Very few would have the perseverance to build those beam splitters (not even I would do it again).
Awesome job!
Charlie
Last edited:
- Home
- Loudspeakers
- Planars & Exotics
- Beam Splitter Project