The RM-5 uses shunt feedback and this seems to be the only kind of voltage feedback around a single inverting stage. While shunt feedback sounds better than series to my ears it's still better to use a lower mu tube and avoid feedback altogether. I don't much like even the current feedback around Rk. Would rather use fixed bias and ground the cathode. RM-5 circuit has one obvious problem - the feedback is volume dependant which seems a bit ugly. Speaking of ugly - just look at their PS! A 723! Was that not the first regulator IC ever?
cheers
peter
cheers
peter
I have been using a super simple(single) E88CC pre amp for a few years now and it really sounds lovely.
It was designed by a friend of mine as achallenge to make a cheap single tube pre amp. It comfortably compares to a CJ PV10A. Super simple no real feed back, the tube is run quite hard in terms of current though to get an acceptable output Z.
Just a cap & resistor PSU. Anode voltage is 99 Volts, but actual crude supply befor dropper resistors on PSU is 380 V. A result of having used a transformer he had but I think he mentioned some other benefit to this.
I will be away from my PC untill 2.1.2003 but if this thread is still alive then I will try and post a cct.
here's a quick idea for the #30.
the 'lytic cap is optional. 200µF should be plenty to pass most freq's, i'd think (i forget the equation..). use a 16 or 25v one.
the coupling caps are whatever.. .033 - .1µF should be ok, 250v'ers.
hum adjust pot is oh.. say 50 ohm.
Vf = 2v (AC)
Rk = 4.3k
Ra = 20k
the 'lytic cap is optional. 200µF should be plenty to pass most freq's, i'd think (i forget the equation..). use a 16 or 25v one.
the coupling caps are whatever.. .033 - .1µF should be ok, 250v'ers.
hum adjust pot is oh.. say 50 ohm.
Vf = 2v (AC)
Rk = 4.3k
Ra = 20k
Attachments

Colt45 said:here's a quick idea for the #30.
No insult intended, but will this preamp drive the Aleph with a 10K input impedance?
Or it's only intended for 50/100K inputs?
I understand that to drive a lower Z input we would need to add some more capacitance at the output, say 5uf or so.
Z OUT
Hi,
Provided you keep the I/C short and put the bypass cap in and up the output to at least 5 microF.
I haven't done any calculation so don't shoot me.
Probably not,it's only there as a precaution.
I would definitely give it try.
Cheers,😉
Hi,
No insult intended, but will this preamp drive the Aleph with a 10K input impedance?
Provided you keep the I/C short and put the bypass cap in and up the output to at least 5 microF.
I haven't done any calculation so don't shoot me.
Further, is the input cap necessary?
Probably not,it's only there as a precaution.
maybe fixed bias would be better?
I would definitely give it try.
Cheers,😉
Ra is a bit too low as the tube's Rp is about 10k.Colt45 said:here's a quick idea for the #30.
the 'lytic cap is optional. 200µF should be plenty to pass most freq's, i'd think (i forget the equation..). use a 16 or 25v one.
the coupling caps are whatever.. .033 - .1µF should be ok, 250v'ers.
hum adjust pot is oh.. say 50 ohm.
Vf = 2v (AC)
Rk = 4.3k
Ra = 20k
From the datasheet I have I'd suggest (i have one set of very poor res curves + data)
B+ 250V (300 or 350V even better, and adjust Ra up to suit)
Va 90V
Vg -4.5V
Ia 2.5mA
Ra 62k
Rk 1k8
Rk bypass; I like to keep corners at least an octave outside the audioband, preferrably two, and would rather avoid cathode bypasses if possible. Choose your poison.
Fhp (2Hz) = 52uF
Rk bypassed:
Gain = 5.4 = 17.4dB
Zout = 9k3
Rk unbypassed:
Gain = 4.53 = 13.1dB
Zout = 17k4
apassgear said
Yes.will this preamp drive the Aleph with a 10K input impedance?
But the question should be, will it drive it well? IME, no. The 30 is a little weak tube, and it will sound like utter crap in this application because it's working too hard. Find something better (and there are lots of options), or use it into a high impedance amp input.
apassgear said
No, providing you keep opreation away from grid current conditions, ie within a volt or so of zero.Further, is the input cap necessary?
Cheers
Now returning to the E88CC:
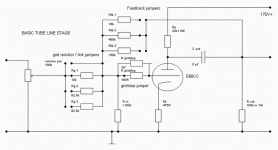
I tried to put most of the info posted here together and came to this experimental schematic.
Grid resistors and gridstoppers can be bypassed or changed by jumpers, as well as the feedback loop can be changed or broken by putting out the jumper.
Reasonable ?
What puzzles me most is the variability of values possible for such a simple circuit. Each change will make a difference in sound, and for each change there will be somebody saying that sounds best...
I do have a scope. I found it inevitable, I almost do no audio work without it. I am btw only a newby in terms of tubes...
Klaus
Attachments
ECC88
Hi,
The reason for that is that you probably work without having a look at the plotted curves first.
Usually I work the other way around:first define the loadline on the curves and then forward to the most suited point of operation.
Cheers,😉
Hi,
What puzzles me most is the variability of values possible for such a simple circuit.
The reason for that is that you probably work without having a look at the plotted curves first.
Usually I work the other way around:first define the loadline on the curves and then forward to the most suited point of operation.
Cheers,😉
Colt45 said:here's a quick idea for the #30.
the 'lytic cap is optional. 200µF should be plenty to pass most freq's, i'd think (i forget the equation..). use a 16 or 25v one.
the coupling caps are whatever.. .033 - .1µF should be ok, 250v'ers.
hum adjust pot is oh.. say 50 ohm.
Vf = 2v (AC)
Rk = 4.3k
Ra = 20k
I agree with Brett - plate load should be at least 30k, preferably more.
And you should not use AC on the filaments. This is a DC *battery* tube. If you feel compelled to use AC you must increase the grid bias by 1V (1/2 of Vf) to -5.5V using Brett's operating point. I would just use fixed bias personally, and I find the 135V Va operating point to work the best, and then quite conveniently a 9V battery can be used on the grid. In that case you will need the input cap - in all other cases, you do not.
Hi
Klaus
Your schematic looks fine. It is certainly going to work well.
A few comments:
I would not care to make a switching arrangement for the gridstoppers, choose a fixed value - I do not think it matters if you use 1k7 or 100 or something in between.
Also you might consider not making the input arrangement consisting of Rg1, Rg2 and Rg3. I would leave it at 10k.
Instead of the the feedback resistors Rf1, Rf2 and Rf3 I would consider a linear pot 0-100k. This pot could then be set at the position giving the preferred subjective result. Then it could be replaced by a fixed resistor.
When I get the time I will make a preamp like this myself. I am happy Tony suggested a feedback resistor of only 18k. I probably would not have thought of so low a value, but now I will certainly try.
Torben
You also have the choice to replace the cathode resistor with Nicd or two to provide fixed bias. I seem to prefer fixed bias applied to the grid but many like the nicads in the cathode, plus the added convenience of them being charged by the cathode current. Fixed bias has much better dynamics and presence to my ears, plus it will give you lower output resistance.
cheers
peter
cheers
peter
lohk said:Now returning to the E88CC:
What puzzles me most is the variability of values possible for such a simple circuit. Each change will make a difference in sound, and for each change there will be somebody saying that sounds best...
Good Klaus, This circuit will work.
Torben notes are on the mark, but let me suggest some changes and make some comments:
As posted before there is a lot of flexibility to this simple stage and many changes to values will not make much difference soundwise, except playing with Rk and FB resistors. I don't think that changing the grid stopper will make much difference, I used 1.7K because I wanted to put a carbon composition and that was the lower value I had at hand. So feel free to experiment different values srtarting from 100 Ohms which is a very popular value used for the purpose.
The lower you go with the FB resistor the more SS sound you will get but I would not go lower than 18K, I also tryed a 12K which didn't make much difference on the scope except lowering the gain. What you get with a low FB its an almost perfect sq wave at 20 Hz except for some tilt on the horizontal part of the trace caused by the time constant at the output cap, the bigger this cap the more horizontal your trace, in my case I use 10uf as i said before. A 150/450K resistor will make almost no change on the scope.
Your B+ and Rp looks OK but you will have to lower Rk to get more current through the stage. The value you have will not get you near the 5/8 mA we need. To start try around 300/350 Ohms
and check the current across Rk and adjust to get 6 or 7 mA.
Refference to ground from grid seems a little low, set it at 250/500K and forget about it.
Well, time to get that hot iron and start soldering resistors to the tube base and feel free to ask.

PSU?
Hi,
As important as the circuit itself is a good PSU.
Any suggestions?
Another way to obtain bias voltage is to tie to cathode to ground and use a high ohmic value for the gridresistor.(10M or higher,depending).
Cheers,😉
Hi,
As important as the circuit itself is a good PSU.
Any suggestions?
Another way to obtain bias voltage is to tie to cathode to ground and use a high ohmic value for the gridresistor.(10M or higher,depending).
Cheers,😉
Re: PSU?
For the ECC88 or the 30?fdegrove said:Hi,
As important as the circuit itself is a good PSU.
Any suggestions?
Another way to obtain bias voltage is to tie to cathode to ground and use a high ohmic value for the gridresistor.(10M or higher,depending).
Cheers,😉
ECC88
Hi Brett san,
For the above preamp using the ECC88/6DJ8.
I welcome all suggestions and make my own,you don't have to all the work there,do you?😉
Things I had in mind:valve rectification or not,choke or not,regulated and if yes valves or sand..you see the recipes.
Cheers,😉
Hi Brett san,
For the above preamp using the ECC88/6DJ8.
I welcome all suggestions and make my own,you don't have to all the work there,do you?😉
Things I had in mind:valve rectification or not,choke or not,regulated and if yes valves or sand..you see the recipes.
Cheers,😉
Re: ECC88
PSU is a matter of preference but a regulator it's a must for me. I have not tested valve rectification, but in my case I don't think it would make any diference with a regulator plus all the filtration I have. Though it seems to me that adding a coil somewhere near the end of filtration is good soundwise.
The psu i now use has a separate box for both transformers with the rec bridge and some hefty caps for a DC of around 380V (haven't measured lately) left over from the Daniel (Cursio) preamp (hum, many years ago). Feeling the need for a regulator and only needing 300V for other projects I added to the main case a couple of RC's and the regulator described by Welborne Labs (PS-3), home brew, that is, plus a small cap and resistance to get the 300V I was looking for before ending it to a bigger cap beside the valve.
But subsecuent projects made me add more filtering to lower voltage mostly with small caps and air core inductor (300/400 mH aprox, home brew ofcourse) with in between R's finishing with a 220uf bypased with 0.1 Wondercap to end with a B+ 160V that I have today. As you may see this is a very flexible PSU since I can tap from any point to get the B+ I want.
All this filtration is way out for this project but it can be taken as a starting point to design something more suitable.
The filament is also regulated with a fix three terminal regulator and a small litic. Simple and efective.
fdegrove said:Hi Brett san,
For the above preamp using the ECC88/6DJ8.
I welcome all suggestions and make my own,you don't have to all the work there,do you?😉
Things I had in mind:valve rectification or not,choke or not,regulated and if yes valves or sand..you see the recipes.
Cheers,😉
PSU is a matter of preference but a regulator it's a must for me. I have not tested valve rectification, but in my case I don't think it would make any diference with a regulator plus all the filtration I have. Though it seems to me that adding a coil somewhere near the end of filtration is good soundwise.
The psu i now use has a separate box for both transformers with the rec bridge and some hefty caps for a DC of around 380V (haven't measured lately) left over from the Daniel (Cursio) preamp (hum, many years ago). Feeling the need for a regulator and only needing 300V for other projects I added to the main case a couple of RC's and the regulator described by Welborne Labs (PS-3), home brew, that is, plus a small cap and resistance to get the 300V I was looking for before ending it to a bigger cap beside the valve.
But subsecuent projects made me add more filtering to lower voltage mostly with small caps and air core inductor (300/400 mH aprox, home brew ofcourse) with in between R's finishing with a 220uf bypased with 0.1 Wondercap to end with a B+ 160V that I have today. As you may see this is a very flexible PSU since I can tap from any point to get the B+ I want.
All this filtration is way out for this project but it can be taken as a starting point to design something more suitable.
The filament is also regulated with a fix three terminal regulator and a small litic. Simple and efective.
Well, here is a proposal for a SS PSU based on my supply. My description should also reach those who are new to toobs.
Premise. No AC at the main case other than signal. Use an aluminum case if you can.
I guess all vacuum preamps benefit from having the transformers on a separate box so we would add to this box both bridges and some caps. For high voltage I would use 200/300uf and for low voltage 6/10K uf. Use bleeder resistor across these caps. Also add to this box mains switch and fuse. Form a common DC ground and connect this to the box and mains ground through a thermistor (CL-60) or a hefty 5 Ohms resistor (2 X 10W 10 Ohms wire wounds in parallel). I would target 250 DC Volts for High and around 10V for low, or so. - (All caps to be rated for the intended voltage of course )
)
For the unbilical cord you could form one with protective cover or use a heavy duty cord with a rubber sheth. My preference for cables would be 18 Ga. for voltages and 16 Ga for ground something that can be dificult with a ready made cable. As connector I would use a 3 terminal XLR, but be consious since these parts are not rated for high voltages, so if the insulation melts when soldering use a better part and by all means check for shorts before using it . I would like some others to coment on what are they using as connectors since the common XLR could not be the best alternative for this application, I think there are similar connectors for this. I use a simple and short (ugly) 5 terminal connector made from molded phenolic insulation, not very practical.
So we will have three cables comming from the tranny box to the main case. Before you make any connections with the three cables add a loop whith them thru a ferrite ring or pass them thru a 1" ferrite tube, Do this even if you use a shielded umbilical.
Take the ground cable and connect to a buss "copper"wire running thru the back panel of the case use as minimum 12 Ga and tin all the surface. Connect this buss wire to the case at one point only (I use a 10 or 12 " long solid wire). This buss wire will be our common ground to which all ground connections will be made. I use separate cables from each channel to ground and take ground for the output RCA's directly from the buss. Also input ground from RCA's are connected here. So far I have had no problems with ground loops.
Prior to the regulator connect the high voltage lead to a Capacitor filter, some 47uf. Next connect to the Welborne Labs PS-3 regulator.
The PS-3 is a very simple reg using a series Darlington pair with a zener reference to the base of the first transistor. The first transistor is a 2N3439 (NPN 350V 50 mA) or other with a simillar beta and raiting (but since this transistor is flowting you can use a lower voltage rating) and for the pass transistor the very common TIP50. Form a stack of around 10 zeners (1 W each I think is enough) to sum the desiered 230 V reference or so and bias them with a 2W resistor for some 10 mA to form the voltage divider.
At the output of the regulator I only use a .47/1 uf polyprop (Wima 400V) as filter to stabilize the regulated voltage.
I have 2 PS-3 reg installed but use only one because is dificult to adjut both for the same voltage.
Next comes a RCLC filter which I parallel, one to each channel, the first resistance will have to drop the voltage almost to the desiered B+ depending on the specs for the coil you will be using. To set the the value for the first resistance I would bredboard all 4 components and load them with the desiered 6 / 8mA and adjust until I get the B+ I want, in this case 170 V.
Next comes the C, in my case I use 1 uf Wondercap polyprop directly attached to the buss wire.
Next is the air coil in series (same as you would use the R), I made the coils from 29 Ga magnet wire to some 350 mH hand wound over a 3/4" dia. mandrel and 3/8" long using 1 1/2" washers to contain the winding (not a perfect lay, but the contrary!). If someone needs help on how to do this please let me know. You don't need to buy, save the mony for good valves.
And the last C sits besides the valve. This one is 220uf bypassed with a 0.1uf Wondercap.
A simple regulated PSU, rock solid and good sound.
Two considerations, for the 3 terminal filament regulator (7806), use a 1 Ohm resistor in series with the load to avoid burning the heater wire of the tube at turn on. Also you need a heatsink for the reg or screw it to the case (this is what I did).
Premise. No AC at the main case other than signal. Use an aluminum case if you can.
I guess all vacuum preamps benefit from having the transformers on a separate box so we would add to this box both bridges and some caps. For high voltage I would use 200/300uf and for low voltage 6/10K uf. Use bleeder resistor across these caps. Also add to this box mains switch and fuse. Form a common DC ground and connect this to the box and mains ground through a thermistor (CL-60) or a hefty 5 Ohms resistor (2 X 10W 10 Ohms wire wounds in parallel). I would target 250 DC Volts for High and around 10V for low, or so. - (All caps to be rated for the intended voltage of course
)For the unbilical cord you could form one with protective cover or use a heavy duty cord with a rubber sheth. My preference for cables would be 18 Ga. for voltages and 16 Ga for ground something that can be dificult with a ready made cable. As connector I would use a 3 terminal XLR, but be consious since these parts are not rated for high voltages, so if the insulation melts when soldering use a better part and by all means check for shorts before using it . I would like some others to coment on what are they using as connectors since the common XLR could not be the best alternative for this application, I think there are similar connectors for this. I use a simple and short (ugly) 5 terminal connector made from molded phenolic insulation, not very practical.
So we will have three cables comming from the tranny box to the main case. Before you make any connections with the three cables add a loop whith them thru a ferrite ring or pass them thru a 1" ferrite tube, Do this even if you use a shielded umbilical.
Take the ground cable and connect to a buss "copper"wire running thru the back panel of the case use as minimum 12 Ga and tin all the surface. Connect this buss wire to the case at one point only (I use a 10 or 12 " long solid wire). This buss wire will be our common ground to which all ground connections will be made. I use separate cables from each channel to ground and take ground for the output RCA's directly from the buss. Also input ground from RCA's are connected here. So far I have had no problems with ground loops.
Prior to the regulator connect the high voltage lead to a Capacitor filter, some 47uf. Next connect to the Welborne Labs PS-3 regulator.
The PS-3 is a very simple reg using a series Darlington pair with a zener reference to the base of the first transistor. The first transistor is a 2N3439 (NPN 350V 50 mA) or other with a simillar beta and raiting (but since this transistor is flowting you can use a lower voltage rating) and for the pass transistor the very common TIP50. Form a stack of around 10 zeners (1 W each I think is enough) to sum the desiered 230 V reference or so and bias them with a 2W resistor for some 10 mA to form the voltage divider.
At the output of the regulator I only use a .47/1 uf polyprop (Wima 400V) as filter to stabilize the regulated voltage.
I have 2 PS-3 reg installed but use only one because is dificult to adjut both for the same voltage.
Next comes a RCLC filter which I parallel, one to each channel, the first resistance will have to drop the voltage almost to the desiered B+ depending on the specs for the coil you will be using. To set the the value for the first resistance I would bredboard all 4 components and load them with the desiered 6 / 8mA and adjust until I get the B+ I want, in this case 170 V.
Next comes the C, in my case I use 1 uf Wondercap polyprop directly attached to the buss wire.
Next is the air coil in series (same as you would use the R), I made the coils from 29 Ga magnet wire to some 350 mH hand wound over a 3/4" dia. mandrel and 3/8" long using 1 1/2" washers to contain the winding (not a perfect lay, but the contrary!). If someone needs help on how to do this please let me know. You don't need to buy, save the mony for good valves.
And the last C sits besides the valve. This one is 220uf bypassed with a 0.1uf Wondercap.
A simple regulated PSU, rock solid and good sound.
Two considerations, for the 3 terminal filament regulator (7806), use a 1 Ohm resistor in series with the load to avoid burning the heater wire of the tube at turn on. Also you need a heatsink for the reg or screw it to the case (this is what I did).
- Status
- Not open for further replies.
- Home
- Amplifiers
- Tubes / Valves
- basic e88cc line stage ?