Hello all,
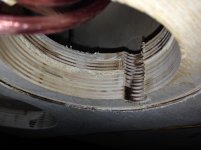
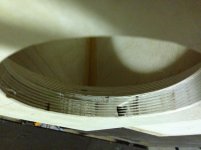
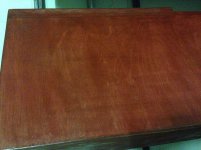
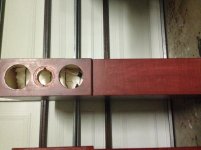
I am building this kit for mainly music (70/30) compared to movies and such. I listen mainly to jazz, classical, and some light rock. I purchased from parts-express. The shipping process went well. I also spoke via email with Curt from Speakerdesignworks and he was very helpful with all my questions. I went with a baltic birch ply MLTL with a rear facing port compared to the front facing port in the plans on their site. I am also doubling the front baffle. This is the first wood project ever for me. It is also the first soldering project for me also. I did make a large mistake in cutting the wood where I cut rebates for the tweeters on both layers of wood as I am using two to make the front baffle 1.5 inches compared to the .75 on the site. I had also cut the rebate holes for the tweeters 1/16 too small and I had already cut the through hole, so I had no way of fixing it by making 1/16 larger in diameter. Luckily I had extra wood and re-cut the outer baffle bords. The pictures here show the wood with the smaller holes and extra rebates on the longer inner baffle boards. I didn't want to not include my mistakes. Hopefully it helps someone after me. If I could do them again I would cut all rebate holes, then insure the speakers fit nicely through them. I would also route the holes from the front of the boards to the back as this plywood chips easily. The sheets come in 5x5 feet, so you will need to buy two of then and they run around 60 dollars each. They are not as dead as sounding (slightly brighter in the mids) as MDF and stand up longer to moving them without breaking. I plan on cutting the baffles for a center channel and surrounds from the second piece of ply I plan on buying tomorrow. I have not purchased those kits yet though, and am just planning ahead as I am using a friends router for this project. I did have to buy some bits for it though. One more thing is I didn't show the pics of the backside of the boards. I have a 45 degree scallope on them as the baffle is now 1.5 inches. This is what Curt stated I should do. I am learning a ton on this project. The main thing is measure more than twice and slow down when the tools are in your hand. I was excited and made mistakes which shouldn't have been made. Let me know if you have any guidance for me as I am a complete newby.
I am building this kit for mainly music (70/30) compared to movies and such. I listen mainly to jazz, classical, and some light rock. I purchased from parts-express. The shipping process went well. I also spoke via email with Curt from Speakerdesignworks and he was very helpful with all my questions. I went with a baltic birch ply MLTL with a rear facing port compared to the front facing port in the plans on their site. I am also doubling the front baffle. This is the first wood project ever for me. It is also the first soldering project for me also. I did make a large mistake in cutting the wood where I cut rebates for the tweeters on both layers of wood as I am using two to make the front baffle 1.5 inches compared to the .75 on the site. I had also cut the rebate holes for the tweeters 1/16 too small and I had already cut the through hole, so I had no way of fixing it by making 1/16 larger in diameter. Luckily I had extra wood and re-cut the outer baffle bords. The pictures here show the wood with the smaller holes and extra rebates on the longer inner baffle boards. I didn't want to not include my mistakes. Hopefully it helps someone after me. If I could do them again I would cut all rebate holes, then insure the speakers fit nicely through them. I would also route the holes from the front of the boards to the back as this plywood chips easily. The sheets come in 5x5 feet, so you will need to buy two of then and they run around 60 dollars each. They are not as dead as sounding (slightly brighter in the mids) as MDF and stand up longer to moving them without breaking. I plan on cutting the baffles for a center channel and surrounds from the second piece of ply I plan on buying tomorrow. I have not purchased those kits yet though, and am just planning ahead as I am using a friends router for this project. I did have to buy some bits for it though. One more thing is I didn't show the pics of the backside of the boards. I have a 45 degree scallope on them as the baffle is now 1.5 inches. This is what Curt stated I should do. I am learning a ton on this project. The main thing is measure more than twice and slow down when the tools are in your hand. I was excited and made mistakes which shouldn't have been made. Let me know if you have any guidance for me as I am a complete newby.
Attachments


 Relocated to Multi-Way since your project is a D'Appolito configuration 2 way.
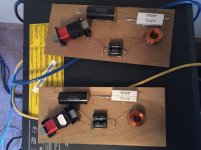
It's not a big deal, but you should leave more space between power resistors. The closer bunched up they are the quicker they'll heat up. You want as much air around them as possible, but it's still probably overkill.
Also can you post a link to the schematic you are working from?
Best,
Erik
Also can you post a link to the schematic you are working from?
Best,
Erik
This is the link to the box design:
Speaker Design Works
This is the link to the crossover:
Speaker Design Works
I didn't solder the common ground yet to the crossover so it is missing, but will be easy to add in before I attach it to the box.
Speaker Design Works
This is the link to the crossover:
Speaker Design Works
I didn't solder the common ground yet to the crossover so it is missing, but will be easy to add in before I attach it to the box.
Thanks, I was getting a little confused. Looks like a good job on the crossover, but if you make any more keep some spacing between power resistors, as showin in the web page you linked, or a little more.
Best,
Erik
Best,
Erik
Resistor spacing
While I agree in general about the suggestions to separate the pair of paralleled resistors to allow better cooling, in this case they are used in a tweeter circuit. Not much power goes to tweeters from music and and these resistors are not likely being used anywhere near their 10-watt ratings.
Paul
Speaker building is harder than I thought. Getting the panels lined up is not too easy. Maybe I tried gluing too many panels at a time. Some of them are off by like 1/16 of an inch and needs a ton of sanding. I found that you can't have any wood glue visible even though it is sanded flush. It won't stain.
Attachments
Staining went smooth. I think I will add one more coat of stain before applying clear coat. It went ok, getting it on all sides, but there are visible streaks where parts are thicker than others. We just had twin girls and getting back within 15 minutes to wipe off excess is harder than it should be. These are the pics of the stain and clear coat I am using. I did use a palm sander to sand before staining, but it left marks. I didn't have tons of time to get it perfect, so just left it as is.
What is the best way to apply plastic clear coat? I have a synthetic brush for it. I have 800 grit wet/dry sandpaper, and 220 grit dry sandpaper.
What is the best way to apply plastic clear coat? I have a synthetic brush for it. I have 800 grit wet/dry sandpaper, and 220 grit dry sandpaper.
Attachments


Finished them
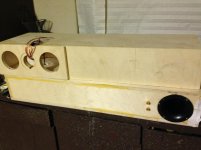
Finally finished them. Well sort of. I don't have time to do everything perfect with the two new babies. I didn't sand the clear coat at all. Only applied two coats too.
I am powering them from a cheap receiver. It is old and only gives out 20wpc. These need 85wpc though. I will build either the Akitika GT101 (60wpc) stereo amp or the Hypex NC400 (300+wpc) monoblocks, or some newclassD monoblocks. The latter two are much more expensive. Does anyone have any experience with them? The later two amps are much more expensive compared to the Akitika.
So far the speakers sound great. I can hear much more of the music. They are flat and don't push up the bass. I can't give a great review as they don't have a great amp.
Attachments
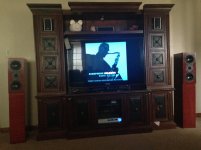
So far my smaller amp is able to get around 80dB out of these speakers. They do play up to around 92dB per the website though. I need a sub now, but these are much better for bass than the cheaper 2.1 system I had before. It is tight and flat to the rest of the music. The detail is very good with music and movies. My wife hates pulling them out more into the room and angling them at all. Stereo imaging is still good, and I have them around 8 inches away from the wall currently.
Instruments scale is almost life-size now for the first time in my home. Once I have a proper amp, I will pull them more into the room and do a real sound review.
Instruments scale is almost life-size now for the first time in my home. Once I have a proper amp, I will pull them more into the room and do a real sound review.
Hi, those numbers that you gave are to be interpreted rightly:
92 dB is probably the sensitivity of a speaker, so it should be written 92 dB/W/m
Which means: place a calibrated microphone on axys in front of the speaker at 1 meter distance and read the sound pressure level when driving it with 1 W of power.
For a doubling of intensity, + 6dB, the amplifier power that is requested follows quadratic law... so if 92 dB is produced with one Watt, for 98 dB the power asked is....
And two sources, as are the L and R channel, sums ( when "coherent" ...) together so you should get over 95 dB with one Watt
I am noticing some buzzing at certain frequencies at the top of my left speaker. I think it might be a cable hitting the back of the woofer. I will open it up and take a look. They are sounding less harsher now that I have 4 weeks on them. They are now not harsh at all. Bass is great for 5.25inch woofers! Highs still sound good and mids too. Even when I tested them with double bass drum music, the bass was fast as the drums were. These are actually the best speakers I have ever owned.
Only thing I wish is that they had better soundstage and imaging. Soundstage and imaging is good in-between speakers but not as good outside them or from front-back I don't think. I am still saving for an Akitika GT-101 A/B amp, so I will rereview after I put it in the path. I am also looking toward my next project. Either the Statemet II or the Uluwatu. I am asking the guys from Speaker Designworks some questions on them now.
Overall I am very happy with my first project
The guys at speaker designworks got back to my question. I am quoting Curt directly:
"Hi Bennie!
Glad to hear you like the Aviatrix design. I suspect your soundstage issue is more room or source material related, rather than the speaker or amplifier. Room acoustics and the speaker positions in the room are very important to soundstage. Without knowing your room specifics, I can suggest the AviaTrix be positioned around 1 meter out into the room, and at least 1 meter from the side walls. Adding sound absorptive panels on the front wall and side walls will probably do more to provide that pinpoint imaging you are looking for. Of course, the source material may not have any imaging to start with. It’s not uncommon in some music for each musician to be close miked, so any room ambience is lost, and the musician’s relative positions are determined only by the engineer or during mastering.
My suggestion: Hang a thick tapestry or acoustic panel on the front wall, or two if you have the TV in the middle. The wall panels should be positioned so that if they were mirrors, you would be able to see the speaker in them from your listening position. Bringing the speakers out from the wall as I suggested above will also provide depth to the soundstage.
The Statement II will be definite step up in sound quality, while the Uluwatu will just play louder than the AviaTrix. Run with the Statements or the more cost effective Anthologies, which will be on my site soon"
I looked up the Anthologies and they look great, they are cheaper than the statements and still have open back mids and play down into the low 30's for F3.
- Status
- Not open for further replies.
- Home
- Loudspeakers
- Multi-Way
- Aviatrix MLTL build