I wrote this before seeing your post with dims. I'll post it here and then look at my calculator.MDF for the "Proof of Concept." Richlite for the Client speakers. THANKS! john
Sounds like you're a pro builder . . . . . so in my opinion, their value is manifold though not universal. On some thinner material they will help make the mounting more robust and stiffen things up a little. In any situation where it's likely that the mount will be cycled , as you know, inserting and removing wood screws degrades the quality of the hold with each cycle. So if phase one is experimental and access to the cabinet interior will be through the opening then some sort of bolt / machine screw with threaded receiver is what I would use.
With the style of T-nut shown on the linked web-page, I use this procedure,
1) Mark hole positions with a 1/16" drill all the way through the material.
2)Using a brad point bit sized for a snug fit, drill from the back and stop at the depth of the threaded barrel.
3)With a brad point bit sized for the bolt to be used, drill from the front of the baffle.
Doing it this way insures the T-nut does not fall out even if the teeth cannot grip the material very well.
I agree that distance from the edge is important but as you're experienced you know you have to make the "how close is ok" call. (I did one build where I had to trim off about 3/16" from the flanges . Not pleasant but it gave me what I wanted.). And again mechanical properties of the material used makes the decision. If it's likely to crumble or not etc.
I have never worked with RIchlite but if it's the same density and hardness as Paperstone and it's thick enough, my first choice would be to drill and tap the holes for a machine screw of appropriate size, but I like tapping material rather than using a nut wherever it's going to be at least as secure.
You do me too much honor, my new friend. I have failed at everything except Chinchilla Ranching. The only reason I have not failed at Chinchilla Ranching is that I never actually tried it. I could not bear to send the little furballs to their deaths.
I am mostly known as a classical music record producer. I moonlight as a loudspeaker-prototyping Team Builder. Any good I have accomplished has been to the credit of my team members.
Thanks for all your suggestions,
john
I am mostly known as a classical music record producer. I moonlight as a loudspeaker-prototyping Team Builder. Any good I have accomplished has been to the credit of my team members.
Thanks for all your suggestions,
john
Yes depends on the material and thickness. 3/4", then regular screws is probably fine if large enough diameter screws are used no matter the material. However if you are fully recessing the driver in 3/4" material then that reduces the thickness that the screws have to bite into. Plywood may be OK, but MDF or particle board is a bit more iffy. Usually I just chop up some of the leftover scrap (that didn't get used for bracing)into small backer pieces to glue behind the spots where the screws will go and give more meat for the screws to bite into.
Last edited:

I use T-Nuts, inserts, and screws all three. Always in baltic-birch (BB).
Ime, it's more about the size of the driver than anything, given good wood like BB.
15-18" drivers get t-nuts in at least 15-18mm BB.
8-12" drivers get inserts in 12-15mm BB.
A smaller drivers gets wood screw, with 12mm BB minimum.
For either t-nuts or inserts, a drill block guide helps keep them perpendicular to mounting surface. https://www.amazon.com/Milescraft-1...=1694303570&sprefix=driil+block,aps,99&sr=8-2
Better yet of course is a drill press, but often hard to have enough swing for larger driver mounts.
Last trick that helps me, is to use a protractor to draw the bolt circle on the mounting surface. Position the driver over the circle drawn for best hole fit...mark holes though driver holes..
Better even than a protractor for this, are the router hole jigs...like Jasper https://www.amazon.com/Jasper-200J-...-19-spons&sp_csd=d2lkZ2V0TmFtZT1zcF9tdGY&th=1
Go ahead and just drill center 1/8" hole needed to route hole for driver, then put jig on the center pin.
Find whatever hole matches up with driver's bolt hole diameter. Put a pencil in that hole and spin the jig around ala protractor.
Then put driver on that circle and mark where holes go......
i never miss any more.....
"You do me too much honor".
Well , you did choose a bolt that will actually fit the mounting hole. I can't tell you how many times I've echoed Homer S. on that kind of thing.
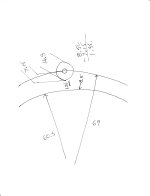
By my scratch calc. (which I urge you to doubt) you have 1.35mm to spare between the T-nut flange and the cutout. It all depends on how exact measurements, cuts and drills are. I find a router and circle jig (Jasper) ends up being very clean and very accurate so would go with that kind of margin.
Well , you did choose a bolt that will actually fit the mounting hole. I can't tell you how many times I've echoed Homer S. on that kind of thing.
By my scratch calc. (which I urge you to doubt) you have 1.35mm to spare between the T-nut flange and the cutout. It all depends on how exact measurements, cuts and drills are. I find a router and circle jig (Jasper) ends up being very clean and very accurate so would go with that kind of margin.
Attachments
Don't think they would fall out, might not be the best quality but the principle is sound, plenty of places sell bright Zn plated T-nuts that look decent quality. If clearance is an issue there is an option of grinding or hacksawing one side off, leaving 3 out of the 4 spikes.I agree with Jeff that these look like they'd fall out at the lightest touch. Maybe you can find a boss of some sort either at a store that sells supplies for furniture builders or at McMaster-Carr: www.mcmaster.com
I'm gluing in some backer pieces today for a build. Still have a couple more to go in after I post this. Normally I wouldn't put them on-end like that, but it was too close to the side of the cabinet to lay them flat and I'm far too lazy to go cutting new pieces 😉. It is for an 8" woofer in a 3way so it is not seeing over 1khz and has plenty of room to breathe anyway,
Last edited:
Absolutely! If you are using a particle board like that, I see no other choice. It will not hold a screw well unless there is some real thickness involved.
I have had very good results with t-nuts with hex drive screws.
Drill the hole to have the T-nut fit snugly. As in, not fall out.
Install the t-nut by placing the screw through a washer and then through 1/2 inch piece of ply wood. Cinch down the hex drive screw and the T-nut is set.
Wood screws are easy to over tighten and pull out.
T-nuts with machine screws torque down uniformly and are predictable. If you do not want to use t-nuts use regular hex nuts, you will need a hand hole on the back of the enclosure.
I have found that wood screws do not torque down uniformly and do not compress speaker gaskets uniformly. The lack of uniformity shows up as resonance peaks in frequency sweeps, in Frequency response plots, distortion plots and hum and buzz plots. *
*
The peaks in the plots may be low level however they do show up in the test results over 5 or so averages. They may even be auditable if they are more pronounced.
Thanks DT
For a $20 woofer... No, definitely not doing that.Now you get to obsess over the diffraction from those blocks. 🙂
Tom
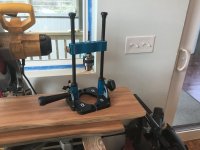
Here‘s a gadget that comes in handy for exactly this kind of thing, you can screw a plywood base to it if needed to stabilize when dangling off an edge like needed for speaker screw holes, but I haven’t had issues if careful…….also I use those madisound t nuts on my bigger (10” +) drivers and put a little gorilla glue on the barrel/face when installing, they work great even in mdf (the one time I used mdf!)
Attachments
I tend to use 12 or 15 inch speakers so the T nuts work well.
However I would use a better T nut than in OP.
I use them with numerous parts that bite into the wood.
However I would use a better T nut than in OP.
I use them with numerous parts that bite into the wood.
Its not just size but based on weight, box material and to some extent if the box is sealed or ported. I also switch to t-nuts if I wear out screw holes.
T-nuts for a 5 1/4" driver?
Complete waste and might not work.
Keep in mind the width of the flange on that size driver is small and the T part of the nut might extend into the driver cut out hole.
Consider threaded inserts if anything.
Either way, the only thing to justify this is if you plan to remove the driver many times.
Pan head sheet metal screws are your friend. Use Roberstson. They virtually eliminate the oops moments.
Ding! 🙂Either way, the only thing to justify this is if you plan to remove the driver many times.
Again will also depend on driver. I would go t-nuts on these. The 4 prong one where it's fine if you loose one.T-nuts for a 5 1/4" driver?
Complete waste and might not work.
Keep in mind the width of the flange on that size driver is small and the T part of the nut might extend into the driver cut out hole.
Consider threaded inserts if anything.
Either way, the only thing to justify this is if you plan to remove the driver many times.
Pan head sheet metal screws are your friend. Use Roberstson. They virtually eliminate the oops moments.
https://www.daytonaudio.com/product...-mmag-extended-range-subwoofer-4-ohm-per-coil
One more bit.
If you decide to go with the T-nuts set them with the bolt using a washer , in other words; it's best not to use the driver frame to pull the nuts into position behind. Once all set then remove the bolts and install the driver.
If you have never used them before I'd also take the time to get a feel for them, putting at least one on a scrap of mdf at the same distance from the edge as it will be in the speaker.
In an up-coming project I'll be using rivnuts (a.k.a. tubular rivets, rivet nuts, etc.) in the place of T-nuts. I won't be crimping them; they will be press-fit. Here is my test piece where I made a series of holes, ranging form 6.5mm to 7.0mm to determine the best size hole. For these rivnuts, 6.6mm was a tight fit and 6.5 needed excessive force.

Last edited:
- Home
- Loudspeakers
- Multi-Way
- Are T-Nuts worth the trouble for a 5.25-inch woofer?