I'm looking for a manufacturer or small shop that will custom wind air-core inductors in single unit or small volumes. I've used North Creek in the past but they're no longer in business.
Right now I'm specifically looking for a pair of heavy gauge 3.7 mH coils for speaker crossovers (in series with the woofers). Can anyone recommend a good off the shelf solution for this value?
Right now I'm specifically looking for a pair of heavy gauge 3.7 mH coils for speaker crossovers (in series with the woofers). Can anyone recommend a good off the shelf solution for this value?
Air Core Inductor Crossover Coils in the Speaker Components Department at Parts Express | 297
You didn't say what wire gauge is needed or if there are any limits on the dimensions of the inductor but the link above shows a few options. They are all 4mH and you can remove turns of wire until the inductance drops to 3.7mH. If you can use iron core inductors for woofer feed, there are smaller sized cheaper options.
You didn't say what wire gauge is needed or if there are any limits on the dimensions of the inductor but the link above shows a few options. They are all 4mH and you can remove turns of wire until the inductance drops to 3.7mH. If you can use iron core inductors for woofer feed, there are smaller sized cheaper options.
Look up forum member Cerrem. I don't know if he'd do air cores but he does design and manufacture audio transformers and judging by the high quality of his contributions on the forum I wouldn't hesitate to call him.
I'm specifically looking for a pair of heavy gauge 3.7 mH coils for speaker
crossovers (in series with the woofers). Can anyone recommend a good off
the shelf solution for this value?
A 3.9mH is within about 5%.
Compare Inductors: Madisound Speaker Components
Last edited:
I used to buy even valued parts from Parts Express or similar. If I needed a 3.7, I bought a 4 and unwound it until I got my 3.7. Always happy with the results.
Why don't you wind them yourself?
It is not at all hard. You can wind it as tidily or scruffily as you wish - truth is the cosmetic look is exactly that.
You can get wire from motor rewind shops, I have paid from zero to a six pack of beer for small quantities. Most will even sell you a reel...
Dip in lacquer after you have wound it if you want it rock solid...
Just to labour the point.... this is NOT hard to do.
I hadn't thought of removing coils from a larger inductor. What's the easiest way to measure inductance without an LCR meter?
I hadn't thought of removing coils from a larger inductor. What's the easiest
way to measure inductance without an LCR meter?
You'd be better off with a few percent error than flying blind.
Last edited:
Wind them yourself, download coil32 for windows. It's dead easy with a hand drill, a wooden dowel with a slot in one end and a cotton glove for controlled tension as you wind.
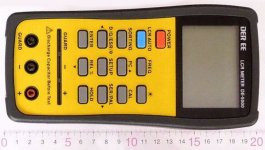
DIY requires that you have a few instruments to measure stuff. Otherwise you are groping in the dark. For passive components the best value in a meter is the DE-5000. You can find them on ebay for about $100 shipped from Japan or $125 from a USA seller with faster delivery. The DE-5000 will measure capacitors, inductors, and resistors at 5 different frequencies. It's cheap, accurate, and easy to use.
Attachments
I use PVC for hubs, or go hubless...
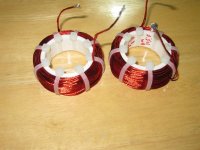
Litz needs the hub due to flex, but PVC makes a great hub. I wind these by hand, but I'm not in the line of making a business from it.
Dunk in polyurethane afterwards to solidify the windings and let dry.
Later,
Wolf
Litz needs the hub due to flex, but PVC makes a great hub. I wind these by hand, but I'm not in the line of making a business from it.
Dunk in polyurethane afterwards to solidify the windings and let dry.
Later,
Wolf
Attachments
-
 Picture011_zpsa310b6c3.jpg46.2 KB · Views: 547
 -
 Picture012-1_zpsc84edb17.jpg53.7 KB · Views: 547
 -
 PL-Coiltermplate001_zps615ac728.jpg147.9 KB · Views: 543
 -
 PL-Coiltermplate002_zpsdfca37ed.jpg155.9 KB · Views: 530
 -
 PL-Coiltermplate003_zpsf4bd3070.jpg145.7 KB · Views: 306
 -
 PL-Coiltermplate004_zpsa1255dde.jpg146.5 KB · Views: 300
 -
 IMG_3111_zpscxuy2ljl.jpg174.7 KB · Views: 368

Basic coil winders with counter are very reasonably priced these days on eBay: Manual Coil Winder Audio Output Winding Transformer W/ Mechanical Counter UK VAT 5192047688954 | eBay
Litz needs the hub due to flex, but PVC makes a great hub.
Hey Wolf, I assume you made those PVC forms (hubs) yourself. Would you care to share the materials and dimensions used? As far as I can tell these center forms and coil holders are not available commercially.
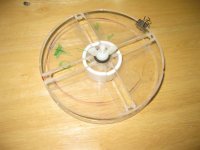
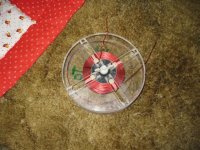
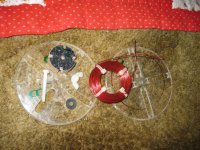
PVC 1.5" and 2" diameter are what I like to use. Typically, I cut them in 3/4" - 1" thickness. The notched circle you see when I go bobbinless is 7/8" particle board. The notches allow the zip-tie installation. Black ABS pipe is also really nice to use if it's available in your area.
I use 1/4-20 nylon bolts and wingnuts with a rubber washer under the wingnut to keep the jig intact and prevent spinning when in use.
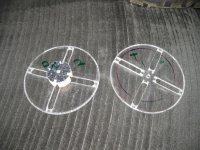
The 'wheels' are 6" diameter 0.22-0.25" thick acrylic pieces. I used a circle jig and a v-groove bit in the router and cut both sides to cut it out. Sand well to remove sharp or rough edges and prevent wear and tear on your hands. The 4 slots are 0.5" wide x 2" long, and rounded on the ends.
If I end up breaking them (I made 2, so far neither has broken), I will likely make some improvements in the next set, or make a set exclusively for using the pipe-cores. I'll likely route a very shallow recess in the inner sides of the wheels to allow the pipe to sit tightly and not shift under use, as well as glue a large plastic washer (with notches) to either outside of the wheels for durability sake. The central spot on the wheels gets microfractures in it from use, and I can see this will eventually fail. The reason for the clear material allows you to count layers, and see through the jig where you might need to. It's also relatively stiff and doesn't flex much during use.
Basically, I just wind and have an LCR meter handy. Use a box-cutter knife to scrape off a bit of enamel every so often to check value and have the binder clip hold the tension while you do. This is your 'helping hand'. Not enough? remove binder and keep winding. The next layer will not have a connection point (if you watch what you are doing) to touch and change the value. If it is enough and your happy, just cut the lead, zip and disassemble.
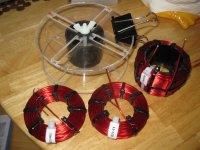
The zip-ties go through the hub or pipe sections and around the coil to secure it. Disassemble the jig and you have your coil.
I highly recommend using the steel-barbed zip ties from Thomas & Betts/Tywrap brand from Home Depot, and also highly recommend you obtain a zip-tie gun like the Paladin Tools brand I have, or the Panduit version if you like.
It took a gallon of Minwax High-Build Polyurethane, just to get the larger ones through the opening in the can. Dunk until the air-bubbles stop, and then remove from dip, let drain a bit back into can, and transfer them to something like a cereal box or pizza box lid to let dry. It should take about 24-48 hours to dry and not be gummy.
I like to use Temco brand wire from Amazon/Ebay. Search for 10 pound spools if you plan on doing a lot.
https://www.ebay.com/p/Temco-16-AWG...c-Magnetic-Coil-Red/1340072110#ProductDetails
TEMCo red magnet wire 10 pound spool ebay - Google Search
The double layer enamel is good stuff. Do not buy the stuff that is meant to melt together or you risk shorts.
Later,
Wolf
I use 1/4-20 nylon bolts and wingnuts with a rubber washer under the wingnut to keep the jig intact and prevent spinning when in use.
The 'wheels' are 6" diameter 0.22-0.25" thick acrylic pieces. I used a circle jig and a v-groove bit in the router and cut both sides to cut it out. Sand well to remove sharp or rough edges and prevent wear and tear on your hands. The 4 slots are 0.5" wide x 2" long, and rounded on the ends.
If I end up breaking them (I made 2, so far neither has broken), I will likely make some improvements in the next set, or make a set exclusively for using the pipe-cores. I'll likely route a very shallow recess in the inner sides of the wheels to allow the pipe to sit tightly and not shift under use, as well as glue a large plastic washer (with notches) to either outside of the wheels for durability sake. The central spot on the wheels gets microfractures in it from use, and I can see this will eventually fail. The reason for the clear material allows you to count layers, and see through the jig where you might need to. It's also relatively stiff and doesn't flex much during use.
Basically, I just wind and have an LCR meter handy. Use a box-cutter knife to scrape off a bit of enamel every so often to check value and have the binder clip hold the tension while you do. This is your 'helping hand'. Not enough? remove binder and keep winding. The next layer will not have a connection point (if you watch what you are doing) to touch and change the value. If it is enough and your happy, just cut the lead, zip and disassemble.
The zip-ties go through the hub or pipe sections and around the coil to secure it. Disassemble the jig and you have your coil.
I highly recommend using the steel-barbed zip ties from Thomas & Betts/Tywrap brand from Home Depot, and also highly recommend you obtain a zip-tie gun like the Paladin Tools brand I have, or the Panduit version if you like.
It took a gallon of Minwax High-Build Polyurethane, just to get the larger ones through the opening in the can. Dunk until the air-bubbles stop, and then remove from dip, let drain a bit back into can, and transfer them to something like a cereal box or pizza box lid to let dry. It should take about 24-48 hours to dry and not be gummy.
I like to use Temco brand wire from Amazon/Ebay. Search for 10 pound spools if you plan on doing a lot.
https://www.ebay.com/p/Temco-16-AWG...c-Magnetic-Coil-Red/1340072110#ProductDetails
TEMCo red magnet wire 10 pound spool ebay - Google Search
The double layer enamel is good stuff. Do not buy the stuff that is meant to melt together or you risk shorts.
Later,
Wolf
Wolf,
this is a great idea with very good looking results! I guess you calculate the turns numbers first that are required to get the inductivity almost right. How do you do this?
Best regards!
this is a great idea with very good looking results! I guess you calculate the turns numbers first that are required to get the inductivity almost right. How do you do this?
Best regards!
Like I said- I don't calculate beforehand- I use an LCR meter and scratch the enamel occasionally. You are perfectly welcome to calculate and wind, but I get an exact value to the meter tolerance when I wind this way and there is no 'hope this is right'. You get a feel for knowing about the right size if you do enough of them.
I hold the jig with my hands and rotate until the first layer is done, then they pretty much self align as you go after that. I keep the tension with my feet aside the large spool it comes off of, and have it roll toward the couch so it doesn't roll away on me. The tension is the hardest part. You lick that, and your wrists are strong enough, this is an easy job.
I've thought of making a hand crank version, or something that will allow the use of my jig, but I've not done that yet.
Later,
Wolf

- Status
- Not open for further replies.
- Home
- Design & Build
- Parts
- Anyone custom wind inductors?