Looks good, but if you're getting into this woodwork lark, you really need more clamps😀
You can never have enough....
You can never have enough....
You can never have enough....
Something like this?
Attachments

Those Quickgrip brand ones are awsome, especially cause they only take one hand to use. We got about 5 of them.
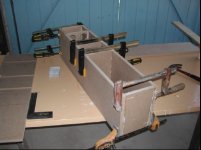
I've made up a pretty flexible clamping set with a few band clamps and some strips of 30mm right angle aluminium. It's got several useful points - guaranteed right angles, even pressure along the joints and the setup is cheap. The only downside is that it can be a bit fiddly to set up, but I think a little more practice will solve that problem.
My first set of boxes using this method have turned out pretty well.
My first set of boxes using this method have turned out pretty well.
Think you didn't use enough woodglue.
Still learning !!
That polyerethane based glue sure swells in contact with water😀
Keld
The band clamps turned out to be the cheapest option - a pair at £6 each and a strip of aluminium at £5. Bargain - works a treat too. Just seemed a better way to get even pressure along the joints than using regular clamps.
Hi Redeye
Yes, band clamps or ratchet straps are great tools, I have several, including a couple of 5 ton ones used in the back of trucks as tie downs. I might have to try your tip with the angle at some point as well🙂 .
Any more photos yet Plasmodium?
Yes, band clamps or ratchet straps are great tools, I have several, including a couple of 5 ton ones used in the back of trucks as tie downs. I might have to try your tip with the angle at some point as well🙂 .
Any more photos yet Plasmodium?
Yup, 5 tons...
I have seen people rip the sides of cheap vans with them by doing them up too tight!
They era also very long, about 5m, so I don't often use them for much these days, but for big construction projects, such as Pergolas, etc, they are great.
I have seen people rip the sides of cheap vans with them by doing them up too tight!
They era also very long, about 5m, so I don't often use them for much these days, but for big construction projects, such as Pergolas, etc, they are great.
No more pics just yet
Glued box #2 today..... hopefully will have something that emits sound by Monday....
the slow bit will be getting nice rebated holes in the fronts...... how do people do this??
I have thought of trying a joinery shop, might do it cheap.... I can see myself making a meal of it 🙁
5 day weekend coming up..... more photos to follow
plasmodium,
shouldn't be to hard with a router. rent one from kennards or something like that. what drivers are you using? what sort of setup? looks interesting......

shouldn't be to hard with a router. rent one from kennards or something like that. what drivers are you using? what sort of setup? looks interesting......
after re-reading, isee you have arouter. oh well
is that brisbane, aust? if they're really loud, i might just hear you........
😱 😎
is that brisbane, aust? if they're really loud, i might just hear you........
😱 😎
the slow bit will be getting nice rebated holes in the fronts...... how do people do this??
If your drivers are round, you can use a circle cutting jig and a router. If you have already cut the holes for the drivers, just temporarily fix a bit of scrap MDF in the hole and use that for your centre.
If your drivers are not round, make a template. Most routers come with a guide bush, just fix this in place and measure the distance between this and the edge of your router bit. Then draw around your driver on a piece of 3mm MDF or ply, and then extend the lines out to make the cut out bigger by the amount you measured earlier. Cut this out with a jigsaw, and bingo, you have a jig!
Fix this in place with some strong double sided tape, or clamps, and then just run the router bush around the inside of the jig, and you are sorted.
To set the depth, just put the router on a flat surface and plunge it ( with the power off!) till you touch the surface. Then lock it off. Most routers have a turret style depth stop, just place the edge of your driver on this, and lower the depth stop down until it touches the driver, and lock that off and remove the driver. Now, when you plunge into the work, the router is set to the exact depth of the driver faceplate, and all without fiddly measuring.🙂
- Status
- Not open for further replies.
- Home
- Loudspeakers
- Multi-Way
- And we're underway (pic)