So I've got an Amp 6 that I've built, but when I hooked up my power supply to it (no voltage regulator or rectifier used - it's jumpered as shown in the directions) the big power cap C99 cooked itself. I double checked the cap orientation and I double checked the voltage, it was putting out a steady 13VDC, which is what I use to power my modified Sonic T-Amp.
I opened a support thread at 41hz.com but it's been over a week and Jan hasn't replied so I've given up hope there. Anyone know what might be going wrong?
I opened a support thread at 41hz.com but it's been over a week and Jan hasn't replied so I've given up hope there. Anyone know what might be going wrong?
Sounds like reverse voltage or over-voltage.
Are you sure your power supply only delivers 13V and that you connected it the correct polarity?
Are you sure your power supply only delivers 13V and that you connected it the correct polarity?
I'm certain of the voltage because I did check it immediately afterward, and it's what I've been running my SI T-Amp on. Having the voltage reversed is more troublesome because the documentation provided by 41hz.com simply sucks. Things are mislabled or inconsistent. One one diagram, hole 1 is marked as negative in, and hole 3 is positive in. In the appendix, hole 2 is referred to as AC 1 and hole 3 AC 2, which would make hole 1 ground, as it is actually printed on the PCB board. The board however, has no indication of positive or negative for the other two holes. Hopefully someone who has a working Amp 6 see this and know for certain.
The regular AMP6 does run off AC, as there is a rectifier onboard. But DC will also work, and it doesn't matter which way you connect it, the rectifier bridge takes care of that.
Did you come in the normal power inputs or go directly to C99? If you "jumpered in" maybe you bypassed the bridge and hit the C99 with reverse polarity?
Anyway, check your connections. This amp is made to run off about 15V AC which is converted to DC on board. Once it is rectified you should see about 20V on C99. Then the regulator will drop the voltage down to 14 or 14.5, depending on the resistor you installed.
DC will not hurt the amp or the cap if you were to bring it in the normal power points at the edge of the board. But 13VDC is not what you want to use, at least not in the long run. You need that 15VAC rectified to about 20VDC (no load) to give the regulator some room to work.
Let us know what you find.
It does indicate in the manual that you can use a DC power supply without a rectifier and regulator. Re-reading it now indicates I may have killed the Tripath chip however.
Here's hoping frying the capacitor blocked the power from reaching and killing the Tripath chip.
It also occurs to me now, that perhaps the power connection is different when using a DC power supply rather than AC. In the normal configuration, the power inputs are ground/AC1/AC2, where as in this diagram, it would be DC -/nothing or ground?/DC +. Is that possible?
Amp6 with 12V DC / without rectifier / without voltage regulator
If you use AMP6 with a 12V DC source like a 12V battery, or an external 12V DC supply, you can remove the rectifier and voltage regulator, as they cause a voltage drop of about 2V and thereby limit the maximum input power. Note that keeping the rectifier, gives input polarity protection. Without the rectifier, you must ensure the amp is connected with proper polarity, or the Tripath chip will be damaged.
• Optionally remove the rectifier
• Remove the voltage regulator Q3
• The following components will not be active and can be removed
o R100, R101, R102, C100, C102, D20
• C99 can still be used, if the power supply works with a capacitive load
• Jumper the rectifier if it has been removed and Q3 as shown below.
• Connect the external power as shown below. Polarity MUST be correct, or the Tripath chip will
be damaged!
Jumpers are black bold horizontal lines (Q3, pin 1-2 and rectifier, pin 3-4).
An externally hosted image should be here but it was not working when we last tested it.
Here's hoping frying the capacitor blocked the power from reaching and killing the Tripath chip.
It also occurs to me now, that perhaps the power connection is different when using a DC power supply rather than AC. In the normal configuration, the power inputs are ground/AC1/AC2, where as in this diagram, it would be DC -/nothing or ground?/DC +. Is that possible?
If you had the regulator in place the Tripath chip probably survived. If not, you may have killed the chip.
You are better off running this board with AC and letting the rectifier and regulator do their thing. Having the regulator so close to the chip helps the power regulation a lot.
If you want to run one on your own supply, like a battery, the AMP6 Basic would be a better choice. Just watch that polarity and voltage!
Are you positive you have the cap orientation correct? On my board the + sign was missing the vertical bar because of some error in printing on the board, this was mentioned on the 41hz site in one of the amp6 threads. The negative side of the cap ( with the white stripe ) should face the toroids. The + side has the square pad on the board. I only mention this because I found it a bit confusing myself.
On my board the + sign was missing the vertical bar because of some error in printing on the board, this was mentioned on the 41hz site in one of the amp6 threads.
Just received my Amp 6 Kit and sure enough the positive sign of C99 is missing the vertical bar on my board as well. I know well to read the construction notes carefully double checking with the schematic and mindfully orienting the components. Building kits, one should be on the lookout for errors and point them to others. Notwithstanding, Jan appears to have well explained all other typos mislabeling, etc. in his construction notes.
I promise to let you know if I cook mine or report any other mishaps.
Where do I source a Toroid tranny for Amp 6? Any suggestions?
Mindfully yours
Seraph said:
Just received my Amp 6 Kit and sure enough the positive sign of C99 is missing the vertical bar on my board as well. I know well to read the construction notes carefully double checking with the schematic and mindfully orienting the components. Building kits, one should be on the lookout for errors and point them to others. Notwithstanding, Jan appears to have well explained all other typos mislabeling, etc. in his construction notes.
I promise to let you know if I cook mine or report any other mishaps.
Where do I source a Toroid tranny for Amp 6? Any suggestions?
Mindfully yours
I actually had the cap soldered in backward, but noticed it before I applied power. I start on one end of the board and double check every component before connecting the AC, this time it paid off.
I snagged a toroid off ebay for $20 shipped, It took about 2 weeks of searching before I found it . They only had one so I can't help out, sorry. Most that I found at the various dealers were $40 +. If you are not in a hurry you can do better. I'm about to order the rest of the parts I need to get mine boxed up. I have tested it briefly to be sure I have output and am anxious to put it to use.
12VAC transformer source
Hi...
You can get 12VAC xformer at Parts Express for $18
Parts Express 12 VAC 54VA adapter
Or get Stancor 12.6V transformer at Apex Jr for about $5...
Good luck!
Hi...
You can get 12VAC xformer at Parts Express for $18
Parts Express 12 VAC 54VA adapter
Or get Stancor 12.6V transformer at Apex Jr for about $5...
Good luck!
I'm about to order the rest of the parts I need to get mine boxed up.
It always pays not to be in a hurry. I have to build the kit first. Hoping to get statrted this weekend and see how far I'll get without fatigue. I too have been thinking about a box though. Have searched ebay for "not working" equipment. Interesting how things can be had for not much if you don't get carried away with trying to fix the problem. Have also looked through the following;
http://www.atiresearch-anodized.com/
and
www.diyenclosures.com
Still need to look through my own piles. Might just be able to salvage something. Would be nice to have a nice enclosure though.
Thanks hoxuanduc for the link and idea.
I bought a bunch of surplus 15VAC 2.4A wall-warts to power my AMP6s.
Works great, even for a 4 ohm load.
Works great, even for a 4 ohm load.
Here are some personal observations but not necessarily recommendations on Amp 6 assembled this past weekend;
Some components due to their small size require some meticulous/careful soldering. There is only a handful of parts but I still used a pillow on the bench for support under the elbow and a vice to hold the board. Using a magnifying glass I rechecked the work progress. One of those magnifying glass-light fixture jobs would be handy. I more used to the point to point wiring or typical more ample space of tube circuits.
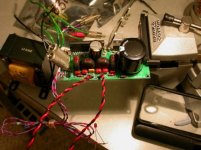
Winding the toroids I felt like a seamster. Using heatshrik seemed to further tighten the windings to reduce stray leakage. However, heatshrink should probably be removed to allow air flow after the toroids are mounted as they might get hot in with amp in high power. I have left them on for the time being. I might used an small thermister control fan depending on how warm things get. I used paint stripper to remove the enamel from the wire. Applied carefully in small amounts using a brush enough only to strip the portion of the wire that would be soldered. Wiped off the paint stripper well with paper towel. Then used acetone to remove the stripper residues wiped clean. Alternatively water can be used to remove stripper then blow dry. Used rice grain size Blue Tack under the toroids for additional stability on the board a bit of which can be seen under the magnifying glass in the picture.
Mounting the LED Mosfet driver (Q1 and Q2), I decided to look up the pinout data only to find out that it is misprinted in the parts list as 2N70000. One too many zeros there, it is a 2N7000. Instructions did say they should have their flat back pointing towards the center of the board due to a misprint on earlier boards. But some of the Amp 6 pictures posted on the 41 Hz site and elsewhere on DIYers sites showed them the other way around! Those might have been hasty pictures like the one here!
One of the output low pass filter caps was missing from the kit, so I salvaged the yellow one from a board I had lying around. Have written Jan about it just to have the same components wired in the output--not a big thing at all. For the inputs, I anchored in a pair of 3.3 uf Westcaps for starters. Thought this might be OK given what I have read about the sound of this amp. Westcaps in my experience tend to be warm and darkish but a bit rolled off on the top and not as detailed as some of the other PIO's. I will be trying different caps and input schemes depending on what I will up using as a source and how far I will go with this chip amp experience.
I have not heard the amp yet. Hopefully will do that soon if problems are not encountered. A 12.6 CT transformer I had lying around resulted in 14.45 V on the output of the regulator. Will try using a wall-wart in time as suggested above as well . A Panasonic RA series 2700 uf replaced the supplied C18/19 which ~was~ 2200 uf higher than the 1800 uf specified in the parts list. Thanks Jan for that.
Will post my impressions of Amp 6 once I hear it burned-in.
All the best
Some components due to their small size require some meticulous/careful soldering. There is only a handful of parts but I still used a pillow on the bench for support under the elbow and a vice to hold the board. Using a magnifying glass I rechecked the work progress. One of those magnifying glass-light fixture jobs would be handy. I more used to the point to point wiring or typical more ample space of tube circuits.
Winding the toroids I felt like a seamster. Using heatshrik seemed to further tighten the windings to reduce stray leakage. However, heatshrink should probably be removed to allow air flow after the toroids are mounted as they might get hot in with amp in high power. I have left them on for the time being. I might used an small thermister control fan depending on how warm things get. I used paint stripper to remove the enamel from the wire. Applied carefully in small amounts using a brush enough only to strip the portion of the wire that would be soldered. Wiped off the paint stripper well with paper towel. Then used acetone to remove the stripper residues wiped clean. Alternatively water can be used to remove stripper then blow dry. Used rice grain size Blue Tack under the toroids for additional stability on the board a bit of which can be seen under the magnifying glass in the picture.
Mounting the LED Mosfet driver (Q1 and Q2), I decided to look up the pinout data only to find out that it is misprinted in the parts list as 2N70000. One too many zeros there, it is a 2N7000. Instructions did say they should have their flat back pointing towards the center of the board due to a misprint on earlier boards. But some of the Amp 6 pictures posted on the 41 Hz site and elsewhere on DIYers sites showed them the other way around! Those might have been hasty pictures like the one here!
One of the output low pass filter caps was missing from the kit, so I salvaged the yellow one from a board I had lying around. Have written Jan about it just to have the same components wired in the output--not a big thing at all. For the inputs, I anchored in a pair of 3.3 uf Westcaps for starters. Thought this might be OK given what I have read about the sound of this amp. Westcaps in my experience tend to be warm and darkish but a bit rolled off on the top and not as detailed as some of the other PIO's. I will be trying different caps and input schemes depending on what I will up using as a source and how far I will go with this chip amp experience.
I have not heard the amp yet. Hopefully will do that soon if problems are not encountered. A 12.6 CT transformer I had lying around resulted in 14.45 V on the output of the regulator. Will try using a wall-wart in time as suggested above as well . A Panasonic RA series 2700 uf replaced the supplied C18/19 which ~was~ 2200 uf higher than the 1800 uf specified in the parts list. Thanks Jan for that.
Will post my impressions of Amp 6 once I hear it burned-in.
All the best
Attachments
I mistakenly connected my amp 6 backwards (no rectifier), and did indeed fry the Tripath chip. I was able to replace it and the amp has been working ever since. Replacing it was tedious and not fun. I snipped all the pins, and used a solder sucker to clean the holes for the replacement.
The good part was that ordering the replacement chip gave me the excuse to order another amp kit from Jan, and save on shipping.
The good part was that ordering the replacement chip gave me the excuse to order another amp kit from Jan, and save on shipping.
Well I thought it about time I did a follow-up on my Amp 6 experience...In so many words, I have really been enjoying Amp 6. Amp 6 has opened my eyes and motivated me towards other SS projects some of which have been on the shelf collecting dust (shame on me!). Amp 6 does somethings like the piano very well IMO and of course in the set up it has been used. I have listened to this amp pretty much continuously since put together. For music I have used a home brew Mini Disc of assorted jazz, classical, piano, rock, acoustic, ambient, etectronica, bossa nova in MP3 and mostly Sony's propriety ATRAC played through Sony's MZ-RH1. Have also used a Nano. The MZ-RH1 does a very nice job as a source whereas with the Nano you might like to consider increasing the amp gain a tad by adjusting the value of the feedback resistors. For the first couple of weeks the amp was driving a pair of no-name 3 way jobs I use for testing that I rescued from a dumpster some decade ago until it dawned on me that somewhere I had a pair of Dana Audio Model 1that I had bought for under 200.00, again about a decade ago. I had used these speakers with a Nak tape deck and a separate Nak amp in my car just laid on their sides in the back seat of an old 84 Renault Alliance I had named Pierre. Pierre was donated to salvation army still running after some 300 K miles some years ago. I always thought very highly of this Dana Audio 1, Nak Tape and amp set up and sure enough Model 1 with the amp was a much better combination. I believe Model 1's efficiency was rated at 89 db. Fellows without getting into the "in" audiophile jargon to describe the sound, I can only tell you that Amp 6 is surprisingly musical to my ears. It does the bass, midrange and top very well. It throws a wide sound stage. It is not grainy at all which is one of the reasons all my other gear to date is predominately tubed. And that is not to say at all that tube equipment cannot be grainy but there is at least this mindset about ss amps that they tend to be harsh sounding and clip hard...And the mass produced stuff out there probably is, not talking audiophile grade stuff here...Music can be reproduced well both ways as long as it is done right with the simplest topologies and/or otherwise least number of components. However, tubes tend to be smoother and do not clip hard. Listen to a 300B SET clipping, it is euphonic! Anyway, I did not suffer from listening fatigue while listening to Amp 6. Amp 6 is enjoyable. Do remember that I have a pair of Westcaps at the input. These do contribute to the overall character of the sound quite a bit. So far I have been very happy with the results. By the way I have also listened to a Trends Audio 10.1 and SI 5066. The Trends Audio had a problem and has been returned for a replacement. The unit's LED after the first few hours of operation went out and did not come back on while the amp itself was still working though at what I thought was not quite its full potential. The amp didn't sound right to me--may be it was the lack of gain compared to the Amp 6 or the SI 5066. The SI 5066 on the other hand was a big smile. It had quite a bit more gain than the Trends out of the box but not the stage and sonics of AMP 6--granted in its unmodified state. Note that I am not necessarily alluding to any inadequacy when referring to gain in these units. The quality of sound, musicality, staging, etc. is far more important.
What I'd like to do next is to use Amp 6 with a preamp; tubed and hybrid both, along with my main loudspeakers to see what I get. Looks like I will be posting my impressions then.
All the best
Seraph
What I'd like to do next is to use Amp 6 with a preamp; tubed and hybrid both, along with my main loudspeakers to see what I get. Looks like I will be posting my impressions then.
All the best
Seraph
- Status
- Not open for further replies.
- Home
- Amplifiers
- Class D
- Amp 6 help