Thanks Mark. Was looking for the riser panel perforated type stuff. Didn't know came as shown of flat stock bent.
last ones I did use are from local hardware store
elements for joining wood elements in building
I didn't found exactly what I needed among existing L brackets, so I took flat long one and I bent it to needed dims
ok, tricky for someone not having decent bender but doable in several ways even without ....... most of them still demanding decent vice
though, taking biggest L bracket, then cutting to needed dim (one side), that's certainly least work involved
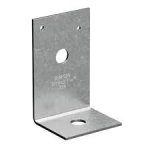
I have used the Simpson StrongTie A24 with Antek transformers:
https://www.homedepot.com/p/Simpson-Strong-Tie-2-in-x-3-7-8-in-x-2-1-2-in-Galvanized-Angle-A24/100375162
https://www.homedepot.com/p/Simpson-Strong-Tie-2-in-x-3-7-8-in-x-2-1-2-in-Galvanized-Angle-A24/100375162
Attachments
You guys are correct, and a BIG BIG hammer. Needed to move the 90 degree bend to save space yesterday, and again my hammer and a bench clamping thing was the solution. Vig noise, big hammer, jumping workbench. I’ll post a few. 2 dollars each for those 

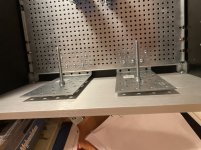
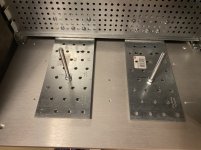
I have checked a bit. It is the Simpson Strongtie 80x220x1.5mm, flat hole plate. Coincidentally, with UMS compatible holes
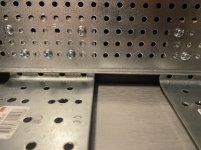
Since flat, I clamped it to that workbench thing, and hand bent at first, using power of Odin and Thor, and then I used a hammer to adjust the point of the 90 degree bend. At first, details weren’t important, as it was mounted well into the chassis. Now, they are mounted as in the pic, very close to the front plate, and mounted from under the base plate. IOT achieve this, I had to «move» the 90 degree bend half an inch or so. So I just hammered like crazy using the bench «press», and hand adjusted a bit, and then hammered some more. Very crude, but good enough result for my dirty crude gremlin use.
It is now close enough to put a tiny rubber foot, leftover from my ACP build, on top of the tranny bolt head, so metal won’t have to touch metal against the front plate. Then I’ll put some foam under the tranny to gently press the rubber against the front. Hope it will turn out OK 🙂
Inspiration for part 1: Chede. Part 2: Batsch champ MZM
Why all the work? Same reason as MZM: no L brackets fitting the need were available. The UMS fitting was a real bonus.
Attachments
Last edited:

It's also easy to drill holes. That's what I did to my A24 angles to mount them to the chassis. I was able to use the large hole in the vertical leg to mount the transformer.
Also, Ben Mah’s choice looks a tad more sturdy than mine. Though, they are surprisingly stable.
I have used the Simpson StrongTie A24 with Antek transformers:
https://www.homedepot.com/p/Simpson-Strong-Tie-2-in-x-3-7-8-in-x-2-1-2-in-Galvanized-Angle-A24/100375162
Ha ha ha!!! I was thinking about that while in bed trying to fall asleep and glad others beat me to it. They have a MASSIVE catalog so could probably find more random sizes and shapes online.
Andy - your solution looks great!!!
Hey all. How to bridge an Aleph J into Mono? I didn't see any diagrams. Rather than go dual mono PS... I think I'm just going to build another one.
"Find Similar" is a great tool with Mouser. Also, as you go along, do your best to determine what the part is used for by referencing the build guide you got the BoM from, and any critical specs. You can also reference 6L6s guide (this thread) for physical connections he used.
1. Use - holds the ground lift thermistor. Is it used in 6L6's guide - no. Alternatives. Mount it to the chassis and the PSU board directly a la 6L6 or any suitable two-position (or more) block you like.
If you really like that model, then this is a slightly beefier model from the same manufacturer. You can compare the specs.
https://au.mouser.com/ProductDetail/Altech/CB6-2H?qs=RTnkMsGiivlJNniHbembQg==
2. Use - Various chassis connections. Is it used in 6L6's guide - sorta. Alternatives - Hit Lowes, HD, Amazon etc, and grab a box. These are very common. Note - they're color coded.
3. Use - Connections for PSU and IEC. Is it used in 6L6's guide - sorta. Alternatives - see above.
4. That's a tricky one. "Audio Grade" caps are a touchy subject. I'll let someone else with thicker skin suggest a part. Personally, I'd look for a low ESR cap from Panasonic or something from the Nichicon UKZ or UFG line as a cop out. There are also 3 different BoMs posted on the store site that offer alternative part numbers. I'd start with revision D and work back. One may hopefully be in stock.
5. This alternative comes up when using the "find similar" functions.
https://au.mouser.com/ProductDetail/TE-Connectivity/282836-3?qs=A%2Bip%2BNCYi6PbXzB92YbbqQ==
Dumb me...I went over to Digi-Key and they had 4 of the 5 things I needed (well I did need the larger size CB6/2H, both were out of stock), with the only missing thing being these:
DPF14-250FIB-M Panduit | Mouser
Which hopefully I can find locally (just want to ensure the correct sizes, but not rocket science on these...they fit or they don't).
The exact caps were in stock, so that could have been a big bottleneck. I ordered 10 because they are so cheap (and if someone else need a pair happy to mail at no charge).
I will carefully review 6L6's guide vs. the Blogspot guide. At the very least this gives me a bigger assortment of parts in case I want to mix and match on the hookup areas. Obviously I won't play fast and loose with the actual electronic components! I felt a little pressure to just get some of these parts on the way, and I can take a few weeks to really dig in to the details. I didn't want to sit on ordering something that was in-stock today...only to have it backordered for 6 months tomorrow.
Thanks again for the help!
Glad you found everything.
Something like this... if you're out at HD etc. or just over Amazon.
https://www.amazon.com/dp/B07FQB6WX...9Y2xpY2tSZWRpcmVjdCZkb05vdExvZ0NsaWNrPXRydWU=
Edited for hitting enter too soon.
Something like this... if you're out at HD etc. or just over Amazon.
https://www.amazon.com/dp/B07FQB6WX...9Y2xpY2tSZWRpcmVjdCZkb05vdExvZ0NsaWNrPXRydWU=
Edited for hitting enter too soon.
Hey all. How to bridge an Aleph J into Mono? I didn't see any diagrams. Rather than go dual mono PS... I think I'm just going to build another one.
yeah no... really. I can max her out easily.
Glad you found everything.
Something like this... if you're out at HD etc. or just over Amazon.
https://www.amazon.com/dp/B07FQB6WX...9Y2xpY2tSZWRpcmVjdCZkb05vdExvZ0NsaWNrPXRydWU=
Edited for hitting enter too soon.
Thanks! I feel I at least now have all of the critical parts on the way (mainly things like those caps that are essential) now I can relax a bit and hunt for the exact other accessories I might want.
(I did order those...just because I trust you know they are the right one!)
Last edited:
Canonken, I would not sweat not getting those plastic/rubber covered fastons. I would consider using a pure metal faston connector, crimping AND soldering the connection, and then govering with heatshrink. Ensures lasting connecting and low resistance 🙂 Or solder directly wherever you can. Nevermind you didn’t get that exact one. They are literally everywhere. If you get one with rubber/plastic on, you can always cut it away so that it is possible to solder.
Regards,
Andy
Regards,
Andy
Thanks Andy!
Can you show me an example of the connectors you suggest?
I'm all about crimping AND soldering for a crazy strong connection!
Can you show me an example of the connectors you suggest?
I'm all about crimping AND soldering for a crazy strong connection!
https://www.amazon.com/TOTOT-Termin...i&sprefix=female+spade,tools,180&sr=1-19&th=1
These have a different type of crimp connection than the ones linked earlier. You can crimp / solder them first and then put the included insulator on after if you want. If you don't like the pre-formed insulators, you can use heatshrink tubing.
If you know you don't want to use the insulators...
https://www.amazon.com/Baomain-Fema...3&s=hi&sprefix=female+spade,tools,180&sr=1-28
The ones I suggested earlier (the blue ones), you can remove the insulator very easily... crimp it, solder it... then put the insulator back on if you'd like.
There are multiple posts in multiple threads re: both soldering and crimping connections that are designed to be crimped. As ZM might say, do whatever helps you sleep well. There are so many options for this type of connection. Most are good ones.
- Home
- Amplifiers
- Pass Labs
- Aleph J illustrated build guide