Well with considerable time wrapped up in completing the “Perfect Restoration” of the Adcom GFA-555 (some may differ) I have finally solved the somewhat of a mystery of what I would consider a higher than normal DC offset at the output terminals. I had spent countless hours’ precisely matching every single component on the input board and amp modules. I have to say at this point I don’t think there’s a single thing I have left nothing to chance. Also, now I feel like one of the most experienced on this amp, that is beside Chris, (I am sure there are others). Now the solution to the problem that drove me to the edge of reality. I discussed the issue of having somewhat high dc offset around in previous posts’ .40mv on the right and .18mv on the left channel output terminals. Now I know you guy’s are saying “what’s’ wrong with that” Nothing more than I am not comfortable with that figure. Why the right side? The left is for the most part ok, or is it. I really got the Idea from another DIY member that added the second emitter degeneration resistor (33.1 ohm) to Q2, 2sa2240. I had matched a set pair of 2SA2240’s for both channels. I used the same jig Chris uses and after 4 orders of 2sa2240’s (70 transistors) I ended up with the matched pairs x4 all within .5%. Then I took them to the curve tracer and all were exactly the same. That still did not improve the offset. So, adding a set of matched resistors to each emitter on each channel the light appears at the end of the tunnel. Now the result is left channel is 0.517 and the right is 0.270 mvdc. This in no way affected the BIAS voltage of 16 mvdc but has made an audible improvement in the sound of the amp. Being skeptical as all listening is subjective I had my Father-in-law come over for a listen. I had him audition the amp before the change was made with several selections he had made from his collection of CD’s. His listening time was around 45 minutes before and after. Using the same CD’s just after a few minutes he went over to the rack just make sure I was not pulling his leg, he just had to be sure it was the same amp. He has Mark Levinson amps so he does have an ear for audio quality. So, I would suggest at least considering adding the second emitter degeneration resistors to the front end (Differential pair) of this amp, there is just a jumper to be removed to add the resistors nothing more. For all I know Mr. Pass had those in the original design and the bean counter at Adcom decided to leave them off. It would not surprise me as they also cut corners on the drivers also. Please no negative comments about this design.
Last edited:


Pictures of the offset with inductive 8 ohm loads, notice the neg offset on the left channel. I'll get the SINAD figures as soon as I get my 8903E back up and running.
So, you soldered the 33.1 resistor to the emitter leg with the other end of the resistor to the board where the emitter leg connected? And how did you realize it was a 33.1ohm that was needed? Sorry, just not as knowing about this as most here!
EM , you will never get better than what you have. Just the tolerance of the LTP emitter resistors with a PERFECTLY matched pair would maybe get you 10mv.
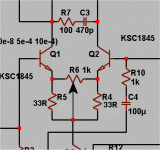
(555 below 1)
A very simple LIN amp , no beta enhancement on VAS. Someone drew the 33R on the pdf already .. ha 😀
(below 2) is the real solution (the trimmer-R6). The 555 , with heavy load of the one transistor VAS on the one "leg" of the differential has offset by design. The more advanced LIN amps (below 3) have both a current mirror and extra beta enhancement tranny at the VAS. Without the trimmer and without curve tracing - 1-2mv (or better) is the norm.
I repaired and sold one ebay 555 , gutted the other to put my amps in. VERY good build quality ,I scour ebay for 535 , 545 , and the 555's regularly. 😀
PS - with the trimmer --- .1 -.5mv is a reality .... and long term 2 year amp - still <1mv.
OS
Attachments

Last edited:
The original value selected by Nelson was 33.2 ohm for the long-tail pair degeneration resistors. I first set up a finely matched pair of the 2240’s in both channels (Q1-Q2) and thermally coupled them (Epoxies, Ect. PN# 50-3186RBK). There is already a position on the board for a second resistor (inverting leg) but a jumper is in place. I cut the jumper (right next to R3) and set up a decade box I had built with values ranging from 20 ohm to 60 ohms and measured the current going to the VAS and monitored the DC offset at the output terminals. I just happened to have some matched sets of the 33.1 ohm on hand to test and they worked very well. Further reduction of the DC offset could be achieved by hand selecting a value for R6 or set up a pot for adjustment as suggested by PB2. I know there are more sophisticated ways to deal with the front end of this amp. My approach was to keep it as simple as possible staying within the boundaries of the designer’s goal. There has been a much defined audible improvement in the amp and hopefully soon I can provide some real numbers to back that up. At present my HP 8903 is taking a sabbatical and hope to have it back up and running in a few weeks.
Last edited:
Ostripper, your DEAD on, of course. I seen your post after I responed to the other. It's nice to see others that have a affection for this series of amps, simple yet very durable. They also sound very good for the investment. With a little TLC and hand selected parts there good for another 20 years.
Yes , very nice amps. I only "gutted" the bad one. It was FRIED. The better LIN
(mine) does have a more open soundstage at high volumes. Less load on differential/current mirrors are the reasons. Same simple EF2. 🙂
Simple is nice , this ADCOM actually was one of my first reverse engineering examples. The other ADCOM's, (535/545) are fully complimentary IPS's. I think 555 sounds better , but I am biased toward single ended IPS's.
OS
Ostripper, your DEAD on, of course. I seen your post after I responed to the other. It's nice to see others that have a affection for this series of amps, simple yet very durable. They also sound very good for the investment. With a little TLC and hand selected parts there good for another 20 years.
Well said!
They are getting old by now, but replacing the electrolytics and a few dollars for bypass caps can do wonders.
@embrown
As I understood it this started with you having painstakingly matched the two sides of your amp yet you ended up with different offset voltages between the two channels. The suggestion, previously in this thread, that it was simply a resistor tolerance difference does not apply since you matched the two sides as I understand it. It was more likely a transistor mismatch and the way to find it would have been to measure all the Vbe's and operating currents in each device to several decimal places. As I understood it each side was the same without the second degeneration resistor. My intention was to help you find the difference, not that I believe it would make any difference in the sound, for curiosity sake. I also pointed out that while one goal is minimum DC offset at the output another should be to simultaneously have a balanced split in the tail current between the diff pair transistors.
Now it seems that you've changed the design by adding the second diff pair degeneration resistor which does not explain the original channel to channel difference but if you like the solution that is fine. Hope you enjoy the amp!
Q5's load is what adcom's "scheme" seems to be for LTP balance . Rather than denigrating any of the classic engineering 😀 , changing the collector load of Q5
(or degenerate the emitter - 33-150R)with a trimmer would allow for a fine tune of the load(s) on both "legs" of the differential pair. Remove the extra 33R if you want but I DO see this on my PDF of the 555 , the 33R may be a revision to the circuit.
Strange how they just "burn" the inverted signal's output through Q5 - different.
When I fixed/recapped my 555, I had 30-40mv per channel offset , the manual (and my assessment of the circuit)said this was acceptable.
OS
- Status
- Not open for further replies.
- Home
- Amplifiers
- Solid State
- ADCOM GFA-555 Output DC Offset Voltage Measurements