I started this thread not because there aren't others but because these are mine and I am going to approach them probably a little differently than others and I know I will probably get into a bind and need some help,
I picked up these two amps that are in excellent condition inside and out and it doesn't appear to have any cap problems yet so I decided to do it myself rather than go thru the pain of shipping them again.
So far I have replaced C806,7,8 & 9. I have a 50a at 600v bridge for a replacement and some 4.7K ohm AT 7watt bleeders that I am waiting for. I need 4 .o1uf at 400v or so X2 long lead that are hard to find if anyone knows of a source let me know.
Attachments
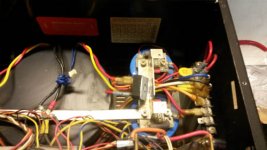
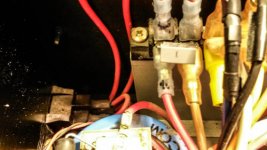
O.K. so across the secondary I don't need the X2 caps (thanks guys) so I put two .01 400V wimas across the AC lines. I will change the cap across the primary on Sat. It's a ceramic now and I want to replace it. I put the amp together and fired it up and dead quiet I let it sit for a while and will proceed to the 4 output boards next. I am trying to organize this so I don't have to disassemble it any more than I have to and I am going to run it after every stage so if something happens I can narrow it down. Due to my limited knowledge I have to be a careful as possible. I have gone over the mods time after time and I believe I have everything down except for the four bypass electrolytics that go on the input board, I can hookup the two end ones but don't know which traces are for the two center ones. All four go across the inside edge of the board.
Attachments
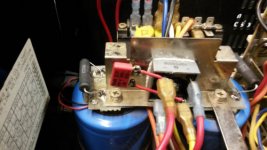
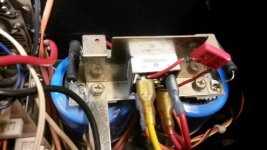
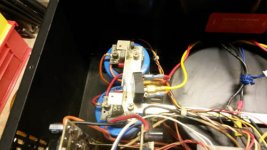
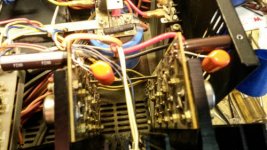
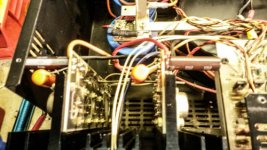
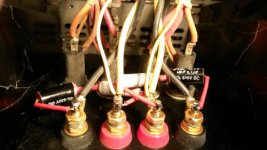
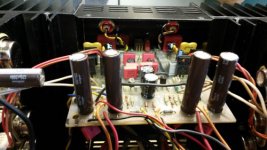
Here we are today. The X2 caps I tried to get with the long leads actually came with them, not as described at all. I replaced the little caps you see that are 47uf at 160V with 120uf at 200V and bypassed them with 22uf at 600V orange drops. I also replaced the Ceramic bypass cap on the mains with one of the X2 caps. I am debating if I need to get to the bottom of those 4 boards to replace the 68pf at 500V film that are there with the same thing.
Attachments

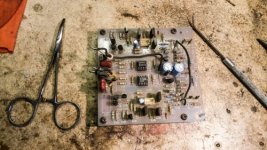
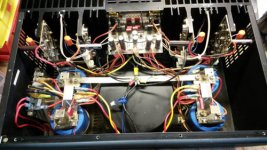
I got to the bottom and replaced those caps and have moved on to the input board. At first I thought I might be able to work on it without removing it but no chance. I numbered every wire going into the board and the board is also numbered, a little labor intensive but not too bad. No way I can work on this without a board holder. I finally mounted the board on my bench and got my fly tying magnifying glass and light hooked up and can see what is happening. I pulled 90% of the caps and the two trimmers and employed my solder sucker to good use. Nice clean board now.
Attachments
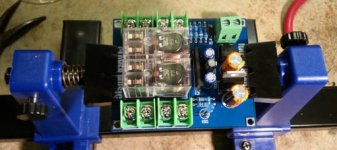
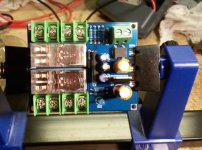
Still waiting on the final stuff from Mouser but these came in the mail today. Little DIY speaker protection boards from China, about 3x2 in. fit nicly in the bottom of the amp and ea. one controls 2 speakers.
Attachments

You too? I've had mine in the workshop, sitting on a shelf for four years building up the courage to tackle it. Mine's dead on one channel, how about yours?Good to see some pics I am gonna have to do it soon
Regards John L.
My 555 works fine but it’s about to be pushed to into full time duty running 300 watts to 4 ohm stereo subs all day.
I opened her up around Halloween to plan a recap/upgrade and inside was the lost cave of the Flying Spaghetti Monster, very daunting. Now I’m wondering if a preventive recap is worth the pain or if I should just ‘runn’er till she blows!’
Good experienced info on refresh or upgrades of the adcoms (especially the 555) is thinner than other Pass designs, probably cause Nelson doesn’t talk about them much. It is sad your adcom has been out of service for 4 years, it might be time to fight the monster and restore the glory.
All done. dropped some solder and shorted out some transistors but repaired.
Thank you! I’m interested, I have a 555II to restore, but my old eyes can’t see much in you tiny photos. I would like it if you (someone else?) could do this at greater resolution. Sorry, I don’t know if it is resolution posted, my problem, or what.
There you go! Please post higher resolution pictures and hopefully schematics, else no one knows what you are taliking about.
- Home
- Amplifiers
- Solid State
- Adcom 555ii rebuild