Ive been toying with the idea of using Ponoko to custom make some acrylic pieces to build a new enclosure for an old piece of equipment I want to rehouse, but for the life of me can’t figure out how to connect the lid to the base if I make a box for the lid. Are there any secrets to this?
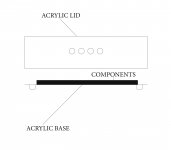
Sure thing; I want to build something like the attached with a lid and a base, with components attached to the base with glued standoffs, but as I say I can't wrap my head around how to connect the top to the bottom once they are completed. I'd think longer standoffs even reinforced wouldn't be stable. Is there a way I'm not seeing? If I'm not giving enough information, please tell me exactly what I need to relay - thanks!
Attachments
just how much heat needs to be dealt with? rehousing an old tube circuit into a plexi case is not an easy task and with out proper ventilation you could wind up entombing your circuit in melted plexi.
as far as joining the two parts plexi and acrylics can be machined to accept screw fasteners or make two sides solid material (think" wood grain" side blocks) to bind the plexi parts/panels...?
as far as joining the two parts plexi and acrylics can be machined to accept screw fasteners or make two sides solid material (think" wood grain" side blocks) to bind the plexi parts/panels...?
This is for a CD player, actually, so no tube heat. I'll look into the screw fasteners - that's really what it needs!
Attachments

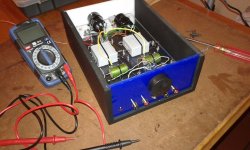
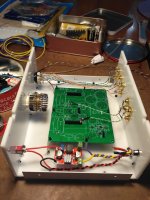
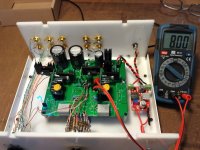
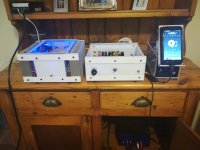
Hi typecrazy789. Since I started with diy 3 years ago I have only used acrylic (Perspex) for my enclosures. I started with a 12AU7 tube headphone amp and actually used an acrylic base as a PCB to connect the components point-to-point. No photo of this included. I then built a Pass B1 on a similar point-to-point basis, but housing the acrylic in a MDF box – see the photos. To date I have built 2 x tube headamps, a Class A headamp, a Pass B1 buffer, a Pass ACA, a Aksa Lender preamp and a Raspberry Pi + HAT DAC music streamer – all with Perspex enclosures. Just a few sample photos here.
I use Perspex because I can get off cuts for almost free. On the ACA amp and Lender preamp I also used angled aluminium off cuts to connect the Perspex panels or lids. To glue acrylic panels I use what is called PVC glue in our part of the world.
What you want to do is more advanced. Hope you are inspired!
Attachments


In order to use the solvent as an adhesive, the edges must be pretty smooth, and square too.
A shop like Ponoko will use a laser cutter, and the edges may not be smooth or square using that technique.
There are special drill bits that can help with potential cracking with plastics too, if you want to avoid adhesive in the joints. The thick stuff is fairly pricey.
I had a fairly large amount of sign-white lexan for years, but finally threw it out.
 Special glue for acrylics and the type of drill to use is one that “scrapes” its way thru
By that I mean the cutting edge needs its angled nature reduced so it doesn’t pull its way in like on metals. You will crack edges and especially exiting the acrylic
You can use a diamond stone to square off the sharp angle of the drill bit to reduce its tendency to “grab” and pull into the plastic material
Regards
David
- Status
- Not open for further replies.
- Home
- Design & Build
- Construction Tips
- Acrylic Enclosure Building