^ AMB audio 🙂
Darwin question: do you have a recommended tool for crimping the molex pins? I'm going to have to order a bag of those pins and a tool as I've completely destroyed half of them by trying to put them on the wire and failing, using tools to get the pins back into a somewhat original state, then failing again. I know it's a very sad state. I can put together a project with nearly a thousand electrical components, but I take hours upon hours trying to attach molex pins to wire with both pliars and the crimping tool I have on hand. Do you have mouser part numbers for the pins and molex headers, as well?
Darwin question: do you have a recommended tool for crimping the molex pins? I'm going to have to order a bag of those pins and a tool as I've completely destroyed half of them by trying to put them on the wire and failing, using tools to get the pins back into a somewhat original state, then failing again. I know it's a very sad state. I can put together a project with nearly a thousand electrical components, but I take hours upon hours trying to attach molex pins to wire with both pliars and the crimping tool I have on hand. Do you have mouser part numbers for the pins and molex headers, as well?
fierce_freak said:^ AMB audio 🙂
Darwin question: do you have a recommended tool for crimping the molex pins? I'm going to have to order a bag of those pins and a tool as I've completely destroyed half of them by trying to put them on the wire and failing, using tools to get the pins back into a somewhat original state, then failing again. I know it's a very sad state. I can put together a project with nearly a thousand electrical components, but I take hours upon hours trying to attach molex pins to wire with both pliars and the crimping tool I have on hand. Do you have mouser part numbers for the pins and molex headers, as well?
I just use a needle nose plier. But its a pain in the behind. Next time I build a Darwin I will use terminal blocks instead.
Thanks Brian. It looks like Jameco also carries the molex connectors (0.100" right?). Do you know if they carry the pins, as well?
Jameco Part number: 234923
Molex Part numebr: 01-50-0114
Jameco link: http://www.jameco.com/webapp/wcs/st...01&catalogId=10001&pa=234923&productId=234923
Molex Part numebr: 01-50-0114
Jameco link: http://www.jameco.com/webapp/wcs/st...01&catalogId=10001&pa=234923&productId=234923
hey, I may have what you need. You just need the IDC assembly that attaches to the end of the cable?
I made another order and asked them to add it to the order I had already made. We'll see how that goes. Thanks Marc!
Will the new JT attenuator setup not support a motor-pot and A/D its slider, the way the old one did? I was really looking forward to ordering a JT from you guys, but I just can't get used to a rotary encoder which goes round and round ad nauseum. I want a pot which stops after reaching FSD. It also obviates the need for a separate display to show the volume setting.

This is how the new JT boards will lay out.
New JT Layout
The AC1 (Audio Control 1) is a host board for the Femto microcontroller. The Femto can be pulled off the AC1 and programmed in your computer's USB port, then reattached (mounts via a pin header).
The AC1 is what we were formerly calling the Uber Controller. It has a power supply, a bunch of inputs and outputs, and a FRAM memory chip for saving state, etc.
For the JT, the AC1 controls one or more relay boards via an I2C bus. Each relay driver has it's own power supply, and is addressable, to it can control a Darwin, JT Left or JT Right. You can use one driver for the JT, but using two will allow you to control balance. Note the second output header for driving older JT relay boards, which have a slightly different pinout.
We are planning a "simple controller" for a low-cost JT as well, which will essentially be a small board with a PIC16F and a pot input that piggy backs on the relay driver board. This will give the same functionality as the old JT controller. No display, no remote control.
The JT relay board is better laid out than the old one, but the same size. It also has an additional relay for full mute.
We have the first run in hand, but are waiting for parts to build and test them. We also need to do a lot of work on getting the new firmware ready. So, it will be at least a few weeks yet.
BrianDonegan said:This is how the new JT boards will lay out.
New JT Layout
The AC1 (Audio Control 1) is a host board for the Femto microcontroller. The Femto can be pulled off the AC1 and programmed in your computer's USB port, then reattached (mounts via a pin header).
The AC1 is what we were formerly calling the Uber Controller. It has a power supply, a bunch of inputs and outputs, and a FRAM memory chip for saving state, etc.
For the JT, the AC1 controls one or more relay boards via an I2C bus. Each relay driver has it's own power supply, and is addressable, to it can control a Darwin, JT Left or JT Right. You can use one driver for the JT, but using two will allow you to control balance. Note the second output header for driving older JT relay boards, which have a slightly different pinout.
We are planning a "simple controller" for a low-cost JT as well, which will essentially be a small board with a PIC16F and a pot input that piggy backs on the relay driver board. This will give the same functionality as the old JT controller. No display, no remote control.
The JT relay board is better laid out than the old one, but the same size. It also has an additional relay for full mute.
We have the first run in hand, but are waiting for parts to build and test them. We also need to do a lot of work on getting the new firmware ready. So, it will be at least a few weeks yet.
Looks awesome, really looking forward to both the new JT and the controller boards. I have to chime in with tcpip here and ask if we would have to use a rotary encoder? Not sure I like the idea of a knob that has no stop.
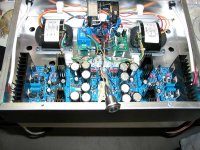
AC1 Joshua & Darwin
You can only please some of the people some of the time. I like the rotary encoder with selecting modes with push button control. It will greatly simplify front panel. They probably will have other options available as it is all software controlled.
My 2 cents
Bill
You can only please some of the people some of the time. I like the rotary encoder with selecting modes with push button control. It will greatly simplify front panel. They probably will have other options available as it is all software controlled.
My 2 cents
Bill
If you look closely at the AC1 (zoom!), you will see there are three 5V I2C headers, three 3.3V I2C headers, two Rotary Encoder headers, the IR and display headers, then a block called EXT_IO. These last ones are basically direct access to open IO pins on the Amtel uC.
So, we could always to a pot on them. Also, since it is so easy to flash the Femto, we hope to see people creating their own firmware for it. Maybe even their own I2C controlled devices. You can easily create your own host board for the Femto as well. Play play play.
There is a reason the AC1 has the 1 at the end 🙂
That sounds good Brian. As long as I can still have my pot Im set 🙂 If Im using the JT with the new controller and no display there is really no way telling how the volume is set with a rotary encoder. Unless of course it defaults to 0 which I guess it can do since its programmable. Will the simple controller have the pot option?
Same here, exactly. I'd rather have a very simple fascia with no display, and a pot is the only way to indicate volume setting in that case. Please.MrMajestic said:That sounds good Brian. As long as I can still have my pot Im set 🙂 If Im using the JT with the new controller and no display there is really no way telling how the volume is set with a rotary encoder. Unless of course it defaults to 0 which I guess it can do since its programmable. Will the simple controller have the pot option?

We are planning a "simple controller" for a low-cost JT as well, which will essentially be a small board with a PIC16F and a pot input that piggy backs on the relay driver board. This will give the same functionality as the old JT controller. No display, no remote control.
Fully agree... The simple controller will only have a pot input.
- Status
- Not open for further replies.
- Home
- Design & Build
- Parts
- A twisted tale about a logarithmic relay attenuator