Wow shinobiwan--that is some beautiful work.
I used to face similar frustrations as those expressed here. I found a great solution:
Build a butt-jointed inner box that is glued and screwed. Make it nice and square. Glue and screw some nicely veneered outer panel onto the inner box. The screws go in from the inside. Just don't go all the way though your outer panel. The corners at the top and sides are mitered 45 degrees, so you don't have any endgrain showing.
The problem with this--you have to have a super square tablesaw to get perfect panels that fit perfectly.
The solution for those of us less talented than Shinobiwan:
Make the panels slightly oversized so that they hang over the front and back. Trim with a router.
Make the front baffle out of solid wood.
The back panel gets painted. Yes, you can see endgrain on the back panel. Nothing is ever perfect, I can live with that flaw.
I have some pictures of the results of this technique, I will post them if I can find them.
JJ
I just have one more thing to add. Yellow glue is not the strongest one on the market. It expends and contracts with temperature changes.
Try using Unibond 800.
Veneering is ideal of cause but a super rigid glue with extremely thin glue line will do wonders.
Try using Unibond 800.
Veneering is ideal of cause but a super rigid glue with extremely thin glue line will do wonders.

You always have the option to emphasize the joint. A saw kerf is a simple way of doing this. The options go on from there. An inlay of contrasting wood will work.
My approach is to resaw boards into 1/4" thick veneer and attach to the mdf.
My approach is to resaw boards into 1/4" thick veneer and attach to the mdf.
ShinOBIWAN said:I know a couple of folks (not in the UK climate) who've said they don't need to use anything more than good primer and thorough filling/sanding prep.
Might I be one of those 😀
Ed LaFontaine said:You always have the option to emphasize the joint. A saw kerf is a simple way of doing this. The options go on from there. An inlay of contrasting wood will work.
 These are good options too, used on a lot of commercial stuff.
The best bet to easily avoid the problem is tight fitting mitre joints, with no end grain exposed at all. Difficult to do for multifaceted boxes (like Ant's above), but not impossible.
Avoid, like the plague, water based finish on unsealed MDF. This is anything that have water in it, even waterbased "sealers". Biggest offender: thinned PVA.
I plan to use the paint which the automotive paint supplier recommended - which I think is water based acrylic. Sealer, then the colour (black subs, metallic red for main panels), then clear then sanding, cutting and polishing as per Shinobiwan's tutorial.
I haven't quite figured out how I'll deal with the joint issue.
I haven't quite figured out how I'll deal with the joint issue.
What about this.
Chamfered joint with a large 25mm (1") round over bit, then the join is given a groove that is filled with Builders Bog - 2 pack filler (shown as white solid hatch).
Has anyone tried this or similar, and does anyone think it will work or not work?
Chamfered joint with a large 25mm (1") round over bit, then the join is given a groove that is filled with Builders Bog - 2 pack filler (shown as white solid hatch).
Has anyone tried this or similar, and does anyone think it will work or not work?
Attachments

I did that on the first set of MDF boxes I built. I just veneered over the roundover. In winter, when everything is really dry, I can visibly see the transition. Maybe if I had sealed it really good before veneering, I wouldn't get that line.
That is one of the problems that prompted me to start using the methond I mentioned earlier.
JJ
That is one of the problems that prompted me to start using the methond I mentioned earlier.
JJ
paulspencer said:What about this.
Chamfered joint with a large 25mm (1") round over bit, then the join is given a groove that is filled with Builders Bog - 2 pack filler (shown as white solid hatch).
Has anyone tried this or similar, and does anyone think it will work or not work?
The problem with most glue joints is lack of clamp pressure. Apply ample glue, then us LOTS of clamps and LOTS of pressure. It is virtually impossible to apply too much pressure with ordinary clamps. You don't need to worry about squeezing out all of the glue.
I have only ever noticed this problem when I was a bit slack about clamping.
I think adding another filler material with it's own expansion/contraction properties is just going to create problems.
45 degree mate seems to provide about the same way of expanding, thus reducing mismatch caused by expansion.paulspencer said:What about this.
Chamfered joint with a large 25mm (1") round over bit, then the join is given a groove that is filled with Builders Bog - 2 pack filler (shown as white solid hatch).
Has anyone tried this or similar, and does anyone think it will work or not work?
richie00boy said:I think adding another filler material with it's own expansion/contraction properties is just going to create problems.
Very well could create 2 lines instead of 1.

soongsc said:
45 degree mate seems to provide about the same way of expanding, thus reducing mismatch caused by expansion.
There is truth here, but everything, absolutely everything shows in ultra high gloss.
Best approach (speaking from my own experience) is to use the right glue, make nice tight joints, clamp like crazy, let dry an adequate time (overnite) and sand, sand, sand and then sand some more.
John,
What glue do you use? I normally use PVA glue, and I have some massive clamps.
The idea behind using builders bog is that it has strength to hold together, being 2 pack.
I think I may have to do some trials before I paint - make a mini box!
What glue do you use? I normally use PVA glue, and I have some massive clamps.
The idea behind using builders bog is that it has strength to hold together, being 2 pack.
I think I may have to do some trials before I paint - make a mini box!
Well, the best work results from combining technology to acomplish a goal. No argument from me here. Some people just make the design so that there should be a line there, and you hide thin lines in a larger line. The line now becomes a design instead of a defect.MJL21193 said:
Very well could create 2 lines instead of 1.
There is truth here, but everything, absolutely everything shows in ultra high gloss.
Best approach (speaking from my own experience) is to use the right glue, make nice tight joints, clamp like crazy, let dry an adequate time (overnite) and sand, sand, sand and then sand some more.
😀
I've seen it done that way, and it makes sense.
In my case, I want to achieve the look of a box that is one solid block with rounded corners as if it has been carved out of stone and polished. It gives a look of solidarity. I know it can be done, it's just a matter of figuring out how, and doing it without a factory!
In my case, I want to achieve the look of a box that is one solid block with rounded corners as if it has been carved out of stone and polished. It gives a look of solidarity. I know it can be done, it's just a matter of figuring out how, and doing it without a factory!
In my case, I want to achieve the look of a box that is one solid block with rounded corners
How many corners do you want to round off? All 12?
When I have finished MDF by painting, sanding, repeat--I have found that it takes several coats to seal up the endgrain of MDF. But once it is done, it doesn't start to show through with changes in humidity.
JJ
paulspencer said:I've seen it done that way, and it makes sense.
In my case, I want to achieve the look of a box that is one solid block with rounded corners as if it has been carved out of stone and polished. It gives a look of solidarity. I know it can be done, it's just a matter of figuring out how, and doing it without a factory!
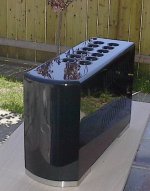
I have done it several times, on several different things. Pic below is a HDF and MDF amp case. No lines anywhere.
I use yellow carpenters glue, BTW. This is PVA glue with aliphatic resin added to increase strength. Remember, don't be afraid to clamp it as tight as possible.
Attachments
Lots of great advice thanks
my best results have come from these techniques.
tight joints
epoxy adhesives
lots of clamps
clean dust thoroghly especially end edges!
Resin gelcoat (like boats are made)
seal all surfaces( yes the inside of the box)
automotive laquers.
my worst results
poor joints
yellow wood glues
no clamps
enamel spray paints
- Status
- Not open for further replies.
- Home
- Loudspeakers
- Multi-Way
- A solution to MDF expansion on joints, translams etc.