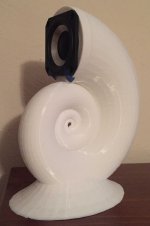
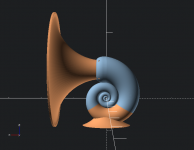
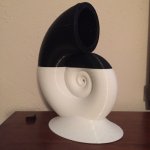
3D modeling in OpenSCAD.
Horn profile by eyeball so far. Modeling in Akabak before printing that part.
xrk971's Trynergy Akabak script has a 300Hz tractrix from Volvotreter's spreadsheet. I'll start with that, maybe squeeze it down a bit to see how it models close to the size I've got, then get my model to follow that flair rate.
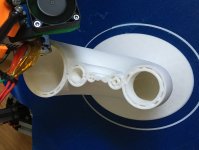
6.5 hours to print.
Here's a shot from the middle of the current print to show the interior structure.

Modeling in Akabak before printing that part.
xrk971's Trynergy Akabak script has a 300Hz tractrix from Volvotreter's spreadsheet. I'll start with that, maybe squeeze it down a bit to see how it models close to the size I've got, then get my model to follow that flair rate.
AkAbak uses a plane wavefront model which is just fine for low flare-rate bass horns, but is not really suitable for simulating a 300Hz fully-formed tractrix horn, which ideally requires an isophase wavefront model.
@xrk971 Thanks, agreed. I originally wanted it to be stout, but now I would make it single walled because I could always add external damping if a single thinner wall resonates.
@Sparrowlegs Know what you mean, now I'm picturing a Unity horn with a spiral on each bass driver as well. I'd also like to experiment with spiraling the front horn, figured to start simple though. Dimensions are about 210mm x 175mm x 105mm
@David Does Hornresp use an isophase model?
@Sparrowlegs Know what you mean, now I'm picturing a Unity horn with a spiral on each bass driver as well. I'd also like to experiment with spiraling the front horn, figured to start simple though. Dimensions are about 210mm x 175mm x 105mm
@David Does Hornresp use an isophase model?
I have a hard time restarting a job that has either jammed or run out of filament. How do you handle errors like that? I use Simplify 3D printing software and it does a good job but error handling is still a very manual operation to reset the head to where it had the problem if you did not catch it when t happened.
How did you model your snail spiral? Or did you download an existing STL file?
How did you model your snail spiral? Or did you download an existing STL file?
How did you model your snail spiral? Or did you download an existing STL file?
Is it a variant of this equation Fudce -
{
2*(1 - E^(u/(6 π)))*Cos*Cos[v/2]^2,
2*(-1 + E^(u/(6 π)))*Cos[v/2]^2*Sin,
1 - E^(u/(3 π)) - Sin[v] + E^(u/(6 π))*Sin[v]
}
@Sparrowlegs: I've used that forumla, but not on this spiral.
I construct the model quite a bit differently now, but here is where I started: Shell Speaker by alexmordue - Thingiverse
@xrk971: I use S3D also, though I imagine any slicer can handle the start at layer X option. I've fixed a couple relatively big prints now, part basic solution and part having been lucky with the printed item's structure. No real secret on the basic solution; measure carefully, divide by the layer height, and restart the print at that layer.
In my successful cases (and I've had many failures) I also got lucky in that I could correlate the shape of the last printed layer with the shape of the layer I would be starting at. For instance with the double walled spiral, there is vertical infill between the walls that gets cut between the spiraling walls. Each layer looks different enough that i knew I was pretty close with where I was restarting just by the structure of that infill on that layer. My other big print fix was a Yoda head. In that case I could tell by how far out along his ears the chosen layer was. Even with those clues I haven't gotten perfect. On the two color spiral, I had a jam partway through the black and had to restart. I was definitely off by one layer and perhaps by two based on the amount of filament that squeezed out as the nozzle was trying to print with no room. Had I been any farther off I probably would have crashed the nozzle in to the print and failed the fix all together. As is I manually trimmed with a knife to remove the mess. On the color change I was ready and just paused the print, swapped filament, and restarted, so not actually much of an example itself.
Last edited:
@David Does Hornresp use an isophase model?
Yes.
Cool to see some more 3D printed speakers turning up lately 
I run a fairly large 3D printer if anyone has any super cool ideas they want to try out. My build area is 360 diameter by 350ish high which should be suitably big for printing a bookshelf size speaker in one piece.
My trick for restarting a failed print is to let the head cool down, and then jog it down to the top of your partially printed part. Step down in 0.1mm increments till you are just touching the part (similar to how you would level your bed). Now send an M114 to read out your current coordinates, this gives you your Z-height to restart the print on.
Last edited:
Anyone have ideas to address a difficulty I've found in slicing the horn model? Picture the horn being printed with the throat at the bottom:
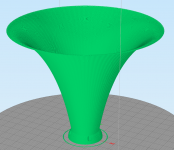
The way most (especially hobbyist class) 3D printers work includes converting the 3D model into a stack of slices to be printed. For the vertical part of the horn this is great, the slices stack up on each other just fine. However the farther the curve gets toward horizontal, the farther each layer gets displaced (for any horn profile with increasing curvature):

I can just make the whole thing thick enough that even the far layers stack, but that uses a lot of plastic and isn't a very elegant solution.
The basic issue is that the slicer (S3D) uses constant height slices, but I really need slices that shrink in height toward the top of the horn. I can make all the slices tiny but then the print will take an extra long time.
Writing this out, I think that thickness of the whole horn vs. slice height is just going to be a basic tradeoff (unless I either create or find a slicer that will do variable heights). Still, would be curious if anyone has another idea.

The way most (especially hobbyist class) 3D printers work includes converting the 3D model into a stack of slices to be printed. For the vertical part of the horn this is great, the slices stack up on each other just fine. However the farther the curve gets toward horizontal, the farther each layer gets displaced (for any horn profile with increasing curvature):

I can just make the whole thing thick enough that even the far layers stack, but that uses a lot of plastic and isn't a very elegant solution.
The basic issue is that the slicer (S3D) uses constant height slices, but I really need slices that shrink in height toward the top of the horn. I can make all the slices tiny but then the print will take an extra long time.
Writing this out, I think that thickness of the whole horn vs. slice height is just going to be a basic tradeoff (unless I either create or find a slicer that will do variable heights). Still, would be curious if anyone has another idea.
- Status
- This old topic is closed. If you want to reopen this topic, contact a moderator using the "Report Post" button.
- Home
- Loudspeakers
- Full Range
- 3D printed spiral enclosure
