Why does making speakers feel so complicated it's like I'm trying to design a space ship or something? I'm just kinda playing it by ear and hoping I don't make any catastrophically bad design choices.
The Basic Design Constraints:
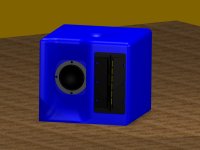
-Enclosure 3D printed on lulzbot taz 6
-One piece (No gluing multiple pieces together)
-Two Channel
-T-Glaze filament for translucent enclosure
-Small listening Room (Under 150sqft)
-Internal tapered T-Line designed to print without support
-Internal T-Line ends in the flared hole on the top of the speaker enclosure
Drivers:
-Tang Band W3-1876S 3" Mini Subwoofer
-Dayton Audio PT2C-8 Planar Tweeter
Amp:
TBD. Ideally, a DIY Class-A. Realistically, something I can buy used on Ebay.
Crossover:
TBD. Need to get further into the design.
The Status:
Basic Exterior shape and speaker placement. Starting to design the internal structure for the 3" driver. Need to work into the design to see exactly what I can do in the space available before I can even start modeling the speaker response with software.
Anything look obviously out of place so far?
The Basic Design Constraints:
-Enclosure 3D printed on lulzbot taz 6
-One piece (No gluing multiple pieces together)
-Two Channel
-T-Glaze filament for translucent enclosure
-Small listening Room (Under 150sqft)
-Internal tapered T-Line designed to print without support
-Internal T-Line ends in the flared hole on the top of the speaker enclosure
Drivers:
-Tang Band W3-1876S 3" Mini Subwoofer
-Dayton Audio PT2C-8 Planar Tweeter
Amp:
TBD. Ideally, a DIY Class-A. Realistically, something I can buy used on Ebay.
Crossover:
TBD. Need to get further into the design.
The Status:
Basic Exterior shape and speaker placement. Starting to design the internal structure for the 3" driver. Need to work into the design to see exactly what I can do in the space available before I can even start modeling the speaker response with software.
Anything look obviously out of place so far?
Attachments
It could be fun to 3D print an enclosure. Lots of freedom to print waveguides and -otherwise difficult to build- shapes. For example, you could fold your transmission line similarly to a Bowers & Wilkins Nautilus.
Some thoughts:
Some thoughts:
- Pick different drivers. The TangBand 3" subwoofer isn't really designed to work up to 3 kHz, while the Dayton planer tweeter only works down to 2.5 - 3.0 kHz. These are specific drivers. There are drivers with a higher price-performance ratio for general applications.
- Placing the tweeter above the midrange results in a better horizontal dispersion.
- Why is the midrange placed in a recess? It will mess up dispersion and frequency response unless carefully designed.
- The TangBand 3" subwoofer is inefficient, so a class A amplifier will be disproportionally expensive.
Last edited:
The intention is to experiment, figure out why it doesn't work the way I expected and try to continuously improve. The Bowers and Wilkins Nautilus was part of the inspiration for the tapered internally folded transmission line.
-I'll look at some different drivers. I listen to music with a lot of bass, so I was prioritizing bass at the expense of smoothness at the cross over point. I'm just scrolling through parts express, so any ideas for replacements would be taken into consideration.
-The tweeter is next to the mid-range because the doesn't fit above the mid-range in the printable area
-The recess is a poorly designed place-holder, while I figure out how to use Hornresp or similar modeling software. I'm willing to sacrifice some horizontal dispersion because that is suitable based on the listening area.
Based on your feedback and progression of the design:
-Remove the recess. It's interfering with the internal structure and I don't have the capability to design it properly yet
-Check into replacing the mid-driver
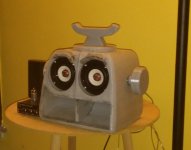
I've attached a pic of my unfinished first attempt at 3D printing a speaker enclosure. It's more an art project than an audiophile project. I'm waiting for the weather to warm up so I can prime it and paint it. It's two Tang Band w3-1878 3 inch drivers. The internal structure is just some rear loaded horn dimensions I found on google. It's not perfect, but it's significantly better than listening to music on my cell-phone, so I'm happy with the results. It's how I got started going down this DIY home audio rabbit hole.
-I'll look at some different drivers. I listen to music with a lot of bass, so I was prioritizing bass at the expense of smoothness at the cross over point. I'm just scrolling through parts express, so any ideas for replacements would be taken into consideration.
-The tweeter is next to the mid-range because the doesn't fit above the mid-range in the printable area
-The recess is a poorly designed place-holder, while I figure out how to use Hornresp or similar modeling software. I'm willing to sacrifice some horizontal dispersion because that is suitable based on the listening area.
Based on your feedback and progression of the design:
-Remove the recess. It's interfering with the internal structure and I don't have the capability to design it properly yet
-Check into replacing the mid-driver
I've attached a pic of my unfinished first attempt at 3D printing a speaker enclosure. It's more an art project than an audiophile project. I'm waiting for the weather to warm up so I can prime it and paint it. It's two Tang Band w3-1878 3 inch drivers. The internal structure is just some rear loaded horn dimensions I found on google. It's not perfect, but it's significantly better than listening to music on my cell-phone, so I'm happy with the results. It's how I got started going down this DIY home audio rabbit hole.
Attachments
The intention is to experiment, figure out why it doesn't work the way I expected and try to continuously improve.
It's not perfect, but it's significantly better than listening to music on my cell-phone, so I'm happy with the results. It's how I got started going down this DIY home audio rabbit hole.
You could literally experiment for the rest of your life and never figure out why it doesn't work the way you expected by guessing. 😕
Designing and building a speaker is a complicated engineering task that spans many disciplines, requiring knowledge of electrical and mechanical properties, acoustic radiation properties related to source size, room interaction with the speaker(s), wavelength vs. frequency, psycho-acoustics including head related transfer function, hearing disorders, Robinson-Dadson contours, etc. 😱
It is a steep learning curve, but if you are passionate about learning, the best advice I can give is to get yourself a membership to the Audio Engineering Society. A membership allows you to download as many papers as you want from industry leaders in the audio field for a full year for a flat fee.
Non-members would pay $ 33 per paper, so it is a significant deal to get a membership.
Update:
So I've been back to the drawing board.
-Downloaded HornResp and started working through some online tutorials
-I've read a lot more forum entries here. And read more articles/papers about speaker design.
Revised plan:
-Create baseline CAD model featuring only the bass/mid-bass speaker
-Use CAD model to generate dimensions for modeling in HornResp and/or similar software. Trying a few different speakers.
-Tweak model to optimize response
-Update model to include space for tweeter (Assuming Silk dome, but depends on results of the model)
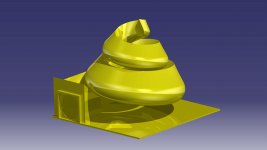
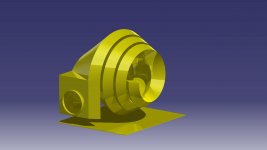
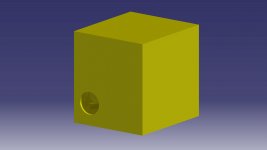
2 Initial Design concepts so far. One is an internal teardrop shaped chamber. The other is an internal rectangular shaped chamber. Both have a linear taper to approx. 1/10th the initial cross section
Both start with a cross section slightly larger than the surface area of a 2"inch speaker. The Teardrop shape is 48" LG for this concept. The rectangular shape is 62" LG for this concept.
1 Pic of the Exterior and One of the internal Volume to see what's happening on the inside
So I've been back to the drawing board.
-Downloaded HornResp and started working through some online tutorials
-I've read a lot more forum entries here. And read more articles/papers about speaker design.
Revised plan:
-Create baseline CAD model featuring only the bass/mid-bass speaker
-Use CAD model to generate dimensions for modeling in HornResp and/or similar software. Trying a few different speakers.
-Tweak model to optimize response
-Update model to include space for tweeter (Assuming Silk dome, but depends on results of the model)
2 Initial Design concepts so far. One is an internal teardrop shaped chamber. The other is an internal rectangular shaped chamber. Both have a linear taper to approx. 1/10th the initial cross section
Both start with a cross section slightly larger than the surface area of a 2"inch speaker. The Teardrop shape is 48" LG for this concept. The rectangular shape is 62" LG for this concept.
1 Pic of the Exterior and One of the internal Volume to see what's happening on the inside