Hello guys,
it's been a while now, but I finished the speakers! After reading all of your suggestions and studing the links you gave me in this thread, I decided to build active 3-way closed speakers.
The Dimension is 620x352x345 mm.
I used these speakers:
As amplifiers, I have chosen two Sure Electronics JAB5 (4x100W), for each speaker 2 channels linked together for the woofer and 1 channel for each midrange and tweeter.
The amplifiers are powered by a MEAN WELL GST360B36-C6P 36VDC 10A 360W.
The name Fast³ stands for 3-way and the usage of F.A.S.T. (Fullrange and Subwoofer Technologie). As far as I know, the usual way to build fast speakers is a 2-way system with fullrange and woofer. But I thaugt, that it might work for 3-way, too.
So I have simulated the Lavoce WAF 123.01 in vituixCAD by using a Linkwitz Transform (further informations are available here @miniDSP or here @Linkwitz) and found out, that it will work, there are some big reserves in excursion.


So I started with mechanical design on Fusion 360...
I asked the 3 manufacturers for 3D CAD drawings for the speakers, which was not a problem for at least Lavoce and B&C, only Monacor (old fashioned germans 😆) was not able to provide the drawing (the answer was - we don't have 3D CAD drawings). So for the Monacor, I just designed a dummy by myself.

Here is a CAD view of a loudspeaker. I've decided on a design where I miter cut the base, top and sides, leaving the back and front offset in the frame construction by an offset in material thickness. There is a compartment for the electronics on the back so that I can avoid any problems with sealing.

The speaker cables are passed through the cabinets via plugs like these:

The midrange driver has an extra cabinet with approx. 5 l, the volume for the woofer results from the design and is approx. 41 l, which is also the value I got from the simulation.
woofer volume:

Here some pictures of the woodwork:


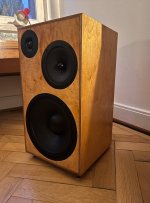
Glued together, a speaker looks like this, I colored the wood with teak stain:

unfortunatelly, I did a little error while gluing, you can see that on the right uncolored speaker, I had some small gaps (still sealed, but visible) I had to close. So I used liquid wood. After sanding and staining, I used the trick my daughter had hinted at. Dad, use a felt-tip pen! Said and done, experimented a little and then boldly colored the fine liquid wood joint with the empirically determined color. After oiling, you can't see anything or you have to get very close.


I have housed all the electronics in an extra compartment in the right-hand speaker. The compartment is ventilated and is closed with an aluminum cover.

Here you can see the two JAB5s. The left amplifier in the picture is the master of disaster. The attentive reader will notice that there are no fans installed, because the active ones are really loud. I have calculated the necessary cooling capacity and installed appropriate heat exchangers for passive operation. I read on the Wondom or Dayton Audio website that you can unplug the coolers without anything happening (apart from visual, auditory and olfactory signaling)
I have to say that these coolers are a compromise, as my desired coolers are not available anywhere. Fischer wants 125€ + transportation + VAT because of minimum order value I would have liked 2 KSK1 coolers. So far it works well, I never measure more than 60°C on the heat sink.
The left speaker is reached via a Cordial 825. The cable is connected via Neutrik SpeakOn connectors, which are probably completely overengineered, but stable.
Next I had to mill the aluminium cover, where I have to admit, I have had some trouble:

I had never milled aluminum before, know that my wood router is not as rigid as one made of metal and thought to myself, hey, go with little depth, decent speed and not quite as fast. With my Makita, that was 34,000 rpm, 0.5 mm depth adjustment and 1000 mm/min feed rate. I don't have any cooling.
The result was that the first depth cut was clean, the second was a disaster. As a joke, I described my result to ChatGPT and gave them my milling parameters and got the answer: depth cut to 1 mm, speed to 12,000 rpm, feed rate to 850. I thought to myself, ok, the workpiece is no longer usable anyway, so I defined a negative allowance of 0.5 mm in Fusion and ran the new G-code through the milling machine with the following result:

Completelly assembled look:


The speakers are about 90% filled, I used Visaton mats as filling material. First I covered all the walls from the inside with cut-to-size mats and then, in the second step, filled the cavities with cut-to-size pieces so that the insulating material was distributed fairly evenly. I sealed the cable feed-throughs (single wires, barely drilled) with a few drops of glue.
Then I'll move on to Sigma Studio next.
it's been a while now, but I finished the speakers! After reading all of your suggestions and studing the links you gave me in this thread, I decided to build active 3-way closed speakers.
The Dimension is 620x352x345 mm.
I used these speakers:
- Monacor DT-300
- B&C 6PEV13
- Lavoce WAF123.01
As amplifiers, I have chosen two Sure Electronics JAB5 (4x100W), for each speaker 2 channels linked together for the woofer and 1 channel for each midrange and tweeter.
The amplifiers are powered by a MEAN WELL GST360B36-C6P 36VDC 10A 360W.
The name Fast³ stands for 3-way and the usage of F.A.S.T. (Fullrange and Subwoofer Technologie). As far as I know, the usual way to build fast speakers is a 2-way system with fullrange and woofer. But I thaugt, that it might work for 3-way, too.
So I have simulated the Lavoce WAF 123.01 in vituixCAD by using a Linkwitz Transform (further informations are available here @miniDSP or here @Linkwitz) and found out, that it will work, there are some big reserves in excursion.
So I started with mechanical design on Fusion 360...
I asked the 3 manufacturers for 3D CAD drawings for the speakers, which was not a problem for at least Lavoce and B&C, only Monacor (old fashioned germans 😆) was not able to provide the drawing (the answer was - we don't have 3D CAD drawings). So for the Monacor, I just designed a dummy by myself.
Here is a CAD view of a loudspeaker. I've decided on a design where I miter cut the base, top and sides, leaving the back and front offset in the frame construction by an offset in material thickness. There is a compartment for the electronics on the back so that I can avoid any problems with sealing.
The speaker cables are passed through the cabinets via plugs like these:
The midrange driver has an extra cabinet with approx. 5 l, the volume for the woofer results from the design and is approx. 41 l, which is also the value I got from the simulation.
woofer volume:
Here some pictures of the woodwork:
Glued together, a speaker looks like this, I colored the wood with teak stain:
unfortunatelly, I did a little error while gluing, you can see that on the right uncolored speaker, I had some small gaps (still sealed, but visible) I had to close. So I used liquid wood. After sanding and staining, I used the trick my daughter had hinted at. Dad, use a felt-tip pen! Said and done, experimented a little and then boldly colored the fine liquid wood joint with the empirically determined color. After oiling, you can't see anything or you have to get very close.
I have housed all the electronics in an extra compartment in the right-hand speaker. The compartment is ventilated and is closed with an aluminum cover.
Here you can see the two JAB5s. The left amplifier in the picture is the master of disaster. The attentive reader will notice that there are no fans installed, because the active ones are really loud. I have calculated the necessary cooling capacity and installed appropriate heat exchangers for passive operation. I read on the Wondom or Dayton Audio website that you can unplug the coolers without anything happening (apart from visual, auditory and olfactory signaling)
I have to say that these coolers are a compromise, as my desired coolers are not available anywhere. Fischer wants 125€ + transportation + VAT because of minimum order value I would have liked 2 KSK1 coolers. So far it works well, I never measure more than 60°C on the heat sink.
The left speaker is reached via a Cordial 825. The cable is connected via Neutrik SpeakOn connectors, which are probably completely overengineered, but stable.
Next I had to mill the aluminium cover, where I have to admit, I have had some trouble:
I had never milled aluminum before, know that my wood router is not as rigid as one made of metal and thought to myself, hey, go with little depth, decent speed and not quite as fast. With my Makita, that was 34,000 rpm, 0.5 mm depth adjustment and 1000 mm/min feed rate. I don't have any cooling.
The result was that the first depth cut was clean, the second was a disaster. As a joke, I described my result to ChatGPT and gave them my milling parameters and got the answer: depth cut to 1 mm, speed to 12,000 rpm, feed rate to 850. I thought to myself, ok, the workpiece is no longer usable anyway, so I defined a negative allowance of 0.5 mm in Fusion and ran the new G-code through the milling machine with the following result:
Completelly assembled look:
The speakers are about 90% filled, I used Visaton mats as filling material. First I covered all the walls from the inside with cut-to-size mats and then, in the second step, filled the cavities with cut-to-size pieces so that the insulating material was distributed fairly evenly. I sealed the cable feed-throughs (single wires, barely drilled) with a few drops of glue.
Then I'll move on to Sigma Studio next.
Attachments

For Sigma Studio:
I found some demo programs for the Dayton KABD-4100 (Here)
I had to adapt them a little to my needs so that they basically work, but I didn't have to change anything in the hardware configuration. The configuration as master for the slave is also correct.
Master (right LS):

Slave Left:

I separated the drivers at approx. 800 and 3500 Hz. The Linkwitz Transform is not so easy to do with Sigma, there is no special block for it. However, you can use an IIR filter in the parametric EQ and enter the values there that you have calculated using a calculation folder for the MiniDSP (!!). You can read the details here:
https://www.minidsp.com/applications/advanced-tools/linkwitz-transform
https://ez.analog.co...--linkwits-transform
In the first step, I programmed the other filters in the EQ as simulated in Vituix-CAD. Sure, only for the rough, fine tuning still has to be done.
Here you can see a first measurement:

After some smoothing and tuning:


They sound great imho, what can I provide you (measurements) for your evaluation?
I'm eger to hear your opinions!
Cheers, Frederik
I found some demo programs for the Dayton KABD-4100 (Here)
I had to adapt them a little to my needs so that they basically work, but I didn't have to change anything in the hardware configuration. The configuration as master for the slave is also correct.
Master (right LS):
Slave Left:
I separated the drivers at approx. 800 and 3500 Hz. The Linkwitz Transform is not so easy to do with Sigma, there is no special block for it. However, you can use an IIR filter in the parametric EQ and enter the values there that you have calculated using a calculation folder for the MiniDSP (!!). You can read the details here:
https://www.minidsp.com/applications/advanced-tools/linkwitz-transform
https://ez.analog.co...--linkwits-transform
In the first step, I programmed the other filters in the EQ as simulated in Vituix-CAD. Sure, only for the rough, fine tuning still has to be done.
Here you can see a first measurement:
After some smoothing and tuning:
They sound great imho, what can I provide you (measurements) for your evaluation?
I'm eger to hear your opinions!
Cheers, Frederik
Very nice speakers!
Impressive!with the following result:
Looks very good - but could you reduce the y-axis scale to 50-100 dB?After some smoothing and tuning:
Off axis response would be interesting to see the effect of non-vertically aligned mid+tweeter!what can I provide you (measurements) for your evaluation?
et voilà:Looks very good - but could you reduce the y-axis scale to 50-100 dB?
off axis:
I thought Germans learned 'feeds and speeds' in kindergarten? 😉 All kidding aside, this is a very well done project! Nice work!I had never milled aluminum before, know that my wood router is not as rigid as one made of metal and thought to myself, hey, go with little depth, decent speed and not quite as fast. With my Makita, that was 34,000 rpm, 0.5 mm depth adjustment and 1000 mm/min feed rate. I don't have any cooling.
The result was that the first depth cut was clean, the second was a disaster. As a joke, I described my result to ChatGPT and gave them my milling parameters and got the answer: depth cut to 1 mm, speed to 12,000 rpm, feed rate to 850.
That's an interesting application of the LT filter. Your maximum boost is around 15dB at 30Hz! As the driver is about 4–5dB more sensitive than many other 12-inch woofers, its input power requirements are commensurately less. The JAB5 amplifier is rated at 100W into 6Ω, so with that LT filter in place, you'll need to keep an eye on the magnitude of the input signal. The maximum voltage swing accomodated by the JAB5 is around 24Vrms.
- Home
- Loudspeakers
- Multi-Way
- 3 way sealed active speaker - I called it Fast³