Hi everyone,
This project turned out to be quick, straightforward, and with a great outcome—so I figured it was worth sharing.
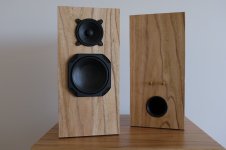
These desktop speakers deliver a clean, confident sound. They handle plenty of power, are solidly built, and easy to put together. The goal was to upgrade the speakers I use with my PC (driven by a TPA3116 amp) for listening to music, voice, and video—so clarity was key. That said, with a bit of EQ, they’re also more than capable of livening up a party.
I went with Faital drivers, partly because they’re readily available here in Buenos Aires, but also because they come with reliable and comprehensive specs.
I kept the crossover design simple—a first-order Butterworth filter set at 1kHz—and it did the trick. Of course, you can always tweak the resistor values if you want to shape the top end a bit more.


This project turned out to be quick, straightforward, and with a great outcome—so I figured it was worth sharing.
These desktop speakers deliver a clean, confident sound. They handle plenty of power, are solidly built, and easy to put together. The goal was to upgrade the speakers I use with my PC (driven by a TPA3116 amp) for listening to music, voice, and video—so clarity was key. That said, with a bit of EQ, they’re also more than capable of livening up a party.
I went with Faital drivers, partly because they’re readily available here in Buenos Aires, but also because they come with reliable and comprehensive specs.
I kept the crossover design simple—a first-order Butterworth filter set at 1kHz—and it did the trick. Of course, you can always tweak the resistor values if you want to shape the top end a bit more.

Here are the specs:
Power: 80W RMS
FR: 80hz to 16khz (metered)
Sensitivity: 88db (1W/1m)
Size: 380x170x180 mm (8.5l of effective internal volume)
Weight: 4kg each
Sorry I have few photos, but as I said the design and building was fast and trouble free.
material

Power: 80W RMS
FR: 80hz to 16khz (metered)
Sensitivity: 88db (1W/1m)
Size: 380x170x180 mm (8.5l of effective internal volume)
Weight: 4kg each
Sorry I have few photos, but as I said the design and building was fast and trouble free.
material
This is the list of materials
Tweeter 3FE22, 8 ohm
https://faitalpro.com/es/products/LF_Loudspeakers/product_details/index.php?id=401000100
Woofer 5FE100, 8 ohm
https://faitalpro.com/es/products/LF_Loudspeakers/product_details/index.php?id=401010100
Vent port 47x136mm
Capacitor 20uf 100v (x2)
Inductance 1.8mHy (x2)
Resistors 8ohm 10w (x2); 16ohm 10W (x2) NOTE this is for 30w max.
9mm MDF 380x180mm (x4); 180x152mm (x4); 362x152mm (x4)
20mm cotton fiber 0.6x0.3m (x2)
Veneer 2.6x0.3m (x2)
Contact cement 500g
Bulk material
The boxes
This time most of the materials that I used were the ones I have or were available in Buenos Aires, and I made all the calculations in order to be able to use then.
After some iterations, using the specs of the woofer, I arrived to 8.5l boxes. For the construction I got precut 9mm MDF (12 pannel), and then I glue then with vinyl glue (the white one). Then I did the cuts for the speakers in the front and the port and connectors in the back.
The only issue was with the hole for the woofer that I had to do with a jigsaw, instead of a cup cutter. The result was functional but not neat.
The idea of placing the connectors directly over the MDF is simple, but in other projects I used a round terminal cup. I recommend this last one method.
The port tube is from Part Express and if flared, I think that in this application a PVC tube will also work.
After testing, I disassembly everything and proceeded to cover the MDF with veneer. I used Paraiso wood. There are 2 methods to do so, one using white vinyl glue (it takes longer but should be better), and one using contact cement. Due to the small size I prefer the second method.
Then I covered the veneer with 3 coats of acrylic transparent paint y cut the holes.
In the future I will add a front screen, and to do so I let magnets under the veneer.
Nice to see more WAWs.
The 3FExx is a good midTweeter, benefits from a coat of thinned puzzlekoat/modPodge.
Where is the XO?
Looks like little or no bracing, 9mm MDF could well be acting like passive radiators.
dave
The 3FExx is a good midTweeter, benefits from a coat of thinned puzzlekoat/modPodge.
Where is the XO?
Looks like little or no bracing, 9mm MDF could well be acting like passive radiators.
dave
Hi, the crossover parts were fixed to a piece of MDF, and this piece screwed to the bottom.
About using 9mm instead of 13mm I think for the use they have (over a desk at 1m from me) 13mm will be overkill. In fact, most commercial speakers use less dense material than MDF and less and cheaper acoustic insulation inside.
Anyway, I wonder how to check if the box is acting like passive radiators?
Use a mechanics stethescope and listen to the box while playing music.
dave
dave
The Crossover and Testing
For the crossover design, I used XSim4 for the calculations, along with Audio Tools software and a Dayton Audio iMM-6 calibrated measurement mic for testing.
I kept things straightforward with a first-order Butterworth filter set at 1kHz. Of course, you can tweak the resistor values if you want to adjust the high-end response—either to bring it up or tone it down.
Everything was mounted on an MDF board, which I screwed to the bottom of the enclosure, right beneath the port tube.
In theory and according to the metering the tweeter should be lowered 3db, but in reality I found it better the way it is now. Lows sound bold and highs are not strident at all, plus voices that are very clear, so no further changes are needed for me.
One challenge I faced was the room itself—it’s pretty empty and sounds terrible acoustically, so I didn’t see much point in over-refining the tuning. Still, the materials I had on hand performed well enough.
The impedance plot could reveal this. If there are signs of a second peak at low frequencies that would indicate a resonator.how to check if the box is acting like passive radiators?
Hi, thanks for the advice. I used it.Use a mechanics stethescope and listen to the box while playing music.
dave
I can't hear music when it is touching the sides, at least at the volume I can play in my appartment.
Anyway to use bracing is easy and unexpensive, so IMO it is a worthy improvement, even for a speed construction and low power use.
Here is the schematic for the crossover.
The theoretical curves are very close to the metered ones.


The theoretical curves are very close to the metered ones.
Final Assembly
To start, I protected the tweeter from protect the tweeter from being blown by the woofer by covering it with a yogurt cup, simple but effective. Then I mounted the crossover at the bottom of the box and sealed the port tube in place with silicone.
I added acoustic damping material to the back and side panels, then soldered and connected everything, making sure to double-check the polarities. Once that was done, I installed and screwed in the drivers.
The end result turned out really well—and considering the time and budget I put into it, I’m more than satisfied.
The total cost came to around USD 250, and it’s hard to find something this good, brand new, for that kind of money around here.
Final Assembly
To start, I protected the tweeter from protect the tweeter from being blown by the woofer by covering it with a yogurt cup, simple but effective. Then I mounted the crossover at the bottom of the box and sealed the port tube in place with silicone.
I added acoustic damping material to the back and side panels, then soldered and connected everything, making sure to double-check the polarities. Once that was done, I installed and screwed in the drivers.
The end result turned out really well—and considering the time and budget I put into it, I’m more than satisfied.
The total cost came to around USD 250, and it’s hard to find something this good, brand new, for that kind of money around here.
Attachments
Final Words (Almost)
All in all, the results came together quickly and turned out great. That’s one of the big advantages of a simple two-way setup with a basic crossover, especially when combined with pro-grade drivers with reliable specs.
One note, these speakers were designed to be easy to build and to watch videos in Youtube, to be used in a video conference and to play background music when working. They do all this effortless and IMO much better than some commercial products that pretend to deliver instead of delivering. They aren’t “hi-fi”, meaning you won’t get super deep bass or ultra-crisp highs, but you get very clear voices and with EQ some fun also. That said, in my case, the real limitation isn’t the source, the amp, or even the speakers, it’s the room.
- Home
- Loudspeakers
- Multi-Way
- 2 ways desktop speakers (easy and powerful)