Several times I have seen Scott and others recommend certain optional improvements or tweaks for speaker enclosures, one of which applies most commonly to back horns with shallow driver chambers. The idea is to move the rear surface of the driver chamber backwards (making the chamber deeper) but then displace the extra volume with many blocks of various lengths of wood, randomly, so that the rear chamber wall becomes “bumpy” but the chamber volume remains the same as the specified chamber volume.
For the life of me I cannot recall what this is commonly referred to as, and I am therefore having difficulty finding the method to accomplish this accurately. I would obviously begin by calculating the volume of the standard driver chamber (as designed). Easy enough. What is the simplest method to achieve the desired result?
For the life of me I cannot recall what this is commonly referred to as, and I am therefore having difficulty finding the method to accomplish this accurately. I would obviously begin by calculating the volume of the standard driver chamber (as designed). Easy enough. What is the simplest method to achieve the desired result?
The technique could be referred to as diffusion. The desired effect may be different in a box, to for example used in a room.

Thank you! Rear driver chamber diffuser.
My first thought is; the material is 15mm thick, so if I move the rear chamber wall back 15mm and then cut an identical piece of 15mm material of the same dimensions and then cut that extra piece into random sized blocks and glue them in place, then I will (fairly) precisely be displacing the extra volume created by moving the rear wall back 15mm.
“Fairly” because I will lose some volume as saw dust. Is there a better way?
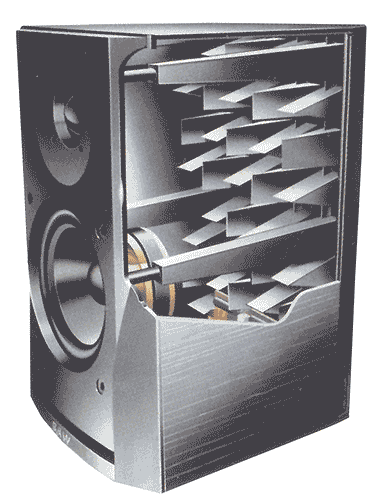
The driver chamber is less than three inches deep, so the goal is to reduce the likelihood of rear wall reflections coming back through the driver cone and colouring the sound. Standard 1/2” cotton/wool felt damping will also be used on 5 chamber walls (including the rear).
No cabinet stuffing is called for in the design. Perhaps it would be helpful to know what I am building… http://wodendesign.com/maeshowe.html
Yes, happy to hear all opinions and ideas on this. Taking my time with this build, so no rush. In fact the next few days are going to be hectic with New Years visitors, so this is really just brainstorming and planning.
Gluing will begin in the new year, so I’d like to have a solid plan by then.
Gluing will begin in the new year, so I’d like to have a solid plan by then.
Right, it's basically one way of creating an internal diffuser & it can work quite well for some enclosures. I'm qualifying that with 'some' 😉 because it does vary with the design objects -in certain cases, you can be relying on compression effects where the chamber geometry plays a role -Ron's Austins, and some (not all) of my Woden enclosures are cases in point. Maeshowe does actually use some damping, although the default is quite minimal -per the pdf, 5 faces of the driver chamber (basically, every surface other than the internal front baffle) are lagged ensuring the throats aren't blocked. You can add another layer around the fold between manifolds 1 & 2 & if a high output impedance amplifier is used, another either around the fold between manifolds 2 & 3, or directly above the angled strike plates & adjust from there depending on room & system characteristics.
Thank you @Scottmoose ! I did/do plan on lining 5 sides of the chamber as it says in the PDF. Are you saying that moving the rear wall of the chamber back and creating an irregular surface isn’t worth the effort? Your note in the Megalith “teaser” PDF is what got me thinking about this.
Thanks for the tips on damping options in the folds!
Thanks for the tips on damping options in the folds!
It has been hypothesised that diffusion may randomise the power to create a condition of entropy through cancellation.. I don't tend to see that as easy to achieve.
A cabinet is a non-minimum phase environment in the modal region. Take diffusion in a room. It's not expected to remove reflections as much as randomise their direction, reducing their discrete nature.
Take the wedge shaped devices in an anechoic chamber. Their goal is to absorb, not to diffuse.
A cabinet is a non-minimum phase environment in the modal region. Take diffusion in a room. It's not expected to remove reflections as much as randomise their direction, reducing their discrete nature.
Take the wedge shaped devices in an anechoic chamber. Their goal is to absorb, not to diffuse.
Absorption is Absorption
Diffusion is diffusion
To reduce or eliminate reflections you want absorption.
Normal lining or absorption used in any speaker.
As mentioned the distances you have for diffusion blocks
are only effective at high frequency.
Ironically basic thin absorption material is more effective
for high frequency. Not much energy, so easy to get rid of.
Sound pressure travels through the hair structure of poly
or cave like structure of open cell foam. Creates friction.
Pressure converted to heat.
This is what cogi is referring too i believe: https://www.diyaudio.com/community/...-cavity-pre-chamber-to-the-next-level.195469/
The idea is to create signicant differences in the distance to the back wall, so that the returning reflection is spread out. Then you damp.
My first encounter with the idea:
Found this thread whike searching,it might be relevant: https://www.diyaudio.com/community/threads/loudspeaker-chaos-theory-inside-diffuser.418563/
If this was monted n a wall it would be called a diffusor.
dave
Last edited:
You can -it's worth a few percentage points, mainly in slightly reducing the amount of damping needed on that surface, although the outright quantity change isn't vast in these enclosures (you get a more significant change in larger examples). It also reduces the size of the small void to the rear that needs filling, and further stiffens the enclosure, neither of which are major differences, but don't do any harm either.Thank you @Scottmoose ! I did/do plan on lining 5 sides of the chamber as it says in the PDF. Are you saying that moving the rear wall of the chamber back and creating an irregular surface isn’t worth the effort? Your note in the Megalith “teaser” PDF is what got me thinking about this.
Thanks for the tips on damping options in the folds!
Thanks to all who have contributed to this thread! I am now armed with enough information to proceed. Perhaps I’ll take some pics and post a build thread later.
take some pics and post a build thread
Please do ;^)
Note: if anyone reading this is optical, i have a set of Maeshowe (in cherry veneer) here for giveaway. They have the bumpy air cavity i did.
dave
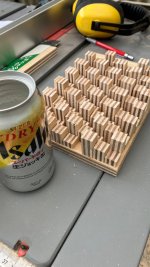
I had a chance to work on this aspect of the build today, but at this point I am starting to think I might abandon this particular tweak. Getting this all glued together in a way that is relatively simple, quick, and effective seems nearly impossible. Wood glue takes a long time to dry and should be clamped for best results. Each piece needs to be glued to the base board plus any adjacent pieces to eliminate vibrations/rattling. It seems like if it is not done perfectly, it will do more harm than good. To do it perfectly with wood glue, it might take weeks. There are 120 pieces (per speaker).
Some sort of instant (or nearly instant) glue would change this situation quite a lot, but I don’t want to risk having pieces falling off and/or vibrating inside the driver chamber.
Some sort of instant (or nearly instant) glue would change this situation quite a lot, but I don’t want to risk having pieces falling off and/or vibrating inside the driver chamber.
Attachments
Last edited:

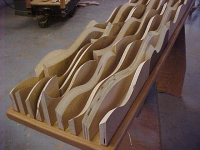
One alternate way Terry Cain used to make his own diffusers (similar, just on a much larger scale) was to cut some strips of stock, then run them, with a random, wavy line through a bandsaw with the table tilted so you got some random angles there too. Like so:
Attachments
- Home
- Loudspeakers
- Full Range
- “Bumpy” or Variable Depth Driver Chamber - Method?