Good day!
I'm here to share with you guys my latest project: A DIY NdFeB-based Subwoofer with 3D printed basket in a 6th order parallel-tuned bad pass box for my first home theater!
I'm from Brazil and my English grammar skills are not great, so be patient.
This project was made from scratch, starting with the mathematical modelling of the magnetic circuit. After the validation of the set of equations that relate the magnetic flux density in the gap and the magnetic circuit geometry, I wrote an optimization routine in Mathcad that gave me as a result all the construction parameters for the magnetic circuit, including coil diameter, wire (AWG), number of turns, number of layers, gap height, etc. as a function of the input parameters. Those parameters was the subwoofer Xmax, defined as 25mm (in one direction), coil DC resistance, etc.
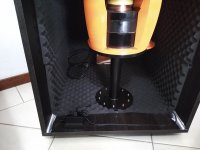
The next step was to design the subwoofer itself. I used Autodesk Fusion (like Solid Works). After the mechanical design, I 3D printed the basket in a Creality Ender 3 Max, capable of printing 30x30x40cm. The magnetic circuit was made using 1020 low carbon steel, with a Zinc galvanization.
To build the coil, I started building a winder machine using a bicycle hub and my 3D printer. I made the coil using a 3D printed mold, a 0.2mm Kepton sheet and a high temperature epoxy resin.
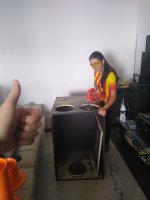
After that, I started putting all the rest of the pieces together (dual damper system, coil, cone...).
With the subwoofer completed, I used a simple resistor-based circuit in my SPEAKER OUT and LINE IN jack of my PC sound card to obtain the Thielle-Small parameters using REW (Room EQ Wizard). This works like the DATS device from Dayton Audio, but much much cheaper.
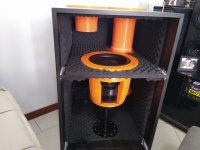
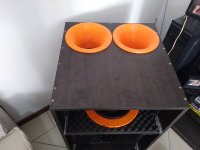
With the subwoofer parameters, I designed a 6th order parallel-tuned band pass, from 20Hz to 100Hz using Bass Box software.
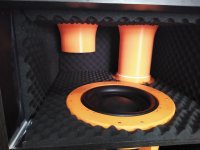
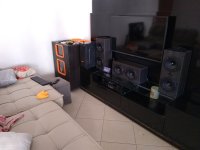
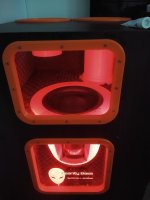
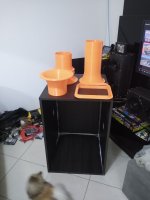
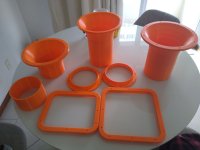
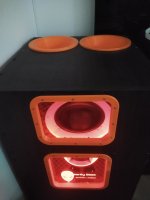
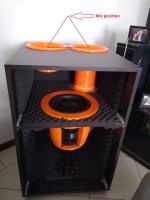
Well, some of the construction photos and the final result are shown. I also 3D printed custom ports and frames for the acrylic windows.
This is just the subwoofer, I build also 5 other speaker boxes for my 5.1 system, but this is subject for another post.
I hope you like, and if you want to see more of my projects, or more photos and videos of this particular project, follow me on instagram: @insanity_bass
If someone have any questions, I will be happy to answer.
Thank you.
I'm here to share with you guys my latest project: A DIY NdFeB-based Subwoofer with 3D printed basket in a 6th order parallel-tuned bad pass box for my first home theater!
I'm from Brazil and my English grammar skills are not great, so be patient.
This project was made from scratch, starting with the mathematical modelling of the magnetic circuit. After the validation of the set of equations that relate the magnetic flux density in the gap and the magnetic circuit geometry, I wrote an optimization routine in Mathcad that gave me as a result all the construction parameters for the magnetic circuit, including coil diameter, wire (AWG), number of turns, number of layers, gap height, etc. as a function of the input parameters. Those parameters was the subwoofer Xmax, defined as 25mm (in one direction), coil DC resistance, etc.
The next step was to design the subwoofer itself. I used Autodesk Fusion (like Solid Works). After the mechanical design, I 3D printed the basket in a Creality Ender 3 Max, capable of printing 30x30x40cm. The magnetic circuit was made using 1020 low carbon steel, with a Zinc galvanization.
To build the coil, I started building a winder machine using a bicycle hub and my 3D printer. I made the coil using a 3D printed mold, a 0.2mm Kepton sheet and a high temperature epoxy resin.
After that, I started putting all the rest of the pieces together (dual damper system, coil, cone...).
With the subwoofer completed, I used a simple resistor-based circuit in my SPEAKER OUT and LINE IN jack of my PC sound card to obtain the Thielle-Small parameters using REW (Room EQ Wizard). This works like the DATS device from Dayton Audio, but much much cheaper.
With the subwoofer parameters, I designed a 6th order parallel-tuned band pass, from 20Hz to 100Hz using Bass Box software.
Well, some of the construction photos and the final result are shown. I also 3D printed custom ports and frames for the acrylic windows.
This is just the subwoofer, I build also 5 other speaker boxes for my 5.1 system, but this is subject for another post.
I hope you like, and if you want to see more of my projects, or more photos and videos of this particular project, follow me on instagram: @insanity_bass
If someone have any questions, I will be happy to answer.
Thank you.
Attachments
-
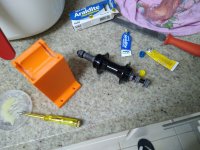 Foto 1.jpg470.9 KB · Views: 163
 -
 IMG_20230506_115936952.jpg272.5 KB · Views: 188
 -
 IMG_20230508_120602747.jpg297.2 KB · Views: 188
 -
 IMG_20230508_120621885.jpg313.4 KB · Views: 172
 -
 IMG_20230508_120631708.jpg216.3 KB · Views: 162
 -
 IMG_20230508_120637272.jpg249 KB · Views: 150
 -
 IMG_20230508_120647107.jpg313.6 KB · Views: 154
 -
 IMG_20230511_115051289.jpg307.3 KB · Views: 151
 -
 IMG_20230520_210721240.jpg159.4 KB · Views: 153
 -
 IMG_20230502_133740166.jpg234.6 KB · Views: 176
 -
 IMG_20230429_175036070.jpg244.5 KB · Views: 167
 -
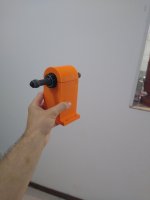 Foto 3.jpg212.8 KB · Views: 152
 -
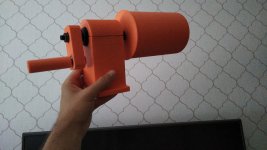 Foto 6.jpeg318.8 KB · Views: 147
 -
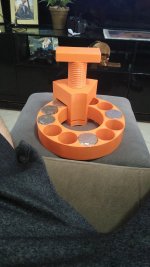 Foto 11.jpeg316.6 KB · Views: 150
 -
 Foto 12.jpg244 KB · Views: 138
 -
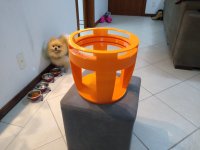 Foto 14.jpg292.7 KB · Views: 143
 -
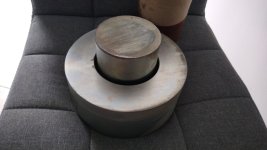 Foto 16.jpeg261 KB · Views: 144
 -
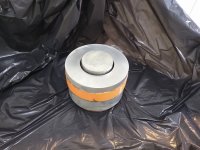 Foto 17.jpg372 KB · Views: 146
 -
 IMG_20221023_164102133.jpg236.1 KB · Views: 147
 -
 IMG_20230520_210752494.jpg151.7 KB · Views: 144

That is some amazing work.
Did you measure the performance of the built 6th order BP subwoofer, to see if it matched the predictions of the model?
Did you measure the performance of the built 6th order BP subwoofer, to see if it matched the predictions of the model?
Good day!Very impressive! How did you charge the magnet*, and where did you source the cone?
* edit: never mind.... I see you used neos pressed into the orange form in between the steel parts.
What are the T/S params, if you don't mind?
The cone was bought from a OEM Brazilian factory, but the dampers (spiders) I could only find in China, since it has to be very large to be (kind of) linear during all excursion (Xmax=+-25mm).
The subwoofer T/S parameters are:
fs 23.9 Hz
Qms 10.048
Qes 0.266
Qts 0.259
Fts 92.5
Mms 502.61 g
Cms 0.088 mm/N
Rms 7.522 kg/s
Vas 35.73 litres
Bl 24.729 Tm
Eta 0.18 %
Lp (1W/1m) 84.71 dB
Dd 26.10 cm
Sd 535.0 cm^2
Good day!That is some amazing work.
Did you measure the performance of the built 6th order BP subwoofer, to see if it matched the predictions of the model?
The only trustable measuring that I did was the system impedance, that was pretty close to the Bass Box.
I have a UMIK-1 from MiniDSP, but my living room are too small for a measurement even in near field, so the measurement (especially for low frequencies) are a total mess. Maybe someone here can give me some tip to overcome this issue...
One thing that I was very impressed was the performance of this subwoofer in very low frequencies (like 20Hz) compared to other subwoofers that I tested before. Since it can achieve very large excursions and the box itself is very large, I can feel the bass in my chest every time I put some test tones in the range of 20Hz~30Hz. I'm truly happy with the result.
Thank you!
That must be a REALLY small living room, LOL.my living room are too small for a measurement even in near field
"Near-field" measurement is done with the mic only a few mm from the DUT (i.e. the speaker's cone if it's a sealed alignment).
You could always try the transfer function approach, which basically involves using a "reference" design which could be a simple sealed subwoofer EQ'd to be flat over the passband of interest (usually 20 Hz to 200 Hz), measured nearfield. Measure it at the listening position, and use the nearfield measurement and the listening position measurement to derive the "transfer function". Then, put the replace the reference subwoofer with the one you want to measure, measure it at the listening position and use REW's measurement tools to remove the transfer function. The end result should be a measurement that's a pretty close match to the theoretical nearfield measurement of the device.
Good day!Measure it outside, in the street if necessary, on a quiet day to avoid traffic noise.
Congratulations,
Just curious, can you link the cone supplier you used?
Any current magnet supplier also?
I used to import SuperGauss magnets from Brazil but that was years ago .
The problem is that I live in a apartment, not a house, and the subwoofer and box weight are more to 100kg (since the subwoofer alone is 46kg and the sub steel support ate about 15kg), so going outside is not an option, unfortunately.
The cone was this one:
https://www.coimbracones.com.br/con...e-a-vacuo-susp-borracha-12-borda-larga-junkes
The magnets I bought in china, in AliExpress. The problem with this is that half of them are very good, measuring N38, but the other half was way weaker. To buy Neo from good suppliers living in Brazil is complicated... The import taxes here are about 93%, so they become very very expensive.
I know, I sold many Guitar speakers there to Boutique Guitar amp builders ("handmakers").
Slightly less complicated thanks to Mercosur trade agreement but even so, a paperwork mess.
No import tax for Argentines but there Is a swarm of minor taxes which quickly add up.
As of your speaker, I did not know it was such a monster 😱 but then measure it in your living room, after all you will use it there.
Does Koimãs still exist?
They used to offer ready made magnet systems and cast frames for custom speaker builders.
Though more focused into Car speakers market.
Good day!That must be a REALLY small living room, LOL.
"Near-field" measurement is done with the mic only a few mm from the DUT (i.e. the speaker's cone if it's a sealed alignment).
You could always try the transfer function approach, which basically involves using a "reference" design which could be a simple sealed subwoofer EQ'd to be flat over the passband of interest (usually 20 Hz to 200 Hz), measured nearfield. Measure it at the listening position, and use the nearfield measurement and the listening position measurement to derive the "transfer function". Then, put the replace the reference subwoofer with the one you want to measure, measure it at the listening position and use REW's measurement tools to remove the transfer function. The end result should be a measurement that's a pretty close match to the theoretical nearfield measurement of the device.
Sorry, what I was trying to say is that, for me (and correct me if I'm wrong) the right way to measure the 'near field' is putting the microphone in the position described in the picture, forming a equilateral triangle with the center of all ports, since putting very close to the mouth of just one of the ports are obviously the wrong way.
When I did that, the measurements vary too much with the box position, showing (I think) that the environment contribution to the overall response is very prominent.
The idea of using a reference box is really good! Maybe I'll try it someday.
Thank you.
Attachments
Good day!I know, I sold many Guitar speakers there to Boutique Guitar amp builders ("handmakers").
Slightly less complicated thanks to Mercosur trade agreement but even so, a paperwork mess.
No import tax for Argentines but there Is a swarm of minor taxes which quickly add up.
As of your speaker, I did not know it was such a monster 😱 but then measure it in your living room, after all you will use it there.
Does Koimãs still exist?
They used to offer ready made magnet systems and cast frames for custom speaker builders.
Though more focused into Car speakers market.
To be honest I bought 3 magnets from Koímãs about one year ago for a cone position feedback subwoofer project that I'm developing. It was my first time buying from them and I was totally disappointed! They promise me a Br=0.3T magnet, but when they came I notice right away that they was very weak. So I test them using my Gaussmeter and a paper from Mexican researchers that found a closed-form solution for Br and the measurement of on-axis magnetic flux density.
Using my measurements and this paper, I found that the Br was about 0.1T, 3 times less than expected. I then throw those magnets in the garbage.
The paper are attached, for anyone interested.
Attachments
Thanks.
Interesting findings.
I never bought magnetic systems from them, I make mine from scratch: punched and turned steel plate, turned steel bar, unmagnetized rings bought in bulk, etc. and have own magnetizers but in any case theirs "look" focused on the Car Audio market , meaning HUGE magnets, visually impressive... but poorly made to say it politely.
Mind you , I have successfully used Brazilian ferrite rings, SuperGauss brand,
https://supergauss.com.br/en/home-en/
excellent quality, but those are made by the Brazilian branch of US based Eriez Magnetics.
I consistently measured Br 3800-4000 Gauss in them.
Thanks again for that paper.
"Testing beats guessing 1000:1” 😉
- Home
- Loudspeakers
- Subwoofers
- Subwoofer with 3D printed basket for Home Theater