I’m always playing, I’m currently thinking about getting some styrofoam eggs of various sizes, wrapping them in glass, body filler-ing to get a nice smooth surface and then using acetone to dissolve the foam. Are jet engine shaped enclosures really all that much better than a basic cubic enclosure with well rounded edges? I tend to build in the bookshelf size category.


I have some experience with this from making extensive use of polystyrene as formers and cores in marine applications. The foam egg is your sacrificial former. There are two very workable options depending on whether you are attracted to a heavy type cab or lightweight type cab. Your idea for glass and bog is not really optimum and would need to be adjusted a bit. Let me know if you would like any pointers with this
Regards
Randy
Regards
Randy

I was able to produce a set of sail panel enclosures in my car with a basic glass fab method like I mentioned above but I’m all ears for better methods. High quality body filler sand’s smooth as heck and adds tremendous structure to the overall design.


At the moment I’m more interested in the objective benefits from very rounded speaker enclosures as opposed to a basic cube enclosure with rounded edges.
Even more so would all this roundness make a difference in my small living room with the speakers needing to be kind of in the corners?
Even more so would all this roundness make a difference in my small living room with the speakers needing to be kind of in the corners?
I see that you are in US. Make me slightly envious that you have ready access to materials that I have to make for things like your egg cab. I started out doing that same way as you until I got into boat building. Then I learnt more repeatable, easier for me to implement solutions
Are you aiming for a tin walled lightweight cab or a dense and heavy one?
Are you aiming for a tin walled lightweight cab or a dense and heavy one?
The weight isn’t really a factor other than I generally think it’s better for a bass producing loudspeaker to have a good bit of mass to it.
Ah, I am only just learning audio modelling too. Sorry, won't be able to offer any help there. There are a lot of good folks on this forum who know this stuff though. Give me a yell when you get to the constructions stages. This is the "flying esky". I used the foam as a former to make this car topper row boatAt the moment I’m more interested in the objective benefits from very rounded speaker enclosures as opposed to a basic cube enclosure with rounded edges.
Even more so would all this roundness make a difference in my small living room with the speakers needing to be kind of in the corners?
It’s all about diffraction, but it’s not clear to me how much of it is wives tales and how much is objectively shown to effect the listener’s experience. While these exotic loudspeakers are impressive looking, are they really beneficial to the point of being worth the effort/cost.
They definitely measure ALOT better. Olson's ancient study showed us that. So much so, one could be forgiven for thinking it's like a different driver.
If no-one has posted some polar measurements, I will post some 360 degrees polars after this weekend.
A driver a rectangular cabinet, then same driver in a spherical cabinet ie. same drivers, different cabinets.
Now whether you think it's worth the effort or not depends on your time/skills/passion/desire. No one can answer that part.
In the meantime, @randy, Please tell us your fast-curved-enclosure build technique.
Last edited by a moderator:
Lol, there is nothing "fast" about it, especially for us in Australia. The market isn't big enough for shops to keep funky bits and things and you and I would have to make some of the things with the method I would pick over different methods
I am heading out to have lunch with my wife. Leftovers from yesterdays 11th anniversary celebrations. I'll do a little rundown when I get back
Regards
Randy
I am heading out to have lunch with my wife. Leftovers from yesterdays 11th anniversary celebrations. I'll do a little rundown when I get back
Regards
Randy
Well, you want enough mass to keep it from moving around if not otherwise retained, but you want stiffness to get its resonance above its intended passband. Adding enough mass to push it below its passband means seriously heavy by most folk's standards.The weight isn’t really a factor other than I generally think it’s better for a bass producing loudspeaker to have a good bit of mass to it.
As GM said, stiffness should get attention. I would add to that, stiffness alone isn't strength, and that dampening has an effect. Please read the following in the spirit of what has worked for me, rather than me on the soap box
I build 'to' a strength 'at' a stiffness level. This excludes auto bog techniques which really is a filler and all the glass used are for creating a working surface conforming to compound curves, not structural. Requires a switch to a different material set hat can be easily obtained from here in US
https://www.boatbuildercentral.com
The glass to use is stitched double bias. The glass fibre bundles are laid flat over the preceding layer at an angle, and the layers come stitched together. Around 200 GSM is a good start for strength for your eggs. Both strength and stiffness are compromised with auto bog style woven glass fabric, as each glass fibre is already bent into 1000s of tight radii
Auto bog systems are based on polyester, and switching to an epoxy based system will again have dramatic results on workability and retaining the stiffness built into the strength over use and time. I try not to confuse cutting edge creations like Americas Cup boats or stealth bombers with what I can realistically achieve in a home workshop too
With that out of the way
This egg former will result in a closed panel with a compound curve, this is a good start with the double bias. A panel is further stiffened and strengthened with stringers. This needs to be a permanent join to work and this is where epoxy shines as it has a long layover period before curing and provides the best platform for chemical to chemical bonds rather than mechanical bonds as with other glue systems. This is the way to avoid delam and sheer issues important to retain that stiffness
First, I would make two MDF jigs. Squares of the same size. Cut a baffle size hole in one and a small hole on the other that will fit over the pointy end of the egg and allow the egg to stand up. Place the baffle one over the big end and join the two plates together using wooden battens as legs using screws
This jig allows access to the central axis of the plug and I would drill down using a bench drill and push in a dowel to allow me to now mount the egg on a drill or lathe to tune a shape into it if needed. Sand down the big end until a face is formed and sand down to the plate for a square baffle surface
A triangle file will score the plug surface lengthwise for the stringers. Sand into the curved surface until all the file triangle is in and sand along to either end to create rows of end to end trenches
Either use a belt sander on hardwood or order some wood flour from the above link. This is a critical ingredient as it is structural when used with epoxy. Make a stiff putty and fill the trenches and smoothen with a flat blade. Don't worry too much about cleaning up the mess from the plug surface, wait for the epoxy to off a bit, and it will easier to pick them off. Set this aside for a few hours, but less than 12
Once the epoxy has kicked a bit and the stringers have firmed up, start laminating. By this stage, I would have already cut the double bias into diamond shape like kite pieces, with the fatter side truncated a bit. Prime the plug with neat epoxy, start laying the sails on. Line the truncated edge with the baffle edge of the plug and smoothen out so that it takes shape and conforms to the plug surface. The pointy end of the sail should just wrap over that end. Repeat with around 1–3 inches of overlap of each sail. Continue until 3 full layers are formed. There is about 12 hours working time for chemical bonds offered by epoxy, so plenty of time to do the layers over 3 days in needed. Don't wait for more than 12hrs as then the bond will only be mechanical
At this point, this is half of the structural strength created, which also has some inherent stiffness. Now to dial up the stiffness, layer this from the following link using the same process as the glass sails. Only now we will run the carbon fibres along the plug axis and around it. Let me know if this doesn't make sense, as English is not my first language. I would be happy with 3 layers of carbon in this section. Again, max 12 hrs between laminates applies, do it before 12 hrs
Now I'll create the sandwich material that starts adding both bulk and stiffness. To get familiar with this concept, cut a small flat bit of foam and cover either side with masking tape. Bend the foam. It will resist bending until the tape tears or its adhesive gives away. This is called a composite sandwich. Instead of foam, I'll make a dense and heavy one by making a putty of two parts wood flour and one part lead powder
https://www.ebay.com.au/itm/273469793800
Now instead of trenches, I'll cut strips of sticky back Eva foam around 10 mm and created ridges around the circumference of the plug body. Fill those wide trenches with the putty and use the ridges as a depth guide for the blade/spatula thingy. Remove the ridges and fill the gaps so that the entire previous lamination is covered with a 10 mm coat of the dense epoxy putty. Let this kick for a few hours until firmed up. Then repeat skin steps in reverse order
The result will be a glass, glass, glass, carbon, carbon, carbon, wood and lead core, carbon, carbon, carbon, glass, glass, glass. I have found this to be the easiest way to create a barrel type structure with the least ringing and dial in required amounts of strength and stiffness
The whole item becomes one structural unit due to working with chemical bonds. Some action with a heat gun on the foam plug will de expand it forming a hard internal lining. The resulting cab is safe for drilling and screwing into. A baffle should be epoxied on to the face end, ply works well
I hope this is of use to anyone making shapely speakers and looking for an amateur engineered solution
Thanks and regards
Randy
I was wondering if the benefits went beyond removing some baffle step issues further smoothing out diffraction, diffraction being an occurrence that I wonder about diminished returns after a reasonable point.They definitely measure ALOT better. Olsen's ancient study showed us that. So much so, one could be forgiven for thinking it's like a different driver.
If no-one has posted some polar measurements, I will post some 360 degrees polars after this weekend.
A driver a rectangular cabinet, then same driver in a spherical cabinet ie. same drivers, different cabinets.
Now whether you think it's worth the effort or not depends on your time/skills/passion/desire. No one can answer that part.
In the meantime, @randy, Please tell us your fast-curved-enclosure build technique.
This is my living room and the shelves where the bookshelves will sit. Let’s say that I get all revved up about building a curved enclosure such as in the op and invest 40-80 hours producing a set. Let’s say I really worked hard on making everything solid, no resonances, and nice looking, then I place them in the corners on these shelves and all that flowing wonderful polar response just jumbles up in the corners and defeats the whole endeavor. Would I better invest my time elsewhere in life and enjoy the shortcomings of cubic cabinets in the corners of a small room as best I can?
Running a landscape business and going into the growing season here is going to make it difficult for regular critical listening sessions but I do enjoy when I can. On those occasions when I’m able to truly enjoy the reproduction would moving those shelves away from the wall a foot or so allow curved cabinets to make a difference?

Running a landscape business and going into the growing season here is going to make it difficult for regular critical listening sessions but I do enjoy when I can. On those occasions when I’m able to truly enjoy the reproduction would moving those shelves away from the wall a foot or so allow curved cabinets to make a difference?
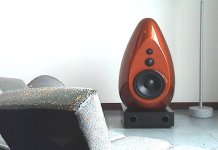
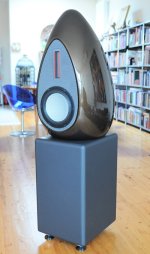
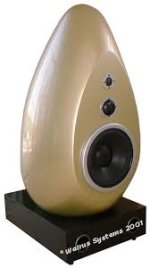
I have always admired Vaessen type enclosure, very sleek. However, such big styrofoam egg is not available.I’m always playing, I’m currently thinking about getting some styrofoam eggs of various sizes, wrapping them in glass, body filler-ing to get a nice smooth surface and then using acetone to dissolve the foam. Are jet engine shaped enclosures really all that much better than a basic cubic enclosure with well rounded edges? I tend to build in the bookshelf size category.
View attachment 1154086View attachment 1154087
Attachments
I’m going to side track my own thread. I’m sitting here having my morning coffee and looking at the walls and corners. What are some thoughts on fitting a small triangular line array right into each corner? Wouldn’t that essentially horn load the drivers down to about 300-500hz or so and completely eliminate the diffraction, and increase spl allowing a smaller array? Personally the Dayton Audio TCP 4” comes to mind, maybe 4 per side and a large format tweeter nestled around the middle?
Attachments

i guess one could simulate the results of egg shaped enclosures with ABEC or it's successor Akabak.
Member @fluid has kindly done it once using my speaker model vs a more rectangular shape.
Look from this post forward what it did for modeling my speaker shape: https://www.diyaudio.com/community/...range-line-array.242171/page-332#post-6524791
It certainly has an effect, and personally I believe it's for the better 🙂. In my humble opinion it makes the (true) source of the sound (the speakers) disappear easier. In other words, the music will image more freely and not point you to the speaker position as much (or at all).
If you search, you will find threads like that.I’m going to side track my own thread. I’m sitting here having my morning coffee and looking at the walls and corners. What are some thoughts on fitting a small triangular line array right into each corner? Wouldn’t that essentially horn load the drivers down to about 300-500hz or so and completely eliminate the diffraction, and increase spl allowing a smaller array? Personally the Dayton Audio TCP 4” comes to mind, maybe 4 per side and a large format tweeter nestled around the middle?
- Home
- Loudspeakers
- Multi-Way
- Egg shaped enclosures