Fellow Earthlings;
I've run across some casual discussion here on the forum regarding the bias pots in the Forte amps, but never any hard core information about how to do it. So (having done it) I thought I might be able to contribute by passing on what I've learned. Please remember, this is just one way to go about this - if you have found a different way, please add it below, you'll be helping everyone who reads this thread!
The work I did was on a model 5 and 6. The model 4 has identical circuit boards, so we know this is good information for the 4, 5, and 6. The 1 and 3 were different animals, and the 7 I'm not familiar with, so please accept this info as valid if you have a 4, 5 or 6 only.
Nelson was not involved in the design of these models (he hired Michael Blasius for that work), so although Nelson has suggested that the pots were probably 5K, in fact they are 500 ohm pots. If you have 5k pots, of course they will work - but since we only need the range from 0-500, you just turned your bias pot from a 25 turn pot to a 2 1/2 turn pot. Which is still better than the 7/8 turn, inward facing pots that are installed.
The pots that are installed on your circuit boards now are Bourns 3386P-1-501. This is a 300V, 1/2 watt, 320 degree turn pot, and is really tricky to adjust accurately. These pots were used for a couple of reasons, that start all the way back to the original design concept. The second generation Fortes were designed as an amp that produced beautiful music at an affordable price, and to do that Michael used a lot of very smart production shortcuts such as using one single circuit board in both the right and left side of three different amps (maybe even the model 7, but I don't know that amp). Ordering 8,000 of the same board is a lot cheaper than ordering 1,000 of this and 1,000 of that, and it fit the design goals.
Anyway, because of this, and because the board has a staggered mount for the bias pots, when the board was flipped over to be used on the other channel, a vertical adjust pot would be facing downward on one side. Not helpful. Here's the pot that is in your circuit board now:

The outward facing adjustment allowed it to be mounted in any direction and still have access to the adjustment screw. Ideally, we would like to not only change these out because they get dead spots, but also make the adjusting process a lot easier. An ideal candidate for this is the Bourns 3299x-1-501, a 300V, 1/2 watt 25 turn, VERTICAL adjust trim pot that will fit right in.

The Bourns 3296x-1-501 will work as well, and is just the military spec version; the 3299x-1-501LF is the same item but meets Rohs specs. These little guys are only 2-3 dollars each, so if you're good with a soldering iron, there's almost no reason not to change them on a 30 year old amplifier.
The 3299 works best because of the leg spacing:

...which you can see is the same as the 3386. By getting a pot with a straight leg alignment, I can bend the center leg a little left or a little right to keep the screw UP on both sides of the amp.

Okay, now that you have the parts, STOP. Before you turn on the soldering gun, GET A READING ACROSS THE LEGS OF THE EXISTING POT THAT'S ON THE CIRCUIT BOARD NOW. The last thing we want to do is install a pot with a lower resistance value than what was in there to start - the extra current flow can heat things up pretty quick. As a reference (only) my transistor bias was set at 175 ohms (the new pot went in around 250) and the output offset was 254 ohms (the new one went in at 330). If for some reason you forget to do this, install both pots at 500 ohms, and open them up during final adjustment.
Your new board might look something like this:

...with those nice brass screws easily accessible now.

As you can see, the pot takes up about the same amount of space on the board, and being offset from the board, should dissipate heat a little better as well.

Hope this helps out a few guys who are still holding on to their Fortes (like me!) as we go through some well deserved maintenance after 30 years of service.
Have you found a different way, or an improvement? Include it below!
I've run across some casual discussion here on the forum regarding the bias pots in the Forte amps, but never any hard core information about how to do it. So (having done it) I thought I might be able to contribute by passing on what I've learned. Please remember, this is just one way to go about this - if you have found a different way, please add it below, you'll be helping everyone who reads this thread!
The work I did was on a model 5 and 6. The model 4 has identical circuit boards, so we know this is good information for the 4, 5, and 6. The 1 and 3 were different animals, and the 7 I'm not familiar with, so please accept this info as valid if you have a 4, 5 or 6 only.
Nelson was not involved in the design of these models (he hired Michael Blasius for that work), so although Nelson has suggested that the pots were probably 5K, in fact they are 500 ohm pots. If you have 5k pots, of course they will work - but since we only need the range from 0-500, you just turned your bias pot from a 25 turn pot to a 2 1/2 turn pot. Which is still better than the 7/8 turn, inward facing pots that are installed.
The pots that are installed on your circuit boards now are Bourns 3386P-1-501. This is a 300V, 1/2 watt, 320 degree turn pot, and is really tricky to adjust accurately. These pots were used for a couple of reasons, that start all the way back to the original design concept. The second generation Fortes were designed as an amp that produced beautiful music at an affordable price, and to do that Michael used a lot of very smart production shortcuts such as using one single circuit board in both the right and left side of three different amps (maybe even the model 7, but I don't know that amp). Ordering 8,000 of the same board is a lot cheaper than ordering 1,000 of this and 1,000 of that, and it fit the design goals.
Anyway, because of this, and because the board has a staggered mount for the bias pots, when the board was flipped over to be used on the other channel, a vertical adjust pot would be facing downward on one side. Not helpful. Here's the pot that is in your circuit board now:
The outward facing adjustment allowed it to be mounted in any direction and still have access to the adjustment screw. Ideally, we would like to not only change these out because they get dead spots, but also make the adjusting process a lot easier. An ideal candidate for this is the Bourns 3299x-1-501, a 300V, 1/2 watt 25 turn, VERTICAL adjust trim pot that will fit right in.
The Bourns 3296x-1-501 will work as well, and is just the military spec version; the 3299x-1-501LF is the same item but meets Rohs specs. These little guys are only 2-3 dollars each, so if you're good with a soldering iron, there's almost no reason not to change them on a 30 year old amplifier.
The 3299 works best because of the leg spacing:
...which you can see is the same as the 3386. By getting a pot with a straight leg alignment, I can bend the center leg a little left or a little right to keep the screw UP on both sides of the amp.
Okay, now that you have the parts, STOP. Before you turn on the soldering gun, GET A READING ACROSS THE LEGS OF THE EXISTING POT THAT'S ON THE CIRCUIT BOARD NOW. The last thing we want to do is install a pot with a lower resistance value than what was in there to start - the extra current flow can heat things up pretty quick. As a reference (only) my transistor bias was set at 175 ohms (the new pot went in around 250) and the output offset was 254 ohms (the new one went in at 330). If for some reason you forget to do this, install both pots at 500 ohms, and open them up during final adjustment.
Your new board might look something like this:
...with those nice brass screws easily accessible now.
As you can see, the pot takes up about the same amount of space on the board, and being offset from the board, should dissipate heat a little better as well.
Hope this helps out a few guys who are still holding on to their Fortes (like me!) as we go through some well deserved maintenance after 30 years of service.
Have you found a different way, or an improvement? Include it below!
Last edited:

Thanks! This is super helpful for me. I'm about to work on a friend's model 6. So for disassembly, it looks like you dismounted all the output devices instead of desoldering and leaving them in place? Any other disassembly tips or things to be aware of?
Just to confirm, the pot closest to the center of the board is the bias and the pot closest to the edge is the dc offset? And both are the same 500 ohm pot?
Did you recap the board? Mine has reddish/purple elna's. I assume they are probably pretty good caps and would be fine for now. So I was curious if you noticed any positive aspect from recapping.
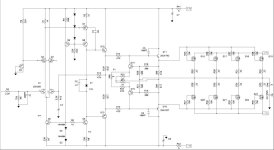
Do you by chance have schematics for the model 4 and / or model 6? I'm hoping to convert the model 6 to run class A like the model 4 so it would be super helpful to have any information how the power supply is wired up on both models.
Just to confirm, the pot closest to the center of the board is the bias and the pot closest to the edge is the dc offset? And both are the same 500 ohm pot?
Did you recap the board? Mine has reddish/purple elna's. I assume they are probably pretty good caps and would be fine for now. So I was curious if you noticed any positive aspect from recapping.
Do you by chance have schematics for the model 4 and / or model 6? I'm hoping to convert the model 6 to run class A like the model 4 so it would be super helpful to have any information how the power supply is wired up on both models.
Hi Rylan,
Sorry, I saw your message first and responded, let me see if I can answer all your questions here.
1. Correct, the pot closest to the center is the bias pot, and the pot closest to the back of the amp is the DC offset. Both are 500 ohm.
2. I did recap the board with Silmic capacitors based on some reading here on the forum and Nelson's personal recommendation. To be honest, I'm not sure if my ears are keen enough to say that I heard a big difference, but they aren't expensive, and it was a fun experiment. . It's always good to replace older electrolytics anyway, although other capacitor types are not as prone to aging out.
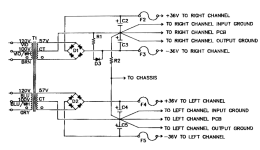
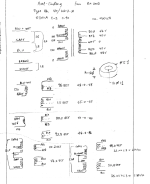
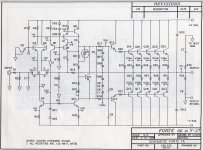
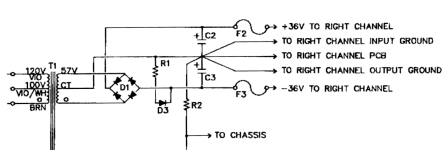
3. Here's a bunch of detail that I was able to scrounge and am happy to share.
Sorry, I saw your message first and responded, let me see if I can answer all your questions here.
1. Correct, the pot closest to the center is the bias pot, and the pot closest to the back of the amp is the DC offset. Both are 500 ohm.
2. I did recap the board with Silmic capacitors based on some reading here on the forum and Nelson's personal recommendation. To be honest, I'm not sure if my ears are keen enough to say that I heard a big difference, but they aren't expensive, and it was a fun experiment. . It's always good to replace older electrolytics anyway, although other capacitor types are not as prone to aging out.
3. Here's a bunch of detail that I was able to scrounge and am happy to share.
Attachments
I'll tell you something else that I found very interesting. Apparently Michael Blasius did an "upgraded" circuit board for these models somewhere in mid production, and I was able to acquire a pair of the boards. After installing them and "tuning" the amp, I was looking forward to hearing the newer boards - what a disappointment. The first thought that came to my head was "The magic is gone". It just sounded like a very clear, high-resolution transistor amp. Not bad in any way, just not my preference, and it only took about 5 minutes of listening before that amp was back on the bench for a total overhaul. (again!) 🙄