Calcium carbonate compounds can make very successful structures and are found e.g. in eggshells. The matrix of eggshells is made of 90% calcium carbonate, and eggshells show some remarkable mechanical properties. So, then why calcium carbonate, as to my knowledge, has never been assessed as a material or compound for midrange or high frequency domes?
Textreme is carbon an epoxy. Epoxy is the binder for the otherwise flexible carbon fabric. And carbon acts as a «filler» for the epoxy resin, providing tensile strenght for the cured resin. Think in an analogy now: Instead of flexible carbon fabric, now take an eggshell as a static, calcium carbonate matrix filler for the epoxy resin. Simply think of teggstreme, so to say ...
As eggs include nicely dome-shaped parts, you could easily resort to an egg to assess the question, wheter calcium carbonate is suited fore midrange domes. An egg, as is, might result in an approx. 2-incher, then. So, lets make a midrange dome driver out of an egg, some drops of epoxy and of an outranged midbass driver. We will hopefulle end up with an eggcellent result. And for shure it will be an eggxeptional construction.
Lets go, then:
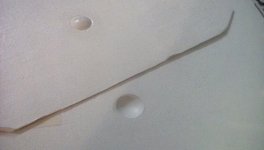
1. Choose an egg, take a handsaw and start smoothly sawing – if the egg is of decent quality from well-fed chickens, it will not brake. If instead several eggs brake, one after the other, then you may change your egg supplier. You will discover that the surface of a robust enough egg is quite resistant to a usual HSS saw blade, not unlike a ceramic surface, until you have managed to make a first groove. You have to be steady, delicate and patient.
2. Then you will have to take away all (!) skin structures from the inside of the egg shell. You can peel the main skin right away. But then you will have to scratch repetitively and for a quite long time the inside of the shell with your fingernails, until you really scratch on the calcium carbonate structure. Cleaning once and then with water from the tap helps. Let then the eggshell completely dry.
3. Carefully and smoothly sand the cutted edge with a sheet of sanding paper lying on a plane tabletop. 120- or 180-graded paper do well, no coarser, not to split small fragments away. Sand until the rim is more or less on one single plane.
4. As the eggshell is highly porous and fragile at the same time, you may reinforce it by applying epoxy into it. Do not laquer it, but gently work some expoxy into the eggshell by using your gloved (!) fingertips. Then wipe the spare epoxy away with a Cleenex or so.
5. When the epoxy has cured/hardened, the dome already is much more rubust and has gained some moderate elasticity. You may then apply a second, very thin layer of epoxy, then wait for it to get sticky, and then you may add some carbon rowing filaments.
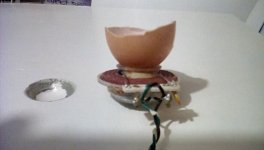
6. An eggshell alone does not make a midrange. For a first assembly, any standard cone driver can be dismantled. In this case, it was a 6.5-inch Audax HDA driver. With scissors, the membrane may be trimmed down to a residual cone slightly larger than the dome circumference. This residual bit of cone will then act as the dome carrier cone.
7. Glue the dome onto the carrier cone. To insure a neat fit, eventially stuff some carbon rowing, slightly moisted with epoxy, around the rim of the dome, into the groove between the outside of the dome and the carrier cone.
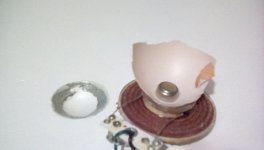
8. The moving assembly will never be dynamically symmetric. The asymmetry might be slight, but may produce substantial tilting forces and maybe even dynamic rub between the voice coil and the walls of the magnetic gap. In this case, you may try to hand-tune this asymmetry by adding a small weight at the right place into the groove formed by the dome and the carrier cone.
On the To-Do-List now are some measurements, which hopefully I will be able to perform in some days.
Apart from the fun, the immediate reward of this project was … the further processed, main waste of the membrane construction process: It became a delicious fried egg.

Textreme is carbon an epoxy. Epoxy is the binder for the otherwise flexible carbon fabric. And carbon acts as a «filler» for the epoxy resin, providing tensile strenght for the cured resin. Think in an analogy now: Instead of flexible carbon fabric, now take an eggshell as a static, calcium carbonate matrix filler for the epoxy resin. Simply think of teggstreme, so to say ...
As eggs include nicely dome-shaped parts, you could easily resort to an egg to assess the question, wheter calcium carbonate is suited fore midrange domes. An egg, as is, might result in an approx. 2-incher, then. So, lets make a midrange dome driver out of an egg, some drops of epoxy and of an outranged midbass driver. We will hopefulle end up with an eggcellent result. And for shure it will be an eggxeptional construction.
Lets go, then:
1. Choose an egg, take a handsaw and start smoothly sawing – if the egg is of decent quality from well-fed chickens, it will not brake. If instead several eggs brake, one after the other, then you may change your egg supplier. You will discover that the surface of a robust enough egg is quite resistant to a usual HSS saw blade, not unlike a ceramic surface, until you have managed to make a first groove. You have to be steady, delicate and patient.
2. Then you will have to take away all (!) skin structures from the inside of the egg shell. You can peel the main skin right away. But then you will have to scratch repetitively and for a quite long time the inside of the shell with your fingernails, until you really scratch on the calcium carbonate structure. Cleaning once and then with water from the tap helps. Let then the eggshell completely dry.
3. Carefully and smoothly sand the cutted edge with a sheet of sanding paper lying on a plane tabletop. 120- or 180-graded paper do well, no coarser, not to split small fragments away. Sand until the rim is more or less on one single plane.
4. As the eggshell is highly porous and fragile at the same time, you may reinforce it by applying epoxy into it. Do not laquer it, but gently work some expoxy into the eggshell by using your gloved (!) fingertips. Then wipe the spare epoxy away with a Cleenex or so.
5. When the epoxy has cured/hardened, the dome already is much more rubust and has gained some moderate elasticity. You may then apply a second, very thin layer of epoxy, then wait for it to get sticky, and then you may add some carbon rowing filaments.
6. An eggshell alone does not make a midrange. For a first assembly, any standard cone driver can be dismantled. In this case, it was a 6.5-inch Audax HDA driver. With scissors, the membrane may be trimmed down to a residual cone slightly larger than the dome circumference. This residual bit of cone will then act as the dome carrier cone.
7. Glue the dome onto the carrier cone. To insure a neat fit, eventially stuff some carbon rowing, slightly moisted with epoxy, around the rim of the dome, into the groove between the outside of the dome and the carrier cone.
8. The moving assembly will never be dynamically symmetric. The asymmetry might be slight, but may produce substantial tilting forces and maybe even dynamic rub between the voice coil and the walls of the magnetic gap. In this case, you may try to hand-tune this asymmetry by adding a small weight at the right place into the groove formed by the dome and the carrier cone.
On the To-Do-List now are some measurements, which hopefully I will be able to perform in some days.
Apart from the fun, the immediate reward of this project was … the further processed, main waste of the membrane construction process: It became a delicious fried egg.
This is an eggceptionally cool idea. Sorry could not help it.😛
Looking forward to how it soumds. I was thinking a smaller 28mm section glued to a dome tweeter voicecoil might be interesting. I have an old DC28F tweeter with a busted dome (sticky wet look coverig came off) that might be a good donor voice coild/uspemsion. I imagine the mass mught be higher though.
Looking forward to how it soumds. I was thinking a smaller 28mm section glued to a dome tweeter voicecoil might be interesting. I have an old DC28F tweeter with a busted dome (sticky wet look coverig came off) that might be a good donor voice coild/uspemsion. I imagine the mass mught be higher though.
Ha, you actually did what I have had in mind for long years now, but never got the make. Kudo's!
One of the challenges from now on is a proper face plate of sorts, so the spider is acoustically isolated from the dome.
Measurements with reasonable resolution would be great, although I would not be not surprised the egg shell will seriously break up around 7-8 kHz.
One of the challenges from now on is a proper face plate of sorts, so the spider is acoustically isolated from the dome.
Measurements with reasonable resolution would be great, although I would not be not surprised the egg shell will seriously break up around 7-8 kHz.
You also could stabilize the spider against rocking by glueing a damping/fixing ring between the spider and the faceplate, leaving just the inner one ring of the corrugation to move.
You can use easter egg from an ostrich to make the mold for a loudspeaker medium head cabinet a la B&W 800 ..... could be an eggigeant enclosure.
So then, a follow up.
First some static data: The Aerogel membrane material I took away was 1.4g, and the rubber surround I took away was 6.4 g. The (sibling) eggshell dome weighs 4.1g. To approximatly compare the moving mass difference between the original membrane vs. the eggdome, take the 1.4g of the cut-away aerogel membrane and roughly add some 1/3 of the cut-away surround, which equals 1.4 + (6.4/3) = 3.5g. These approx. 3.5g are opposed to the approx. 4g of the eggdome. No big difference.
And now, let's get dynamic!
Before the imminently planned measuring session, I listened first the eggdome in fullrange to a Schubert piano sonata. This sounded quite appealingly and precisely, but there was a notable, decent coil rub noise during transients. During this first Schubert session, there was optically some max. 1mm ... 2mm pp dome exkursion.
And then ... Marian Faithful. Broken english. Nomen est omen ... say, broken egglish! Eggsitus! I was quite fascinated to watch the eggdome jump some approx. 16mm pp, when the rhytmic bass kicked the dome. Then, after some 10 seconds, the roof of the egg flew away! It was not unlike the one in Fukushima, fortunately in a scaled down version, but for the same reason, I guess: Probably the pressure inside of the nearly closed chamber formed by the dome and the supporter cone grew too high, thus making the eggshell explode.
So, this first experience lead to a fourfold conclusion:
First, for a next take, I will generally have to improve the rotational symmetry of the egg dome geometry and of the dome mount onto the supportive cone.
Second I will have to provide a better control of the dynamic assembly to avoid rub.
Third, for the next take I eventually will drill some holes into the base of the supporter dome, such as to limit the pressure inside.
Fourth, I will limit the testing bandwidth to >200Hz.
That was it. So, at the moment, a measurement session became obsolete.
I am very open to your ideas about how to improve on this concept, and I would like to take a second take. Because Schubert, without the rub, would have sounded quite nicely and promising.
Last edited:
We need a DIY project that is an incomplete midrange driver where you must add your own egg. Fully replaceable, so glue melts with hot air.
We also need someone to sell matched pairs of eggs, for those without the tools and time to match their own.
We also need someone to sell matched pairs of eggs, for those without the tools and time to match their own.
Last edited:
I would anchor half the spider diameter and affix it. This will yield less wobble of the voice coil.
This unit died from overeggscursion by eggsceeding eggs-max. 😀
But pun aside there could be a real problem with the sound pressure inside the dome, as eggs are optimized in a highly asymmetrical fashion - while they can withstand quite a bit of force from the outside, this is probably not the case from the inside out. Otherwise no chick would be able to hatch... so it seems like a good idea to incorporate pressure relief holes indeed.
But your creativity is really enjoyable and encouraging - keep it up! 🙂
Try an emu egg much larger.or even a duck egg would be bigger more like a 3 inch dome.i work on an egg farm and very rarely we find a giant chicken egg over 2 inches in diameter on the smaller radius.very interesting nonetheless.
This is an old picture of some of the domes I have made for my 25mm exciter which I use on my dml panels.
My wife keeps chickens ,which gave me the idea to use eggs as cones .
Annoyingly they are not in this picture ,but I think I still have some lying around somewhere?
If I find them I will take a picture.
The frequency response was pretty good but I think they only went down to about 2k (I think) on their own without the panel.
I used to coat them and glue them with pva.
Actually I just remembered that I originally used them as a concave dome, which was easier to put together.
The main problem I found was the cavity noise caused by the hard dome reflections within the rear cavity.
Also of interest maybe , is that the coil former and magnet on my exciters have cooling holes which prevents pressure build up within the cavity.
Steve.
Attachments

Maybe some coton inside could damp the air pressure inside making it more distributed ?
Could be nice to experiment with half of a ping pong ball with mopooge for the surface damping.
Perhpas some adhesive tape on the internal egg side, two tapes crossed...
Could be nice to experiment with half of a ping pong ball with mopooge for the surface damping.
Perhpas some adhesive tape on the internal egg side, two tapes crossed...
Thank you all for your inputs!
DIY, in my understanding, is not meant as an exclusively serious discipline: I enjoy this DIY playground to have real fun and allowing also some silly things to get materialized. An also, to submerge into a project that has a 99% chance to fail. Why not? Learning by doing, even along with non-serious projects. This actual world is just all too serious enough ... So, as long as it does no harm to anybody, this egg-domed midrange is to be seen in the same spirit as e.g. another more-fun-than-serious project of mine, the AMT electrostatic tweeter I published some time ago.
I think I will set up MK II. But I will have to make myself helper tools first for it, e.g. to better center the structures. This will take some time. And, besides the points to improve upon from MI I which I have mentionned before, I will try to apply some carbon roving fibers onto the inside of the egg surface also. Mk II should be as stable enough as to perform some measurements with it. I am really interested to see e.g. how the dome breakup modes will occur. Dome breakup, I said. Not dome break. Dome break has already been assessed along with MK I, as you know now.
By the way: There are some really nice scientific papers about eggshell structure. I have learned a lot during these past days about eggs ... and I also discovered two (dreadfully lousy) youtube flics of a guy having basically made the same 12 years ago.
Last edited:
I managed to find these two panels with the egg shell domes.
One picture from the front showing the inner and outer dome and the other from the coil side with the exciters removed.
The concave domes were quicker and easier to make but because of the smaller cavity this pushed the resonance higher up.
Steve.
One picture from the front showing the inner and outer dome and the other from the coil side with the exciters removed.
The concave domes were quicker and easier to make but because of the smaller cavity this pushed the resonance higher up.
Steve.
Attachments

This is the easy way to glue a shell onto a coil former or exciter.
In the first picture I just glue the eggshell to the exciter foot of former with pva.
In the second picture I slowly break away the shell ,the glue prevents the eggshell cracking below the foot.
When most of the shell has gone above the glue , I then sand down with a wooden block with sandpaper for a smooth finnish.
The shell remains attached to the inner side of the foot of former as long as enough glue has been applied.
I usually coated the shell with pva to help damp it a little And prevent any cracking.
And that's it.
Steve.
Attachments
- Home
- Loudspeakers
- Multi-Way
- The DIY Midrange Dome Teggstreme Driver (or the epoxy calcium carbonate matrix dome)