Hi all!
I've just got my workshop going in my garden which is pretty small (3.5x3.5m) ad have been relying on an Echo Dot for audio and it's been getting on my nerves. So, before I get stuck in to my other 2-way I need to sort this out.
- Needs to be small
- Needs to be tough
- Needs to have a grille to keep dust at bay (valchromat dust is the worst)
- DSP / Class D
A while back I saw Scott Hinsons great speaker project using the B&C 5CXN44 and it looked really interesting. Rather than just make Scotts design I thought I'd start from the ground up and make them to my spec which is a particular heigh/wwidth to fit on my workshop shelf. Well... it turns out speakers end up looking kinda the same when you only have one driver. I majorly copied his vent assembly though. The shame.
I did some sims as an 8L cabinet, knocked up a cheap and nasty cabinet and did some measurements. Then put some offcuts in the cabinet to reduce it 7.5L and cut the pipe tuning to around 55hz. Added 45g of poly stuffing. I'm happy with the roll off in the low end but my finished cabinets will be closer to 7L to tighten it all up a bit.
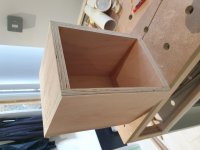
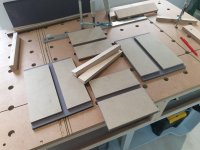
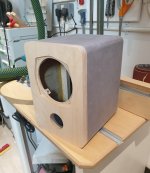
My mate brought me round some offcuts of black valchromat so I thought I'd use this but the 19mm board he brought round was knackered. I laminated some 6mm MRMDF and some of the 10mm he gave me and started dimensioning it up. I'm rather route- table-happy at the moment so I routed a dado groove for some stretchers all around the inside of the cabinet to help with alignment and panel stiffness. The panels are rebate jointed. And this is where I am with the project.
I'll update as and when.
Cheers!
I've just got my workshop going in my garden which is pretty small (3.5x3.5m) ad have been relying on an Echo Dot for audio and it's been getting on my nerves. So, before I get stuck in to my other 2-way I need to sort this out.
- Needs to be small
- Needs to be tough
- Needs to have a grille to keep dust at bay (valchromat dust is the worst)
- DSP / Class D
A while back I saw Scott Hinsons great speaker project using the B&C 5CXN44 and it looked really interesting. Rather than just make Scotts design I thought I'd start from the ground up and make them to my spec which is a particular heigh/wwidth to fit on my workshop shelf. Well... it turns out speakers end up looking kinda the same when you only have one driver. I majorly copied his vent assembly though. The shame.
I did some sims as an 8L cabinet, knocked up a cheap and nasty cabinet and did some measurements. Then put some offcuts in the cabinet to reduce it 7.5L and cut the pipe tuning to around 55hz. Added 45g of poly stuffing. I'm happy with the roll off in the low end but my finished cabinets will be closer to 7L to tighten it all up a bit.
My mate brought me round some offcuts of black valchromat so I thought I'd use this but the 19mm board he brought round was knackered. I laminated some 6mm MRMDF and some of the 10mm he gave me and started dimensioning it up. I'm rather route- table-happy at the moment so I routed a dado groove for some stretchers all around the inside of the cabinet to help with alignment and panel stiffness. The panels are rebate jointed. And this is where I am with the project.
I'll update as and when.
Cheers!
Attachments
-
 20210923_002325.jpg603.3 KB · Views: 1,179
 -
 20210914_183815.jpg561.7 KB · Views: 1,038
 -
 20210914_183154.jpg700.3 KB · Views: 1,048
 -
 20210916_223744.jpg835.4 KB · Views: 1,020
 -
 20210922_174718.jpg861.8 KB · Views: 991
 -
 20210922_221619.jpg829.6 KB · Views: 477
 -
 5CXN44 BR Test.jpg203.7 KB · Views: 627
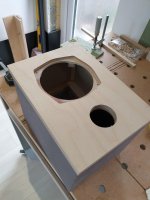
Cabinet and baffle done.
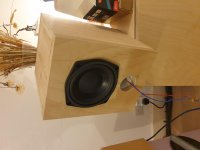
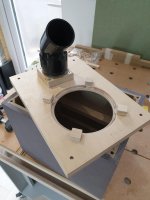
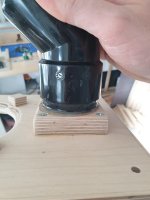
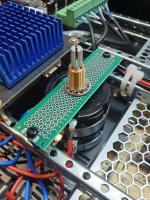
I use a different brand of pipe and it was a couple of mm in OD wider to fit in to the forstner bit hole so I had to use the router table to manual mill a mm off. I rotated it over the cutter and against the fence and a stop. Worked quite well and is rock solid with expoxy securing a filltetting it in place. I use a tremplate/flush trim cutter to copy the pipe opening on to the front of the baffle.
The locating dowel holes on the baffle have 6x9mm N52 neo magnets in them for a grille. Not sure if that is beefy enough to be honest but I am pretty sure I can just used bigger magnets on the grill side to compensate.
I didn't want to entirely flushmount this driver so it protrudes about 1.5mm. When I look at them in situe it makes me wonder why I bother but at least I know its done. It truly as a pain in the bottom to do as when you trace around the tiny radius on the corners the router and its bushing slips away so easily and I had to restart it 4 times.
Attachments

Last edited:
Progress!
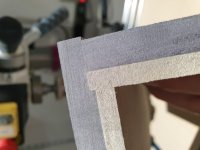
I was looking for an 18mm radius router cutter for ages that didn't cost a fortune and then one popped up on BG for about £5. Well, it lasted just long enough to do this project and now it is completely dull. You get what you pay for. It took an age to do because the orientaion of the panels dictated I roundover any edges that could tear out before I went across them.
Anyway, some clear coat tomorrow, not sure how I am going to keep the black dust off the birch during inbetween coat sanding. Maybe mask the birch and do the valchromat first then go over everything once it is sealed? Hmmm.
Attachments
Last edited:

Neat little bookshelf!
You may be able to somewhat dampen that organ pipe resonance at 700 Hz (and midrange leakage too) by rotating the inner segment of the port towards the side or bottom wall, provided they are covered with felt or wool.
Port Resonance Suppression: Inspiration from Technics | Audio Science Review (ASR) Forum
OTOH, you can run into a node of enclosure eigenmode that way. Need some investigation, if you are interested in some additional tinkering.
awesome! I'm about to build Scotts design.
Cool, hope you start a thread so we can see/read what you do and your thoughts on it!
Neat little bookshelf!
You may be able to somewhat dampen that organ pipe resonance at 700 Hz (and midrange leakage too) by rotating the inner segment of the port towards the side or bottom wall, provided they are covered with felt or wool.
Port Resonance Suppression: Inspiration from Technics | Audio Science Review (ASR) Forum
OTOH, you can run into a node of enclosure eigenmode that way. Need some investigation, if you are interested in some additional tinkering.
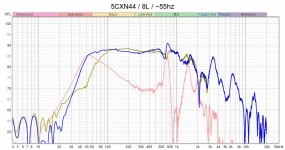
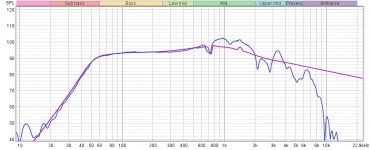
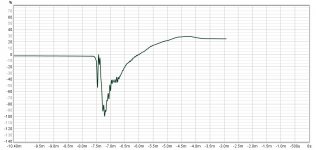
Cheers for the input man. Yeah, that resonance spike alarmed me during the simulation phase but as these are for the workshop I prioritised SPL over this.
However, after your post it got me thinking about how much that spike rang as when I did a quick far-field measure (which I didn't save) it didn't really show/was negligible. I had a quick look at the spectogram of the woofer/vent merged responses and it does show some ringing. Will it be audible? Hmmm, dunno... but if this were an audiophile set up I'd be concerned.
Attached is the graph with the resonance at 700hz-ish.
I haven't epoxied the second elbow of the vent on either cab yet as this will need to be tuned to size so, I will definitel try your suggestion of aiming the port around.
Thanks for the link, tinekring is definitely on the cards!
Attachments

Last edited:
PS. the cabinet walls were not lined in this measurement. The cabinet had just 45g of polyfill so later this week we will have some proper measurements to scrutinise when the walls are lined with wool felt as well.
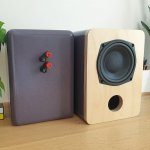
The cabinets are finished and tuned.
Tuning has ended up circa 55hz and volume is somewhere around 6.5-7L. 25g of loose fill.
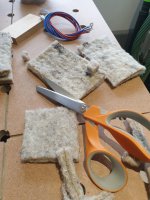
I bought 2 square metres of wool felt carpet underlay about 3 years ago which is what I have been using for wall linings since then. Gives the insides a nice sheepy smell. I may have gone overboard here with a flap of wool between the woofer and the vent as it is really close.
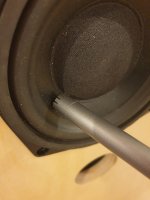
The only issue I have been running in to is slightly irratic measurements due to the dust cap on this driver being acoustically transparent. This means I can't do the traditional two measurements (a few mm off the dust cap and flush with the baffle over the vent) with accuracy. I have been using the closest part of the cone to the dust cap and vent measurements to merge - as pictured.
I don't have enough space to do ground plane measurements. Any ideas what else I could do to verify measurements? Not that it is hugely importantly, tbh.
Tuning has ended up circa 55hz and volume is somewhere around 6.5-7L. 25g of loose fill.
I bought 2 square metres of wool felt carpet underlay about 3 years ago which is what I have been using for wall linings since then. Gives the insides a nice sheepy smell. I may have gone overboard here with a flap of wool between the woofer and the vent as it is really close.
The only issue I have been running in to is slightly irratic measurements due to the dust cap on this driver being acoustically transparent. This means I can't do the traditional two measurements (a few mm off the dust cap and flush with the baffle over the vent) with accuracy. I have been using the closest part of the cone to the dust cap and vent measurements to merge - as pictured.
I don't have enough space to do ground plane measurements. Any ideas what else I could do to verify measurements? Not that it is hugely importantly, tbh.
Attachments

Last edited:
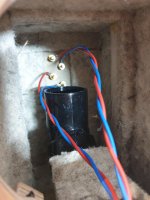
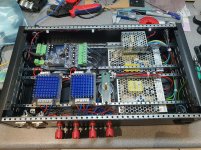
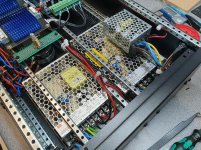
All my components for the DSP and amp are ready to be assembled/connected.
- MA12040 amp board for tweeters
- MA12070 amp board for woofers
- 2x Meanwell LSR 15v & 24v PSUs to avoid beat tones and to feed each amp the appropriate voltage
- MiniDSP 2x4 Balanced (the weak link here)
- DC-DC isolator 24v-12v for the MiniDSP
I'm a bit concerned about the noisy DSP, hopefully the lower wattage MA12040 will temper that a bit. If not, and I still have headroom, I will add an L-pad to the tweeters as they are hugely more sensitive than the woofers, obviously.
Attachments
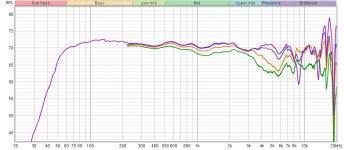
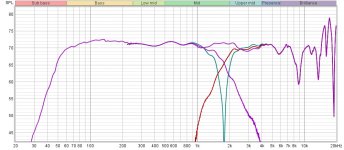
The funky looking measurement has been on my mind - I know it can't be correct past about 200hz as it shouldn't dip so low in the lower mid.
I was making up a baffle simulation for when I merge near field and far field measurements and I got an odd response. When I applied the form of the baffle simulation contour to the nearfield measurement it forced it into what matched perfectly with my hornresp simulation.
I surmise that this is due to the mic being pointed at one side of the woofer cone and not having the benefit/summed gain of being in the centre and receiving all the energy put out by the cone. I may be wrong but I think I'm on the right track.
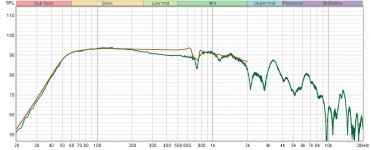
This is the Hornresp simulation (brown) vs the measured box (green):

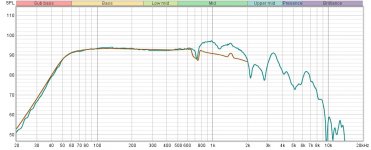
This is the Hornresp simulation (brown) vs the measured response with baffle contour simulation applied (teal):

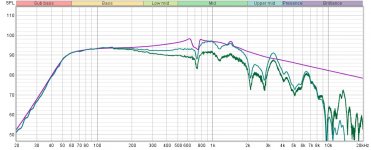
This is the measured box (green) vs measured box with baffle sim applied (teal) vs baffle simulation contour (magenta):

This is the measured box with baffle contour simulation applied twice (purple) vs baffle sim (magenta):

It looks like the mic, at the angle I used, leads to the normal amount of baffle loss. Quite interesting, I thought. Now I have a good idea what the response looks like for real and what it should look like when I take far field measurements.
I was making up a baffle simulation for when I merge near field and far field measurements and I got an odd response. When I applied the form of the baffle simulation contour to the nearfield measurement it forced it into what matched perfectly with my hornresp simulation.
I surmise that this is due to the mic being pointed at one side of the woofer cone and not having the benefit/summed gain of being in the centre and receiving all the energy put out by the cone. I may be wrong but I think I'm on the right track.
This is the Hornresp simulation (brown) vs the measured box (green):
This is the Hornresp simulation (brown) vs the measured response with baffle contour simulation applied (teal):
This is the measured box (green) vs measured box with baffle sim applied (teal) vs baffle simulation contour (magenta):
This is the measured box with baffle contour simulation applied twice (purple) vs baffle sim (magenta):
It looks like the mic, at the angle I used, leads to the normal amount of baffle loss. Quite interesting, I thought. Now I have a good idea what the response looks like for real and what it should look like when I take far field measurements.
Attachments
nice project, looking forward to see some far-field measurements.
where can i read more about this design?
where can i read more about this design?
nice project, looking forward to see some far-field measurements.
where can i read more about this design?
Hey, cheers!
Scotts version can be found here:
Log into Facebook
You can also read about mine.... here 🙂
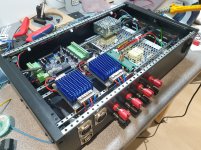
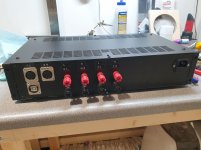
Amplifier and DSP complete.
I forgot how annoying the MiniDSP 2x4 Advanced plugin is to use and just how noisey the 2x4 is. So noisy that I cut to the chase and put a dual L-pad in the amp chassis. It made sense for future flexibility. It is isolated by nylon standoffs.
I also abandoned the DC-DC isolator as it was giving me a weird rising voltage reading which I've never seen before so I threw money at it and bought the DSP its own little 12v PSU. Isn't it cute?
A couple of years back I vowed never to use the binding post style connector. WHY DID I DO IT TO MYSELF? Aside from these it's all Neutrik and Van Damme, not that it matters that much.
It isn't the prettiest thing on earth but it works. That cheap volume knob for MiniDSP needs to go...
Attachments


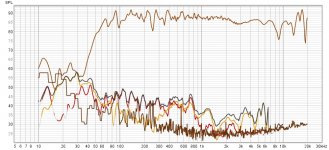
These weren't the easiest to design a crossover for tbh, I ended up working on the horizontal 15 degree measurements as the choppiness settles down a bit by then. I flattened each driver out as appropriately and best I could then dropped in a 24db LR.
I assume the bunching at 2.5-3.5k is the woofer surround causing diffraction as it forms the mouth of the horn.
These really are remarkable drivers, I have to say.


Perhaps I have the signal path inverted somewhere?
No time alignment used, the crossover just dropped in perfectly. If I try to time align the drivers then it makes it very hard to get a decent and well matching crossover region.
I assume the bunching at 2.5-3.5k is the woofer surround causing diffraction as it forms the mouth of the horn.
These really are remarkable drivers, I have to say.
Perhaps I have the signal path inverted somewhere?
No time alignment used, the crossover just dropped in perfectly. If I try to time align the drivers then it makes it very hard to get a decent and well matching crossover region.
Attachments
- Home
- Loudspeakers
- Multi-Way
- Workshop Co-ax Mini Bangers - B&C 5CXN44