I am attempting my first amp build and I am trying to make my own PCBs. I have not had a lot of luck using an iron to transfer the circuit to the PCB (two-sided). Traces were too narrow and I just didn't know where the heat was going.
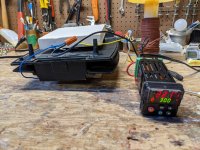
In my previous life I sold heaters, sensors and controllers for a living so I thought I would try to make a heat press of sorts. Because my PCB is two-sided I want to heat from both sides. A quick trip to the local Goodwill store and I and the proud owner of a George Foreman Grill.
I disassembled the grill and placed to 7" x 7" x 5/16" thick pieces of aluminum between the two halves of the grill and placed a sensor between the two pieces of aluminum. My goal is to heat up the aluminum to around 375 F (from what I understand that is around the desired temperature).
I am only getting in to the low 200's between the aluminum.
Questions:
Will a temperature of 200 F work with more time or does it have to be ~375 F?
I plan on placing 1 or 2 ten pound weights on top of the assembly. Is this necessary? More is better?
Thanks and I should mention - first time post!
Tim
Attachments
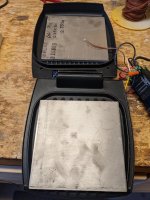
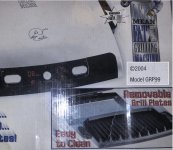
The George Grill has ridges to make sear-marks on meat. Soft meat will wrap the ridges and absorb significant energy.
Your "to" Aluminum plates are hard and flat. They only take heat on the tips of the ridges, not all along the ridges, with a lot of air in the grooves between the ridges.
Take the ridged plates off. However it looks like your model does not have removable plates. We just went through this trauma (for food not PCBs)--- "George" comes in many variations each lacking some key feature (no timer, no shutoff, no temperature, can't really clean...). The two models attached do strip down to flat heating plates.
Attachments
I use a laminator. It works great.
For double-sided PCBs I print out top and bottom layer and sandwich them together using a strip of PCB material as a spacer. It takes a bit of practice to get the registration right between the top and bottom layer, but with practice you can get down to ±0.25 mm registration between top and bottom without too much fuss.
I usually don't go smaller than 15 mil trace width for toner transfer PCBs, and I only go that skinny if I really have to. Mostly I stick with 20 mil trace width.
I think I paid ~$25 for my laminator. I had to hack it a little bit as the output side had a lip where the PCB would catch. That was easily removed with a hacksaw. 🙂
I don't know exactly how hot the PCB gets. Maybe 70-80 ºC. Hot enough that I can't handle the board for much longer than it takes to feed it into the machine. I usually run the board though 7-8 times and let it cool before I toss it in a water bath to remove the paper.
I use some glossy paper made by HP and an HP LaserJet M401dne for the printout.
It's pretty rare that I etch my own boards these days. I find outfits like OSH Park are well worth the money. That also leaves the mess in their basement instead of mine. 🙂
You can get even lower cost manufacturing out of China, of course, but I prefer to support North American manufacturing.
Tom
Stick to professionals.
Ask for price breaks, you might find several for almost the same money as for a one off.
Then if you spoil one, no big deal...
Etchants are messy, and toxic.
Take care.
Ask for price breaks, you might find several for almost the same money as for a one off.
Then if you spoil one, no big deal...
Etchants are messy, and toxic.
Take care.
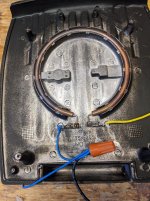
Maybe you can cannibalize those omega shaped semi embedded heating resistors and clamp them straight to the Aluminum thick plates.
Direct contact and you avoid the unefficient ribbed plate.
Maybe you can reuse the hinges and some other elements (bimetallic temperature sensors?) ,etc. from the original one.
Direct contact and you avoid the unefficient ribbed plate.
Maybe you can reuse the hinges and some other elements (bimetallic temperature sensors?) ,etc. from the original one.
There's really no reason anymore to make your own. Go here:PCB Prototype & PCB Fabrication Manufacturer - JLCPCB
You do need a set of gerbers, though.
Fast, very inexpensive and very good quality. I send all our company prototype and some production stuff there.
Bill
You do need a set of gerbers, though.
Fast, very inexpensive and very good quality. I send all our company prototype and some production stuff there.
Bill
Hi Bill
Are the quotes from JLCPCB introductory "teaser" rates or standard pricing?
I get promotions from Digikey for their PCB prototyping--- enticing, but they don't touch JLCPCB from what I see so far.
Thanks,
Steve
Are the quotes from JLCPCB introductory "teaser" rates or standard pricing?
I get promotions from Digikey for their PCB prototyping--- enticing, but they don't touch JLCPCB from what I see so far.
Thanks,
Steve
Go to PCBShopper – A Price Comparison Site for Printed Circuit Boards to have a price comparator between several pcb manufacturs
I have done several projects with JLBPCB using their software. Its a little clunky and I would not use it for a really complex project or high end project but on the simple stuff its so cheap that I can discard the boards if there is a serious mistake and not feel bad. Its also fast and you get a soldermask. its also easy to share the board so others can order it directly. Probably cheaper than resending extras in a group buy with their absurdly cheap shipping.
Thanks for the feedback on JLBPCB.
I was going to comment that making your own boards is really cheap once you're setup but expense is nearly trivial. Now I suspect that board turn-around time is the sole incentive for DIY.
During my working life, we had a cross-the-country consultant, Harry, who helped us with microwave development and his time was precious. Our resident layout guy, John, was a wizard and the Harry/John combo was magic. With Harry's sketch-work guidance, John would revise his CAD artwork, image onto self-applied photo-resist, etch in ferric chloride, then drill through-holes for Z-wires in lieu of plated holes. John would then hand-solder surface mount components (0402 and an occasional 0201); John would frequently revise an entire 3" x3" breadboard in less than a day! It shortened development time immeasurably. All this was accomplished with hand tools and home-made equipment.
Doubtful that many DIY'ers would feel so pressed for time. 🙂
I used to have a setup like that actually. UV light, photo resist, NaOH developer, ferric chloride etch. It probably took me ~45 minutes from layout to etched board. I donated it to a local HAM radio club when I moved across the Atlantic.
I do have a toner transfer setup, but I haven't used it in a couple of years. OSH Park (and others) will deliver boards inside of two weeks for a very reasonable fee. I usually have enough projects going that I can make progress on a different project while the boards are in the fab.
Tom
I do have a toner transfer setup, but I haven't used it in a couple of years. OSH Park (and others) will deliver boards inside of two weeks for a very reasonable fee. I usually have enough projects going that I can make progress on a different project while the boards are in the fab.
Tom
Etchants are messy, and toxic.
Which is another reason I avoid the cheapest PCB outfits. Who knows what environmental regulations they follow, if any.
Tom
I don't think you can make money anymore operating at a really marginal level. The volume is in premium multilayer boards made with pretty sophisticated machinery. Line widths are so fine that missing the etch time by a small percentage would trash the boards. I think JLBPCB is not making much on their small volume stuff but they keep the plant busy and build loyal customers. And help pay for that expensive machinery. Here is more on them: Inside JLCPCB.com Factory - in China - Electronics-Lab.com if they were not only in China.
I can´t wait 2 weeks!😱 and to boot, *anything* sent from China to Argentina, even if a single match pays U$55 Courier so even the $5 "starter" offer becomes $60.I used to have a setup like that actually. UV light, photo resist, NaOH developer, ferric chloride etch. It probably took me ~45 minutes from layout to etched board. I donated it to a local HAM radio club when I moved across the Atlantic.
I do have a toner transfer setup, but I haven't used it in a couple of years. OSH Park (and others) will deliver boards inside of two weeks for a very reasonable fee. I usually have enough projects going that I can make progress on a different project while the boards are in the fab.
Tom
To boot, "more than 3 units" of anything is considered "commercial - for resale" Import and gets entangled in red tape, local IRS authorizations or at least registering, etc.
Besides, I make Guitar amps, so boards are large by necessity: power amps minimum 10 x 15 cm, preamps 30 x 4 cm (because of the long line of pots along one side) and with those sizes Chinese pcbs which are charged by the sq. centimeter become expensive quickly.
While I pay some 50 bucks for a 3ft by 4ft single face phenolic board, go figure, do the Math.
Of course, have invested in UV exposure beds, heated 20 liter etching tank, full silkscreen equipment, etc. .... for almost 50 years now and it has self paid dozes of times.
But the main advantage, besides that, is that I can go from onscreen image to thermal transfer to etching to drilled board in 45 minutes as mentioned above, 1 hour tops.
And then if I like the result, I burn a silkscreen and in 1 day can have 100 boards ready to assemble.
Of course, I use the same setup to screen front and back panels, and in a pinch, even custom promotional T shirts he he.
Just buy the "empty" black cotton T Shirts by the dozen for peanuts and screen them in house.
Hi Bill
Are the quotes from JLCPCB introductory "teaser" rates or standard pricing?
I get promotions from Digikey for their PCB prototyping--- enticing, but they don't touch JLCPCB from what I see so far.
Thanks,
Steve
They are standard pricing if you're okay with the defaults for board options. You might have a teaser rate, but the boards are usually cheap regardless. 5 double layer postcard sized boards is about $5. Board colors are free (+a few days sometimes), but gold plating and the fancier routing gets pricey.
Shipping by DHL is expensive and usually ends up being ~4x the board cost ($5 for the boards but $20 for shipping). I believe they have cheaper shipping options if you're willing to wait.
Honestly, I've never considered making my own boards any more with places like JLC and OSHPark around. I'm drawing it up in Kicad anyways - I can afford the few bucks more to have them professionally made.
Yes, I use it often.Have you seen the heatless transfer method
gajanan phadte
Great definition but best is freedom from pinholes, solvents partially dissolve toner and the resulting liquid fills them up, while partial melting (ironing) only does it half way.

- Home
- Design & Build
- Equipment & Tools
- PCB Heat Press