I'm looking for treatments to apply to the interior walls of speaker cabinets to damp wall resonances, and want to experiment with what the British call "bitumen pads", notably used in the BBC LS3/5A design.
This automotive acoustic treatment comes up when I search for "bitumen": 3M 08840 Sound Deadening Pad. They are only 1/16" thick so you'd have to layer them up.
Amazon.com: 3M 08840 500 mm x 500 mm Sound Deadening Pad (1-pad): Automotive
Is this the right stuff or is there a better equivalent available in the US?
This is a whole lot cheaper and will work better for the inside of a speaker -
https://www.homedepot.com/p/GCP-App...PIPHorizontal2_rr-_-202267106-_-202288632-_-N
https://www.homedepot.com/p/GCP-App...PIPHorizontal2_rr-_-202267106-_-202288632-_-N
It depends on what your goal is, either to reduce the panels from reverberating, or to reduce the reflections inside.
For the resonance part I prefer this, as it’s a butyl product vs asphalt.
https://www.homedepot.com/p/Nashua-...ndow-and-Door-Flashing-Tape-1343003/206495170
For the reflection part, I use various foam sheets, attached using contact cement or carpet tape. Thick felt is a good option too.
For the resonance part I prefer this, as it’s a butyl product vs asphalt.
https://www.homedepot.com/p/Nashua-...ndow-and-Door-Flashing-Tape-1343003/206495170
For the reflection part, I use various foam sheets, attached using contact cement or carpet tape. Thick felt is a good option too.
I've also had very good success gluing a rubber-backed outdoor carpet to the inside of the cabinet, I'm sure there would be a carpet tile of some sort available at Lowes or Home Depot, most likely available by the piece.
Use a caulk adhesive to attack to the walls. Silicone, latex, liquid nail, whatever, not critical.
Use a caulk adhesive to attack to the walls. Silicone, latex, liquid nail, whatever, not critical.
And I have found that unless a speaker has very thin walls, that most of the time improvements come from reducing the internal reflections.
Measurements
My focus here is on wall resonances, not on acoustic standing waves (which are normally treated via acoustic foam and/or fiber stuffing). My speaker cabinet walls are made from 1/2" plywood, which has numerous high-Q resonant modes and is obviously a poorer choice than MDF with its superior damping qualities.
I could not find a suitable bitumen damping pad that I felt was thick enough and dense enough to have a significant impact on resonances in the 1/2" plywood walls.
I also considered visco-elastic compounds like Green Glue. I did not try this route because it looks like these materials do not set firmly so would be messy inside a speaker cabinet.
Instead I experimented with Liquid Nails construction adhesive, which sets to a rubbery consistency and adheres very well to wood and other surfaces. I also tried Bondo fiberglass resin, an epoxy-like material which is messy to work with and requires good ventilation and sets up to a hard plastic consistency.
I used a DIY accelerometer: a cheap piezoelectric element attached to the speaker wall via double stick tape, and amplified with a mic preamp. A pink noise/FFT system was used to generate frequency response graphs showing enclosure wall resonances.
Here are a few observations:
- 1/4" coating of liquid nails - almost no effect
- 1/8" coating of Bondo fiberglass resin - about 6 dB reduction of resonances below 800 Hz but the additional rigidity produces a few high-Q peaks at higher frequencies
- 1/8" layer of liquid nails sandwiched by a piece of vinyl floor tile - moved resonances around but no significant improvement
- 1/8" layer of liquid nails sandwiched by 1/2" x 1-1/2" x 8" pine strips - about 6-12 dB reduction of resonances over most of the audio band
- additional transverse brace connecting opposing walls - this additional rigidity helped further reduce resonances below 400 Hz but caused a few peaks to appear at higher frequencies
Last edited:
Interesting that the construction adhesive didn’t do more, wouldn’t have expected super great results either, but would have thought it’d have done more.
For my car doors, I back up the thin sheet metal with pieces of cutting board using lots of screws. That material sounded best to me vs wood.
For my car doors, I back up the thin sheet metal with pieces of cutting board using lots of screws. That material sounded best to me vs wood.
Further treatments using car sound deadening mat
To follow up, here is a graph showing the cabinet wall frequency response using my DIY accelerometer system. Red is power line hum components, so you have to compensate for the effect on the remaining curves. White is the bare cabinet walls.
Treatment #4 (above). 3 mm layer of liquid nails sandwiched with multiple 1/2" x 1.5" pine strips (violet). As noted above this is very effective over most of the frequency band, except for a large peak at 900 Hz.

I then ordered this Siless 80 mil (2 mm) sound deadening mat (it's cheaper in larger quantities):
Amazon.com: Siless Black 80 mil 7.5 sqft Sound Deadening mat - Sound Deadener Mat - Car Sound Dampening Material - Sound dampener - Sound deadening Material Sound Insulation - Car Sound deadening Bulk Kit Trunk: Automotive
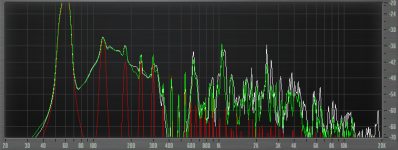
Treatment #6. Here is the effect of a single layer of the mat covering about 70% of the enclosure wall (green). As you can see a single layer has very little effect. (Presumably it is more effective on metal automotive body panels.)

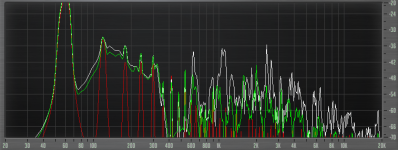
Treatment #7. Here is the effect of two layers of the mat with a 1/2" x 1.5" x 7" pine strip epoxied at a diagonal onto the mat sandwich (green). This eliminates all peaks above 500 Hz.
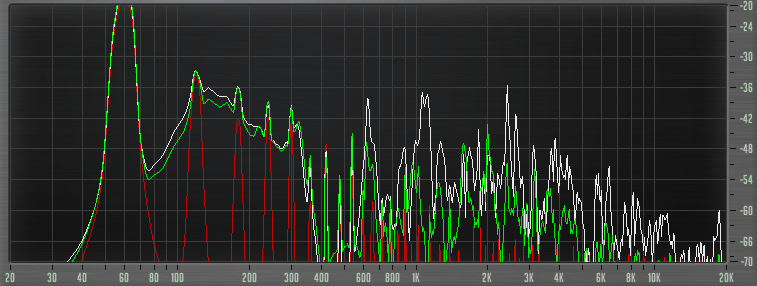
Conclusion. Although a little more expensive and harder to work with than treatment #4, treatment #7 may be worthwhile.
To follow up, here is a graph showing the cabinet wall frequency response using my DIY accelerometer system. Red is power line hum components, so you have to compensate for the effect on the remaining curves. White is the bare cabinet walls.
Treatment #4 (above). 3 mm layer of liquid nails sandwiched with multiple 1/2" x 1.5" pine strips (violet). As noted above this is very effective over most of the frequency band, except for a large peak at 900 Hz.
I then ordered this Siless 80 mil (2 mm) sound deadening mat (it's cheaper in larger quantities):
Amazon.com: Siless Black 80 mil 7.5 sqft Sound Deadening mat - Sound Deadener Mat - Car Sound Dampening Material - Sound dampener - Sound deadening Material Sound Insulation - Car Sound deadening Bulk Kit Trunk: Automotive
Treatment #6. Here is the effect of a single layer of the mat covering about 70% of the enclosure wall (green). As you can see a single layer has very little effect. (Presumably it is more effective on metal automotive body panels.)
Treatment #7. Here is the effect of two layers of the mat with a 1/2" x 1.5" x 7" pine strip epoxied at a diagonal onto the mat sandwich (green). This eliminates all peaks above 500 Hz.
Conclusion. Although a little more expensive and harder to work with than treatment #4, treatment #7 may be worthwhile.
Attachments


One final note about the 80 mil automotive sound deadening mats. The one I linked to above has a coat of black paint over the aluminum foil surface. You will probably get better adhesion in multi layer applications using the unpainted aluminum version. Here is such a mat from Siless but the ones from Vibro (who make a 200 mil variant), Killmat, Noico, etc are probably similar:
Amazon.com: Siless 80 mil 7.5 sqft Sound Deadening mat - Sound Deadener Mat - Car Sound Dampening Material - Sound dampener - Sound deadening Material Sound Insulation - Car Sound deadening Bulk Kit Trunk: Automotive
Also I would not recommend the thicker automotive sound/heat insulating "foam" products. These are available in 5mm to 20mm thickness but are much less dense than the sound deadening mats, and probably less effective at damping wooden panels.
Late to the discussion
I just ran across this searching for poly fill material suggestions and read through it. It begs the question why don't you just select a better material from the start? 1/2" for a sub...really??
I just ran across this searching for poly fill material suggestions and read through it. It begs the question why don't you just select a better material from the start? 1/2" for a sub...really??
The auto deadening products (like Dynamat and similar products) have a thin sheet of adhesive butyl rubber, and a thin aluminum sheet on the top. I've used it to improve CD players, valve amps, resonant glass shelves, turntables. I wouldn't expect it to be be best product for speakers.
For speakers I would bond sheets of hardwood ply to the interior, then apply thick dowel internal bracing - front/back would be most important, but not neglecting side-side and top/bottom.
And if the speaker is not a sub, put it on a solid stand.
For speakers I would bond sheets of hardwood ply to the interior, then apply thick dowel internal bracing - front/back would be most important, but not neglecting side-side and top/bottom.
And if the speaker is not a sub, put it on a solid stand.
For a subwoofer, with little output above 100 Hz, I would agree. But it has been shown here and elsewhere that stiffening an enclosure only moves resonances around.
That's what the designers of the BBC LS3/5A found as far back as the 1970's. Even the Celestion SL600, made with ultra-stiff aircraft aluminum panels, required deadening material to avoid audible resonances.
Think about a guitar. Stiffening an enclosure wall is like pressing on a fret to shorten the length of the vibrating string. It will vibrate at a higher frequency, but just as loudly. To make the guitar quieter you have to rest your palm on the string near the bridge ("palm mute" technique), which adds a damping element to deaden the sound.
Small followup... Contrary to my recollection it appears the BBC came up with the "thin wall with damping" technique in the 1960's prior to the LS3/5A design (Reference).
Also to reiterate, I found a single layer of the auto-body-deadening-material to be ineffective (in the context of my small enclosure with 12mm birch ply walls), and you need to use at least two layers. If you have access to bitumen pads, I've seen a rule of thumb that the damping material should be up to half as thick as the enclosure wall.
Also to reiterate, I found a single layer of the auto-body-deadening-material to be ineffective (in the context of my small enclosure with 12mm birch ply walls), and you need to use at least two layers. If you have access to bitumen pads, I've seen a rule of thumb that the damping material should be up to half as thick as the enclosure wall.
Use green glue to secure linoleum or PVC floor tiles or sheet. It's poor man's constrained layer damping.
- Home
- Design & Build
- Construction Tips
- 3M sound deadening pad - bitumen?