I have surface finished aluminium parts occasionally, usually with silicon carbide "wet and dry" paper, just by hand, and it works fine.
But I now have a scratched panel that is more than a square metre, plus its partner that needs to match.
The scratches are more than superficial, which will be a serious waste of time if done manually.
My first idea was a portable belt sander but there is a problem with choice of suitable abrasives.
A belt sander is fairly "harsh" so a non-woven Surface Conditioner Material (SCM, like "Scotchbrite" brand abrasive) would seem suitable because it provides a bit of cushion.
I have used SCM in a rotary sander with reasonable results but it doesn't seem to be easily available in portable sander belt sizes, only belt file and fixed machine sizes.
So ordered a 'burnisher" type spindle from AliExpress to fit my polisher/sander.
,

I haven't ordered abrasives yet, there's a choice of abrasive paper flap wheel, SCM drum, or abrasive paper/SCM hybrid.
Any recommendations?
A final option is a Mirka Random Orbit Sander, or a cheaper clone.
These look really nice with dust extraction that the burnisher lacks.

I first noticed them in videos from people who make very nice stuff, and it looks like what they really use and not product placement, so it seems the professionals' choice.
Any opinions on these?
David
But I now have a scratched panel that is more than a square metre, plus its partner that needs to match.
The scratches are more than superficial, which will be a serious waste of time if done manually.
My first idea was a portable belt sander but there is a problem with choice of suitable abrasives.
A belt sander is fairly "harsh" so a non-woven Surface Conditioner Material (SCM, like "Scotchbrite" brand abrasive) would seem suitable because it provides a bit of cushion.
I have used SCM in a rotary sander with reasonable results but it doesn't seem to be easily available in portable sander belt sizes, only belt file and fixed machine sizes.
So ordered a 'burnisher" type spindle from AliExpress to fit my polisher/sander.
,
I haven't ordered abrasives yet, there's a choice of abrasive paper flap wheel, SCM drum, or abrasive paper/SCM hybrid.
Any recommendations?
A final option is a Mirka Random Orbit Sander, or a cheaper clone.
These look really nice with dust extraction that the burnisher lacks.
I first noticed them in videos from people who make very nice stuff, and it looks like what they really use and not product placement, so it seems the professionals' choice.
Any opinions on these?
David
Last edited:
Dunno, but FWIW we used 3M systems to polish alum, SS up to including mirror finish til it closed in '94; so is it available Down Under?
What do you mean by "it"? 3M is still around in Australia and the US.so is it available Down Under?
It's a US company so I doubt we have any products here that are unavailable for the last 30 years in the US.
Best wishes
David

We of course don't know what that scratched square meter panel (or its function) is but if it is just aluminium sheet maybe replacing it is the fastest/cheapest/most efficient solution?
I have aluminium stuff with severe damage powder coated and sanding the sides of severe scratches often is enough for a practically impeccable finish. Stuff that drives is another matter. When stones or hard particles come against the power coating surface it may chip and water can creep in and corrosion will start. That is plain ugly.
Last thing with severe damage was aluminium ships mast profile used for loudspeaker stands. These were already powder coated in high gloss black but it was dropped and a large piece had chipped off besides an ugly dent. Sanded that one flat and had it recoated. Only the center of the large area is still visible (about 4 mm) which I think is acceptable as nothing is perfect.
Last edited:
I got nice non-glossy finish by brushing aluminium with a steel brush (by hand or with a drill). This will mask any scratch.
The scary reality is when you have things about perfect the next day someone makes a fresh scratch or dent. The ability to repair is no party to those that think all stuff can be treated roughly.
I call this my 13th Law of JP: Those that state a scratch can be removed in a few minutes never have removed any scratch.
I call this my 13th Law of JP: Those that state a scratch can be removed in a few minutes never have removed any scratch.
The good thing is - any further scratch after the first one is less scary! It just adds to the character and patina.The scary reality is when you have things about perfect the next day someone makes a fresh scratch or dent.
Yes the pursuit after perfection is futile but it usually takes a few years before that lands. Reasonable wear & tear add to character.
Useless rough treatment and damage of valuable stuff are another thing.
Useless rough treatment and damage of valuable stuff are another thing.
Beauty 🙂Use the other side?
Last edited:
Thank you very much for the offer, I have been super busy at work since we last met but it's finally slowed down and I had planned to call you, as I catch up both with friends and also projects like this. Nice to combine the two.The Mirka is fantastic, I have one you can have a play with if you want. I'm in Bruce now, a bit closer than before.
By coincidence I was in Bruce earlier today, very convenient!
There does seem to be a consensus that the Mirka is top option, what model do you have and have you used it on aluminium?
If so, with what abrasive?
Mirka do a net abrasive with silicon carbide that looks like it would be ideal, but maybe "wet and dry" type paper is all that's needed.
Best wishes
David
Last edited:
I have done this with minor scratches on small pieces but this is a bit deeper, and hard to do evenly over a such an area, especially with a drill.... a steel brush (by hand or with a drill). This will mask any scratch.
The burnisher is balanced and shaped to be better suited for the job, but essentially the same idea, thank you.
Best wishes
David
What finish do you want?
If you are looking for a mirror polish then I would suggest a random orbital sander and use polishing compound.
For a matt finish then sand blasting but a 1 sq meter piece is going to need either of a big cabinet or a lot of media if you cannot collect and rear use it.
If you are looking for a mirror polish then I would suggest a random orbital sander and use polishing compound.
For a matt finish then sand blasting but a 1 sq meter piece is going to need either of a big cabinet or a lot of media if you cannot collect and rear use it.
Excellent question!What finish do you want?
There is no particular finish that I am determined to achieve, I will be happy provided there is a reasonably even, unscratched result.
(This is also a bit of an educational experiment, to better learn how to work with aluminium, after previous experience mainly with woodwork on speaker builds and the like.)
I plan to have the plates black anodized, so that does rule out the option to simply cover the scratches with paint.
I have previously had small aluminium parts bead blasted and was a little surprised that it didn't hide imperfections very well.
A sand blasted finish would surely hide imperfections better but I would be a little concerned that if it was blasted too hard then the panels may distort.
That wouldn't be a problem with my own, smallish blaster but it would be a slow job for such an area.
It may be a problem if I send them to an industrial contractor with the power level of compressor they use, plus the extra cost.
So I think I will try the Mirka, or a cheaper clone first.
Thanks for your proposal, always helpful to have other fallback options to consider.
Best wishes
David
Clamp the sheet onto a flat surface.
It is quicker and may be cheap to buy black anodised sheet.
I don't know how deep the scratches are but bead blasting is not ad ferocious as sand blasting. Uses wet n dry to flatten the scratch followed by sand blasting should hide it.
DIY sandblasting requires a mighty big air tank. Not sure how big my tank is but when I was doing this. I could only blast for a few secods but my pieces were smart - about 300 x 50 x 20 mm.
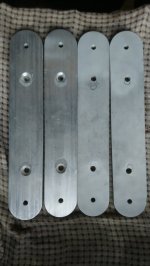
FYI These are base plates for PMC speakers someone else made for a different model to mine so the original holes filled in by tapered aluminum rods then redrilled to move the holes further apart.
It is quicker and may be cheap to buy black anodised sheet.
I don't know how deep the scratches are but bead blasting is not ad ferocious as sand blasting. Uses wet n dry to flatten the scratch followed by sand blasting should hide it.
DIY sandblasting requires a mighty big air tank. Not sure how big my tank is but when I was doing this. I could only blast for a few secods but my pieces were smart - about 300 x 50 x 20 mm.
FYI These are base plates for PMC speakers someone else made for a different model to mine so the original holes filled in by tapered aluminum rods then redrilled to move the holes further apart.
Attachments
DA with a scotchbrite pad, then anodize it if you really care about the finish.
Otherwise just live with a soft material the pretty much anything will scratch.
Otherwise just live with a soft material the pretty much anything will scratch.
Somewhat dangerous especially with a large piece but you can frost it with lye in water. The reaction gives off hydrogen so only do it outside away from spark or flame. Wash it with an acid like vinegar or muriatic after then clear water. The process eats away the surface so scratches should be reduced or eliminated depending on how long you leave it covered. The finish is pretty durable once you get the black smut off. Years ago the method was published in popular mechanics "boy mechanics".
DA? acronym without context isn't very informative...DA with a scotchbrite pad, then anodize it if you really care about the finish.
The panels are 1.2 x 1.2 m, so even to build or source just the tank would be a substantial job. Plus the need for a few hundred litres of caustic solution to have sufficient depth to slosh around for a uniform etch. Not an attractive option thanks....you can frost it with lye in water...
Because it's DIYAudio?! Part of the fun is to do it yourself, and to learn.Why not take it to an automobile shop
And the extra cost doesn't appeal.
Reasonable proposal, because I do tend to mistakenly try to DIY when I should just hire a professional, but this job looks like it should be fine.
I haven't seen any pre-anodised sheet near the size of this panel.It is quicker and may be cheap to buy black anodised sheet.
I doubt it exists anywhere in Australia, not an option AFAIK.
Best wishes
David
- Home
- Design & Build
- Construction Tips
- Scratch repair on aluminium plate (several square metres)