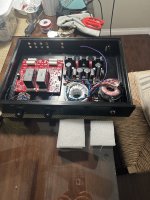
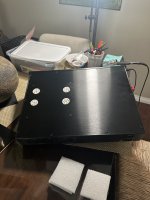
Hello, can anybody here recommend chassis venting ideas? I am mostly worried about the PS-21 and the heat sinks. Looking at the chassis you will notice that everything is mounted to the top plate. the transformers have been mounted with very tough 25 lb mounting tape and I will be using foam as a wedge on the bottom panels.
Attachments
Some holes or slots in the top and bottom plates near the heat sinks. What more do you need?
jeff
jeff
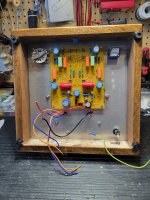
Here is what I did. partially for fun/interest and partially for temperature control.

.jpg")
.jpg")

How about mounting the power transformers near the power entry socket and the power supply board closer to the preamp front panel .
Enlarge the diameter of the four tube socket holes and suspend the audio pcb deeper into the chassis (ie. from longer hex standoffs) so that the warm tubes create air current draw and you get air flow around the tubes and out the holes.
Locate vent holes in the bottom plate so that the air drawn in has to flow past the heat sinks to get out the top.
You can put a little smoke (cigarette if you use 'em, incense or something like that if you don't) in underneath to see how much flow you get once everything is warmed up. Then add more holes in the bottom or enlarge top holes if needed.
My2¢
Last edited:
I'm not sure, that mounting tape keeps the toroids, if its get warm/hot.
Use mounting element to fixing.

Use mounting element to fixing.
How about mounting the power transformers near the power entry socket and the power supply board closer to the preamp front panel .
Enlarge the diameter of the four tube socket holes and suspend the audio pcb deeper into the chassis (ie. from longer hex standoffs) so that the warm tubes create air current draw and you get air flow around the tubes and out the holes.
Locate vent holes in the bottom plate so that the air drawn in has to flow past the heat sinks to get out the top.
You can put a little smoke (cigarette if you use 'em, incense or something like that if you don't) in underneath to see how much flow you get once everything is warmed up. Then add more holes in the bottom or enlarge top holes if needed.
My2¢ Thanks, good ideas but unsure how I will open up an existing hole.?
"unsure how I will open up an existing hole.?"
Do a search on "Step Drill Bit" . There's quite a range in price. Or maybe a friend has one that goes large enough.
(If you go that route , you should consider how to support the plate so that it doesn't bend under pressure. Not difficult but needs to be done.)
Do a search on "Step Drill Bit" . There's quite a range in price. Or maybe a friend has one that goes large enough.
(If you go that route , you should consider how to support the plate so that it doesn't bend under pressure. Not difficult but needs to be done.)
Last edited:
I did something similar with a Zero Zone board kit I bought.Here is what I did. partially for fun/interest and partially for temperature control.
View attachment 1334041View attachment 1334042View attachment 1334043
Attachments
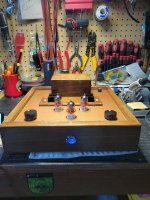
If the tube sockets are not mounted the the top of the chassis make the holes the tubes go through about 1/4” bigger than the tubes so there is a ring around the tubes for heat to escape. Also put some 3/8” holes on the bottom of the chassis, the more the better, to get convection going to pull the heat out the top tube holes. Tiny holes do not do any good move air out. Go as big as you can and still keep fingers out.
Attachments

Thanks to all for the advice. I will make the changes to enlarge the tube holes and move the power transformers close to the power entry module. I didn't make anything permanent yet so easy to change. What would give me a better finish with the step drill, drilling from the top or bottom?
I'm definitely going to use round hole punches like you did in the future for heatsinks.Here is what I did. partially for fun/interest and partially for temperature control.
View attachment 1334041View attachment 1334042View attachment 1334043
It partailly depends on the quality. Not knowing that ahead of time and starting without a lot of experience , I'd go through the top.What would give me a better finish with the step drill, drilling from the top or bottom?
One issue is the cut between steps that can leave a chamfered edge that in the case of anodized aluminum might expose more of the natural aluminum colour to view from above, which unless it's sized just right and perfectly uniform won't look good.
If you get a nice clean vertical wall it's easy to colour so that it's not visible.
One trick is to be gentle with pressure and to stop the instant (and I mean instant !) it pops through at the step you want. You'll understand what I mean easily enough if you take your time and watch carefully , getting a feel for how everything is working in the steps leading up to the one you want. It's not at all difficult. It just takes care and attention if you want to do a clean job.
If you get any burring on the underside you can take that off (from the underside) with the chamfering interstep on the step drill. Again, go slowly and use your head and it will be fine.
Another 2¢
I'm definitely going to use round hole punches like you did in the future for heatsinks.
I agree, that's a good trick I hadn't thought of, simple as it is! ;-)
Greenelee punches are great but get expensive as you get over one inch size. Don’t get cheap knockoffs as they don’t last and don’t cut cleanly after one use. I use hole saws over one inch. Just use cutting oil and you won’t have issues with tearing. Sets are cheap on Amazon but are metric sizes only.
With aluminum, even the thicker aluminum, I sometimes use Forstner bits used for wood. I chuck them up in my drill press set to the slowest speed. I go slow, a little at a time brushing away the filings as I go, along with using a light oil to keep the bit cool. The Forstner's make nice clean holes, or flat bottom recesses in thicker aluminum for volume control pots, and knobs.
- Home
- Amplifiers
- Tubes / Valves
- Chassis venting recommendation for Aikido octal and PS-21