I have little confidence in my woodworking skills so need to ask to get right since once glued, well that’s it! I have completed a wood base crossover, cut wire lengths all of which will be installed in the cabinet through the front baffle. That part I am good with, and my crossover assembly fits through the front baffle openings. 😀
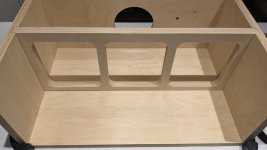
Still a noob... This is my second speaker project from a flatpack and hardware kit. I chose a flatpack because I couldn't find anyone local to do the wood cuts for me and do not have a kitted-out workshop to handle these cuts like many folks here. The published basic design does not accommodate for a brace though it does recommend implementing. I worked with the supplier on this, and they provided a center brace design which you can see the in the picture.
My questions center around the order of assembly and gluing the enclosure pieces.
Thanks for any advice and guidance.
Still a noob... This is my second speaker project from a flatpack and hardware kit. I chose a flatpack because I couldn't find anyone local to do the wood cuts for me and do not have a kitted-out workshop to handle these cuts like many folks here. The published basic design does not accommodate for a brace though it does recommend implementing. I worked with the supplier on this, and they provided a center brace design which you can see the in the picture.
My questions center around the order of assembly and gluing the enclosure pieces.
- Is it best to glue all at once or glue in sections to assemble modularly?
- Depending on the above… The front baffle is flat glued (no screws), would you recommend it be part of the initial assembly to get a good box brace all round for clamping?
- The center brace is not tight, there is wiggle room for floating. I am presuming that the gaps allow for better fitment however, is filling this small gap with carpenter glue or No More Nails recommended?
- Should the center brace be pin nailed for extra hold?
Thanks for any advice and guidance.
Attachments
I would look for YouTube build guides for speaker to get a feel for how others do it.
Firstly a dry assemble is always good, I guess you know this hence your point about the brace.
How many clamps, right angle pieces with clamps do you have to hold them in place and be square whilst they dry.
A slow to dry wood glue maybe useful here as it allows you to position, clamp, and if they need a small adjustment undo the clamp and shim or fix the joint as required.
Ideally the brace should be retained in a small rebate and then firmly attach to the adjoining walls as you complete final glue up. If it is a bit loose, Solidly affix one side to the cabinet and use a compressible gasket, foam draught excluder, speaker sealing tape to allow it to contact the front panel. Not as perfect as a direct glue but it should help damp the panel where it compresses the foam.
Depending on build you may have to use the front panel. back panel fitted to allow everything to align. People do use cooking grease proof paper between the pieces, wipe of any seepage of glue with a damp rag and use the grease proof paper to act as a thin gasket to stop the panel sticking to further glue that may seep out.
Only when you are really happy would get the glue out, and maybe have another pair of hands available to help out. Why should you have all the fun?
@raymondj Thank you for the tips and insight. Second pair of hands is my wife who knows more about wood working and power tools then I do. She was the one asking about the ordering and the brace fastening requirement.

Thank you very much and will let you know how we get on!
We were planning on using 2 band clamps for initial hold in place while preparing 4 long top to bottom. There are 4 shorter ones on left which can be used front to back.How many clamps, right angle pieces with clamps do you have to hold them in place and be square whilst they dry.
Yes, our preference as well as we are not very quick at getting this right. LePage's Pro Carpenters glue is what we have been using for projects which allows for adjustment time. The CNC work is good insofar as the fitment in the dry setup so hopefully that is helpful. They also left a 0.5mm overhang on the panels so a flush trim can be had with a router. That shall be a new experience.A slow to dry wood glue maybe useful here as it allows you to position, clamp, and if they need a small adjustment undo the clamp and shim or fix the joint as required.
Thank you, noted. I have speaker gasket material which I was going to cut for the speaker installation stage. I can snip this and use on the ends for baffle assembly where the frame and brace come together.Ideally the brace should be retained in a small rebate and then firmly attach to the adjoining walls as you complete final glue up. If it is a bit loose, Solidly affix one side to the cabinet and use a compressible gasket, foam draught excluder, speaker sealing tape to allow it to contact the front panel. Not as perfect as a direct glue but it should help damp the panel where it compresses the foam.
Ya, wax paper we call it here. I usually apply glue and spread with a small brush to avoid gobs when clamping and having to chip off.People do use cooking grease proof paper between the pieces, wipe of any seepage of glue with a damp rag and use the grease proof paper to act as a thin gasket to stop the panel sticking to further glue that may seep out.
Thank you very much and will let you know how we get on!
At the beginning of post #1 a crossover mounted on a wood base.
It's Better if you leave It outside [*]
[*] It's Better if you leave It WELL outside
It's Better if you leave It outside [*]
Not really neededhave speaker gasket material which I was going to cut for the speaker
[*] It's Better if you leave It WELL outside
Would expand on this? Not following what you mean. Current config looks like this to be mounted bottom rear compartment.[*] It's Better if you leave It WELL outside
The Xover looks good, and seem to be made with high quality parts e.g. air core inductors, so as long as its is away from the drivers your installation looks fine to me. There is nothing stopping your partner making you a beautiful external wooden Xover box if that's what you want.
Hei darling, what if we put the X-over outside?!
Ah ah ah
Now I'm having visions of stripped wires, and oxidation, and silicone dirt from tape
Ahahah
Ah ah ah
Now I'm having visions of stripped wires, and oxidation, and silicone dirt from tape
Ahahah
@picowallspeaker Perhaps for the next pair which are not a kit design. No need for this use case and application but thanks.
Ok, let's bring it on for the next conversation, together with Why did you put Litz wire in the coils !?!
😍
😍
I could tell you that I prefer to strip varnish strands more then solid core inductors or I could tell you the vendor did not have a solid core in stock or perhaps I should refer you back to my 1st post where I indicated I purchased a kit. It would be best to question the engineer who selected the kit components for a technical debate on the matter. I can provide you contact details.Ok, let's bring it on for the next conversation, together with Why did you put Litz wire in the coils !?!
For my opinion on the matter:
I don't think it matters one bit since these will be fed with by a low wattage tube amp
Seems to be a better application in this example since small confined space and potential to reduce inherent interference
Then vendor was out of stock for solid core, seriously.
- Home
- Loudspeakers
- Multi-Way
- SEAS Bragi Speaker Project