I've used the laser printer with toner transfer paper process for a few panels. Same stuff I use for resist to make PCBs at home. Need to create inverted text and then heat transfer with clothes iron. It's a bit tricky to learn but it does produce a durable result.
Attachments
Last edited:

JMFahey do you have example of silkscreen on anodized aluminum?
Another option is reverse laser printing on 1.5mm or 3mm or 6mm clear cast acrylic (many acrylic dealers do this like the one linked below where I get my acrylic sheets). Include hole center dots in the printed panel layout so you can drill accurately later and outer cut so they can cut the panel rectangle too. Then mount the clear acrylic over your metal front panel, screwed or just trapped in a frame. Lettering will never wear off because its reverse printed from behind. It will be much like a 1970's Sansui Receiver look, where they back printed the tuner bands on glass.
https://www.custommadebetter.com/products/custom-pattern-sheet-request
They look swish, thanks for the link, Ill check em out.
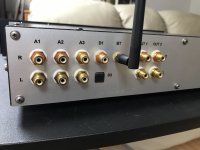
Yes, the the plate looks pleasant indeed. I chose a bronzed one to contrast with the aluminium front.
I have to say it has a strong adhesive, so far many months after placement it hasn't budged at all.
Not today but I have done it many times, results are real PRO, like on any such Commercial printing.JMFahey do you have example of silkscreen on anodized aluminum?
Anodized aluminum surface is excellent to screen on, because the process itself crates micropores (so it can hold dye type inks for coloring); if you like a matte/dull finish you can sandblast surface, with a coarser or finer media, which has the added bonus of hiding minor imperfections, scratches, discolourings, etc.
Finest media is blasting with glass microspheres, which leaves behind a very smooth satin surface, you have seen it many times.
In any case, anodizing or blasting, screen ink used is two component epoxy.
It strongly adheres to surface, is "thick" because there is not solvent evaporation, and you can feel it being slightly rise with yourfingertips.
Very Professional, the most used finish.
Didn´t know you can laser print on such a thick material but hey , every day I learn something new.Another option is reverse laser printing on 1.5mm or 3mm or 6mm clear cast acrylic (many acrylic dealers do this like the one linked below where I get my acrylic sheets). Include hole center dots in the printed panel layout so you can drill accurately later and outer cut so they can cut the panel rectangle too. Then mount the clear acrylic over your metal front panel, screwed or just trapped in a frame. Lettering will never wear off because its reverse printed from behind. It will be much like a 1970's Sansui Receiver look, where they back printed the tuner bands on glass.
Those Sansui receivers had the scale silkscreened on acrylic sheet, on the back side of course.
I have done it to imitate classic Marshall guitar amps, in that case screened on back and then sprayed gold to create a background.
They were so famous for that finish they are currently known as "Plexis", go figure.

Then to simplify and save cost they switched to front screening on gold anodized aluminum.
That's a nifty trick. My wife does this for art & craft and never thought about it for aluminium.I've used the laser printer with toner transfer paper process for a few panels. Same stuff I use for resist to make PCBs at home. Need to create inverted text and then heat transfer with clothes iron. It's a bit tricky to learn but it does produce a durable result.
The art of the control panel, I've always wanted to try to so something up like the old Sansuis in acrylic, glass, fine wood and aluminum but so much to learn, printing, silk screening, engraving... And so little time to learn it.

Yes, thanks everyone. I was just wondering how to deal with this. Last year I built an amp for a friend but didn't label anything, thinking it was obvious what tubes went where. WRONG! So I've been looking for an affordable solution for future projects. Some great ideas here. Here's one that turned up on our local DIY forum:
https://hugawe.com/products/this-is-a-perfect-gift
I've order one to a) see if it actually arives and b) see if a beginner like me can use it. ;-)
https://hugawe.com/products/this-is-a-perfect-gift
I've order one to a) see if it actually arives and b) see if a beginner like me can use it. ;-)
The "maker spaces" at the public libraries in my area have large scale vinyl printers that also cut. Free to use and the staff will help.Know anyone with a vinyl cutter like a Cricut? They can print some nice stick on logos and lettering
How about using small name tags? I'm thinking the hard plastic ones that are typically engraved or milled. I'd imagine they'd be pretty affordable. Just get them without the safety pin on the back, drill a couple of holes, and mount them with fancy machine screws.
Tom
Tom
That is what the Scott SignGraver is used for. Used to use it for making industrial control panels and badges, now I use it for faceplates.
Yes, thanks everyone. I was just wondering how to deal with this. Last year I built an amp for a friend but didn't label anything, thinking it was obvious what tubes went where. WRONG! So I've been looking for an affordable solution for future projects. Some great ideas here. Here's one that turned up on our local DIY forum:
https://hugawe.com/products/this-is-a-perfect-gift
I've order one to a) see if it actually arives and b) see if a beginner like me can use it. ;-)
I'm waiting for the Laser Pecker 4 to arrive, that one will engrave anodized aluminum or stainless steel and ferrous metals bare. For aluminum it must be anodized though. That model 2 is great too, but they upped the power with 4. Fiber laser is the way to go for what we're discussing (which these are). Diode laser or CO2 has its drawbacks for a DIYer panels.
https://www.laserpecker.net/blogs/news/laserpecker-4
How about a label embossing machine like this?
Nice retro custom feel, cheap and cheerful.
No ties to sellers.
I used silk screen printing on my DIY preamp. Paid around 2 $ single piece. Wood board face plate was already fixed on chassis so it was an afterthought to make proper faceplate. So got plain aluminum stip, brushed it clean with flint paper, printed and than glued on faceplate. More pictures here.

I have heard after screen printing ink dries, blowing proper temp hot air permenantly adheres ink to the surface and makes it durable. (Dont do on acrylic)
regards.
I have heard after screen printing ink dries, blowing proper temp hot air permenantly adheres ink to the surface and makes it durable. (Dont do on acrylic)
regards.
- Home
- Amplifiers
- Tubes / Valves
- DIY Amplifier Labels