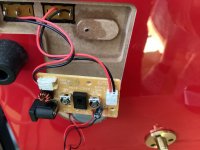
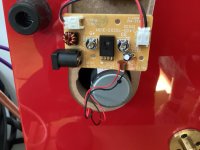
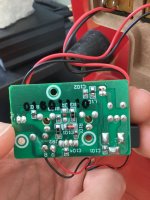
hello. yesterday while trying to adjust the speed on my Thorens TD203 turntable I busted the 33 1/3 RPM potentiometer, now no matter how much I rotate it, nothing happens. I looked it up, apparently this happens a lot as the thing is very tender and the instruction manual makes this task look rather simple. after the 33 1/3 RPM debacle I unscrewed the controller housing and adjusted the 45 RPM potentiometer live, applying caution - this worked like a charm. so, the question is - can the 33 1/3 RPM potentiometer be replaced? also, could I perhaps get away with an affordable variable (bench) PSU? if I understand correctly, I need to adjust DC voltage the motor receives.


Those adjustable presets are dead easy to replace. I can't make the numbers out clearly but if one says 473 then that is 47 and three zero's (47k) and if the other says 203 then that is 20k
Takes seconds to replace them.
An adjustable supply feeding the motor is not accurate enough, the part in the middle of the board is a voltage regulator that adjusts the output in relation to load on the motor (it senses back emf).
Both presets could be changed in the time it takes you to read this 😉
ok, maybe you can change them in time it takes me to read this 🙂 does this speed mean there is no soldering involved?Those adjustable presets are dead easy to replace. I can't make the numbers out clearly but if one says 473 then that is 47 and three zero's (47k) and if the other says 203 then that is 20k
Takes seconds to replace them.
An adjustable supply feeding the motor is not accurate enough, the part in the middle of the board is a voltage regulator that adjusts the output in relation to load on the motor (it senses back emf).
Both presets could be changed in the time it takes you to read this 😉
the numbers are 472 and 202, it's the 472 which is broken.
I am guessing it means 4.7 kOhms, and I will need something like this: https://www.digikey.de/de/products/detail/bourns-inc/3339P-1-472/2536438 ? the profile of this thing might be too high however to fit under the hood. perhaps something like this https://www.reichelt.de/de/de/spind...bou-3296w-1-472-p238578.html?PROVID=2788&&r=1 so I could bend it?
Little presets like those used to be so readily available. 5k is fine if you can find them. There are a few on ebay. Wouldn't normally recommend that as a source but for a preset worth a try.
Old scrap equipment like old vcr's and the like might have some in.
https://uk.farnell.com/bourns/3306f-1-502/trimmer-5k-6mm/dp/1689847
You can solder them to the back of the board if that helps with space. To unsolder them just heat the middle leg first with the iron and pull to free. Do the same for the other two pins being careful not to lift the print (so do not push back down, just heat and pull). Clear the holes of possible. Solder braid is ideal. If not then position the new preset and heat each pad to melt the solder and gently push each leg through, one at a time.
These are excellent, very stable, and you can slightly bend the leads to fit. I've used them for decades.
It will never break.
https://www.mouser.com/ProductDetail/Bourns/3329H-1-502LF?qs=yhV1fb9g/KZ9bOTTx1WuAA==
It will never break.
https://www.mouser.com/ProductDetail/Bourns/3329H-1-502LF?qs=yhV1fb9g/KZ9bOTTx1WuAA==
all right, thank you very much. soldering it is then... eh, I really wanted to avoid it (as can be seen from my very first post here), but oh well - life... I guess I'll need to practice a bit first, last time I did soldering was in high school, decades ago, and I was never real good at it.
yes, I reckon I might as well replace the surviving potentiometer too while I'm at it? for the sake of consistency?
Not necessary, but if you are confident in your soldering, then it won't hurt.yes, I reckon I might as well replace the surviving potentiometer too while I'm at it? for the sake of consistency?
Practice on an old broken circuit board first. There's got to be one laying around somewhere in Germany.
Surely a friend has some, and tools. Maybe he will replace the pot(s) for you if there still is concern.
Last edited:
Definitely practice on something scrap if you can. Old remotes, anything. Be sure the iron is suitable, a bigger rather than smaller tip can be best. Use ordinary traditional '60/40' solder that has cores of flux in it for electronics work like this. Do not use lead free stuff.I guess I'll need to practice a bit first, last time I did soldering was in high school, decades ago, and I was never real good at it.
Just a thought if you do. They may interact depending how the speed switching works. If so then one (whichever that is) has to be set before the other.yes, I reckon I might as well replace the surviving potentiometer too while I'm at it? for the sake of consistency?
- Home
- Source & Line
- Analogue Source
- busted the potentiometer on my Thorens TD203