Hello together,
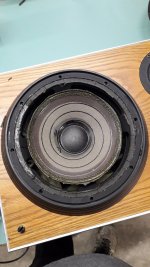
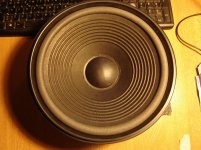
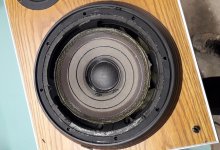
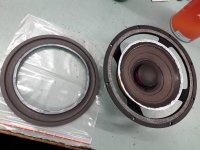
I`ve get my hands on some used Dynaudio P31. They are nearly 40 years old. The foam surrounds are broken and need a make over.
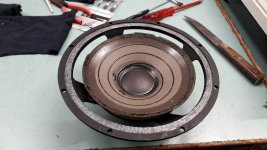
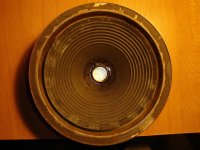
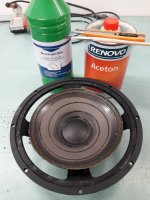
I disassemled the woofers and start cleaning them.
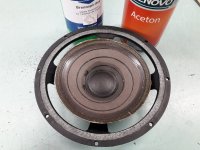
Get some progress,
But now some question pop up.
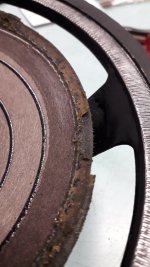
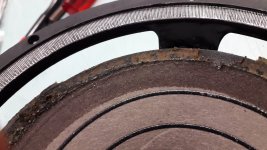
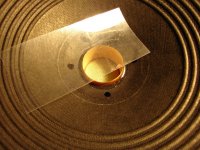
At the edge of the paper membrane there is some yellow foil.
Do someone know, is this foil part of the Membrane or part of the old foam surround?
If its part of the old surround, i have to remove it right down to the paper.
Do someone have a tip how to this properly?
Till now i have applied some alcohol to the old surrounds and scratch the leftovers away.
If there is a better way suggestions are welcome.
Greets Alex
I`ve get my hands on some used Dynaudio P31. They are nearly 40 years old. The foam surrounds are broken and need a make over.
I disassemled the woofers and start cleaning them.
Get some progress,
But now some question pop up.
At the edge of the paper membrane there is some yellow foil.
Do someone know, is this foil part of the Membrane or part of the old foam surround?
If its part of the old surround, i have to remove it right down to the paper.
Do someone have a tip how to this properly?
Till now i have applied some alcohol to the old surrounds and scratch the leftovers away.
If there is a better way suggestions are welcome.
Greets Alex
Attachments
The method I used was to repeatedly apply Methyl Ethyl Ketone (MEK) with a brush on the surface that is glued, then it comes off without the need to "scrape", because you will ruin the cone. I do not know if new liquids are used nowadays, their sale was prohibited here because it was very volatile and some boys blew their heads off purposely inhaling it, you understand me ...
Find out in a special liquids store (here called Drugstore), alcohol does not work. First you would have to have the replacement foam to know how far to take off the old one.
And you also have to remove the dust cover and center the coil before gluing the new foam. That's very important or the job will go wrong. Check out some YT videos before proceeding.
https://www.simplyspeakers.com/?__c...TpG5bEe0xhoy4Z8Q.5hs-1641143974-0-gaNycGzNCRE
You can send them a message and they will respond as soon as possible to see if they have the repair kit, it usually comes with the special glue.
You can send them a message and they will respond as soon as possible to see if they have the repair kit, it usually comes with the special glue.
Removing the DC surely is the better way, but it also can be done without. We'd need to apply much extra care to do so, though.And you also have to remove the dust cover and center the coil before gluing the new foam. That's very important or the job will go wrong. Check out some YT videos before proceeding.
Best regards!

Thanks for your suggestions.
If I dont need to remove the Dust cap this will be the prefered way.
I`ve seen a Tutorial where they align the Membrane in 2 Axis with the help of some clothepins, that the coil dont scrape and than glue it.
With some more clothespins like in the picture, maybe a "dryrun" befor glueing is possible.
If i get it easy here, i will give Methyl Ethyl Ketone a try.
It seems to be like Aceton but i little bit stronger.
Maybe this is what i need 😉
Thanks a lot
Pics of progress will follow
Very interesting the system of the "clasps", obviously it is an eyesore, I consider it a joke of KP, I hope the OP does not take it seriously.
I have repaired many speakers, and the method of centering the voice coil BEFORE gluing the surround wing is due to the fact that the "spider" may be off-center, due to humidity, misuse of the speaker with the wing already deteriorated, etc, etc.
It can even be off-center if the new surround is stuck slightly off-set! Glues exert traction when drying!
Usually not necessary, but ....... Murphy's Law is imperative here!
You decide, the risk is yours.
This is a job I did, it's the speakers from a Technics SB1950 cabinet.😊
My favorite method is to center the voice coil with a sheet of mylar, I have several of different thicknesses for the different speakers.
I had not seen the previous PE video in detail, note that not using special liquids (Mek or similar) to loosen and remove the adhesives results in the destruction of the dust cover, (among other problems) and not getting a new one of the size of the original, the repairman decides to place a smaller one than the original, the visual result is really ugly, 👎and I also wonder what would happen if that job were on a high quality speaker, would the owner accept a job like that?, in that job they change the TS parameters, Mms for example. Not to mention compliance if the surround is not of the same elasticity .....🤔
Clothes hangers, OMG ! 😢
KP, Happy New Year !
Attachments
-
 parlante 10 pulgadas.jpg286.6 KB · Views: 72
 -
 reparacion bafle technics sb1050 017 m.jpg326.1 KB · Views: 60
 -
 reparacion bafle technics sb1050 021m.jpg312.3 KB · Views: 83
 -
 reparacion bafle technics sb1050 024.JPG481.5 KB · Views: 96
 -
 reparacion bafle technics sb1050 026.JPG512.2 KB · Views: 72
 -
 reparacion bafle technics sb1050 038.JPG427.8 KB · Views: 111
 -
 reparacion bafle technics sb1050 049.JPG313.2 KB · Views: 70
Last edited:
Absolutely not! I did this successfully with a certain number of drivers. To gain some routine, I first chose cheap ones that I'd had to discard otherwise. The trick is to have the VC centered, i. e. to avoid scraping, after putting glue beneath the surrounds and before setting the pegs, first in north to south, then in east to west direction and so on.Very interesting the system of the "clasps", obviously it is an eyesore, I consider it a joke of KP, I hope the OP does not take it seriously.
Admittedly, if a replacement dust cap is available and you're apt to remove the old DC and to glue the new DC with pleasant outcome, VC centering by a shim is the more precise way.
Best regards!
🙄Absolutely not! I did this successfully with a certain number of drivers. To gain some routine, I first chose cheap ones that I'd had to discard otherwise. The trick is to have the VC centered, i. e. to avoid scraping, after putting glue beneath the surrounds and before setting the pegs, first in north to south, then in east to west direction and so on.
Admittedly, if a replacement dust cap is available and you're apt to remove the old DC and to glue the new DC with pleasant outcome, VC centering by a shim is the more precise way.
Best regards!
I really do not see the utility of that method and less with the clarification that I highlight. But if it works for you, then my congratulations ! I can only ask, how do you take off the old wing from the basket and from the cone? Scraping with a cutter like the boy in the video? 👎
The liquid does the miracle, (in the attached video they use toluene, it is a little less volatile than methyl ethyl ketone) because it also removes the dust cover and you use it again. You only need patience and a good chinstrap so as not to inhale it, and ventilated environments (as with Covid, ha)Absolutely not! I did this successfully with a certain number of drivers. To gain some routine, I first chose cheap ones that I'd had to discard otherwise. The trick is to have the VC centered, i. e. to avoid scraping, after putting glue beneath the surrounds and before setting the pegs, first in north to south, then in east to west direction and so on.
Admittedly, if a replacement dust cap is available and you're apt to remove the old DC and to glue the new DC with pleasant outcome, VC centering by a shim is the more precise way.
Best regards!
Several applications with a brush, and you will see how everything comes off and cleans easily.
The new sorruond will stick in its correct position if you use the appropriate glue and spread it correctly, if the spider is healthy (in 99% of cases) and you have centered the coil, it will stick in the right place. No need to use clothespins or clips.
(I have only had a delicate case with JBL cones that were coated with "Aquaplas", the excess liquid dissolves it, but the secret is not to apply too much - as in the video - many strokes and gently peeling off the foam do the trick. same work.)
Greetings !
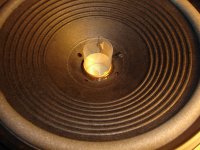
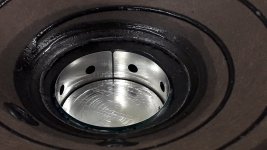
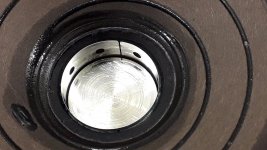
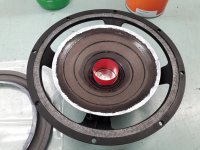
First chassis completly cleaned an prepared for glueing the surround.
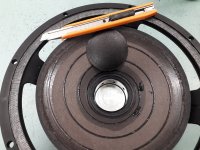
Like Academia50 suggested I removed the dust cap, to place some shims for centering the coil.
I think i will order some new dust caps. I dont trust the old reglued ones will permanetly stay in place.
Like Academia50 suggested I removed the dust cap, to place some shims for centering the coil.
I think i will order some new dust caps. I dont trust the old reglued ones will permanetly stay in place.
Attachments
I think i will order some new dust caps. I dont trust the old reglued ones will permanetly stay in place.
I've reglued plenty of dustcaps and never had a problem. Tacky PVA glue works well for paper.
I think the same as fatmarleyI think i will order some new dust caps. I dont trust the old reglued ones will permanetly stay in place...
Good decision, remember to center the voice coil at least four equidistant points.Like Academia50 suggested I removed the dust cap, to place some shims for centering the coil.
.............
You can use strips of paper folded to the necessary thickness if you don't have mylar, - or some similar plastic material - but the advantage of these materials is that after applying the glue and seating the surround, you can gently move the cone / VC assembly. to check that the CV is not scratched within the air gap.
If it does, correct on the necessary side (the opposite) with KP-style snaps .....😉
If the " spyder " is in good condition, there will be no problems, but a quick check will give you peace of mind that the work will be fine.
Last edited:
............but the advantage of these materials is that after applying the glue and seating the surround, you can gently move the cone / VC assembly. to check that the CV is not scratched within the air gap. 😵
Sorry, something was missing after the previous paragraph: .... then you extract the mylar or plastic strips, you check, (moving the cone / VC assembly gently) you put them back and wait for the final drying.
Sorry, something was missing after the previous paragraph: .... then you extract the mylar or plastic strips, you check, (moving the cone / VC assembly gently) you put them back and wait for the final drying.
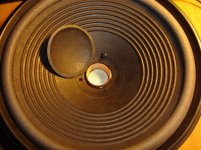
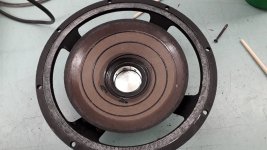
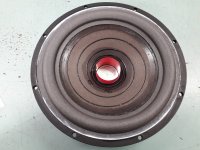
Its done, both speakers are refoamed.
I made some pic`s that maybe help if someone also have to refoam Seas 21F-WB
I made some pic`s that maybe help if someone also have to refoam Seas 21F-WB


Removed dust cap, applied glue to the membrane & the foam.
Be carefull to choose the right side or you have a inverted foam surround
Centered the coil with the Plastic shim made from a Leitz Schnellhefter
Be carefull to choose the right side or you have a inverted foam surround
Centered the coil with the Plastic shim made from a Leitz Schnellhefter
Attachments


- Home
- Loudspeakers
- Multi-Way
- refoam Dynaudio P31 Seas 21F-WB