Okay, so it seems as though I have a problem. The problem is I found this site and now I need to build stuff. And admitting it is the first step, right?
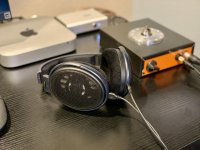
Recently, our friend @dBel84 introduced me to about a dozen different headphones from classic to modern, dynamic to planar, and I figured it was time to pick up a pair. So after lots of reading and reviews, and with the assistance of dB, I picked up a pair of Drop HD6XX. The price was right, the performance wonderful (to me), and now I need something nice to run them with.
In the photo you'll see a nice hybrid amp that dB loaned me. But it'll have to go back home at some point and I'll be sitting in silence. Another friend built a WHAMMY and brought it over for a listen recently. After listening to it, it seemed like this was the amp for me, especially since it comes from this community.
This project is a bit of a cheat since our friend @passive420 had a partially-assembled kit on the swap meet. He packed it in a box and sent it all the way across the pond to the USA, and now I have a weekend project ahead. After gathering a few accessories and a case, I'm ready for business.
I bought the Hammond case that @6L6 suggested, and as noted it's a fairly tight fit. So I'll be following his suggestions for managing that space (primarily the location of the power input module) and hopefully get along with little problem.
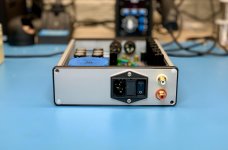
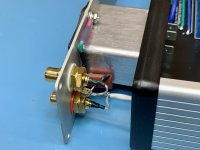
Because of the tight quarters, I picked up a shielded power input module to keep noise down where possible. Did you know they don't come with fuse drawers? I didn't. Another order, another five bucks. I had hoped to use the Neutrik-style RCAs I had left over from my Aleph J back panel kit, but alas they're too large. So a couple of normal compact RCA jacks will be used. On the amp that I have on loan from dB, he installed both 1/4" and XLR jacks on the front for flexibility, even though the device isn't balanced. I'll be doing the same.
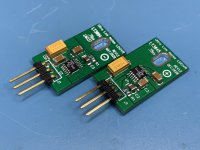
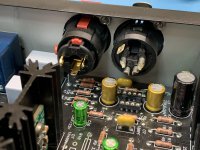
@passive420 sent along a couple of nice discrete regulators with the equipment he sent me. He also provided OPA604AU and OPA1622 opamps for my first venture into opamp rolling. This should be a fun experiment since I've never really A/B'd anything before. All part of the experience.
Recently, our friend @dBel84 introduced me to about a dozen different headphones from classic to modern, dynamic to planar, and I figured it was time to pick up a pair. So after lots of reading and reviews, and with the assistance of dB, I picked up a pair of Drop HD6XX. The price was right, the performance wonderful (to me), and now I need something nice to run them with.
In the photo you'll see a nice hybrid amp that dB loaned me. But it'll have to go back home at some point and I'll be sitting in silence. Another friend built a WHAMMY and brought it over for a listen recently. After listening to it, it seemed like this was the amp for me, especially since it comes from this community.
This project is a bit of a cheat since our friend @passive420 had a partially-assembled kit on the swap meet. He packed it in a box and sent it all the way across the pond to the USA, and now I have a weekend project ahead. After gathering a few accessories and a case, I'm ready for business.
I bought the Hammond case that @6L6 suggested, and as noted it's a fairly tight fit. So I'll be following his suggestions for managing that space (primarily the location of the power input module) and hopefully get along with little problem.
Because of the tight quarters, I picked up a shielded power input module to keep noise down where possible. Did you know they don't come with fuse drawers? I didn't. Another order, another five bucks. I had hoped to use the Neutrik-style RCAs I had left over from my Aleph J back panel kit, but alas they're too large. So a couple of normal compact RCA jacks will be used. On the amp that I have on loan from dB, he installed both 1/4" and XLR jacks on the front for flexibility, even though the device isn't balanced. I'll be doing the same.
@passive420 sent along a couple of nice discrete regulators with the equipment he sent me. He also provided OPA604AU and OPA1622 opamps for my first venture into opamp rolling. This should be a fun experiment since I've never really A/B'd anything before. All part of the experience.
Attachments

Last edited:

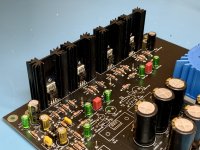
Got a couple bits done this afternoon. Since it’s sunny and warm in these here parts today, outdoor construction took priority over indoor fun.
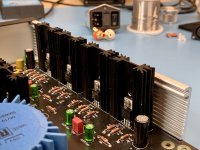
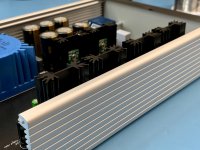
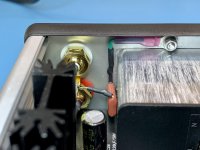
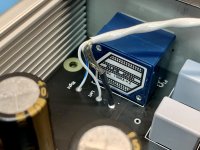
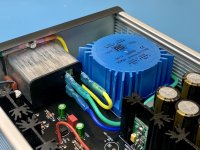
Put the heat sinks on the FETs and soldered 10 ohm resistors in. Not sure why they were missing, but they’re in there now. Also soldered some legs on the fancy voltage regulators.
Put the heat sinks on the FETs and soldered 10 ohm resistors in. Not sure why they were missing, but they’re in there now. Also soldered some legs on the fancy voltage regulators.
Attachments
Last edited:

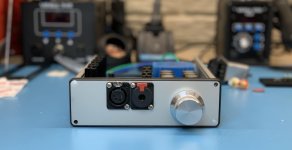
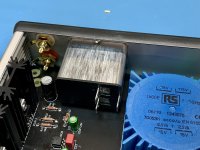
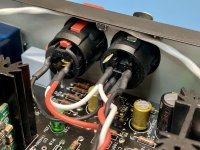
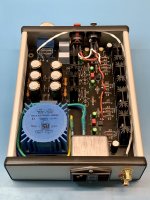
Fiddling with front panel layout tonight. The volume control is where it is, but I did have some flexibility with the output jacks. I mounted them fairly high on the panel to make opamp rolling a little easier. I’ll have to remove the knob and retaining nut from the volume control and take the front panel off to more easily access the opamp socket. And, of course no tall devices because of the balanced jack placement. That’s okay, though. Plenty of regular-height devices that will fit.
As noted earlier, the balanced jack is there for convenience, not function. It’s not a balanced output. I took the cue from dB’s amp and like the feature. Screws are temporary, as some will no doubt notice they aren’t tapered flat head. Seems like you never have the hardware you need.
Debating on power light location still. Probably upper right of the volume control tangent to the top/right edges of the knob. Small blue LED will look lovely.
Attachments
Last edited:
coming along nicely.
a quick run through the band saw or another drop ship and all will be done or let them breath and go topless 😉
a quick run through the band saw or another drop ship and all will be done or let them breath and go topless 😉
Never considered the topless option. 😀
coming along nicely.
a quick run through the band saw or another drop ship and all will be done or let them breath and go topless 😉
Nice build so far Chris. Don’t worry about that little heat sink oopsie. Happens to the best of us, especially when surfing Mouser late at night. 😉
After years, the WHAMMY is still my go to preamp. I recently swapped an OPA2134bb for the 1622. I’m liking the 1622. I also have the Senn 6xx’s. Very nice phones to pair with the WHAMMY. Great choice! Enjoy the listening!
After years, the WHAMMY is still my go to preamp. I recently swapped an OPA2134bb for the 1622. I’m liking the 1622. I also have the Senn 6xx’s. Very nice phones to pair with the WHAMMY. Great choice! Enjoy the listening!
Late night Mouser browsing is our arch-nemesis!
Can’t wait to hear it!
Can’t wait to hear it!
Nice build so far Chris. Don’t worry about that little heat sink oopsie. Happens to the best of us, especially when surfing Mouser late at night. 😉
After years, the WHAMMY is still my go to preamp. I recently swapped an OPA2134bb for the 1622. I’m liking the 1622. I also have the Senn 6xx’s. Very nice phones to pair with the WHAMMY. Great choice! Enjoy the listening!
Maybe I should install a roll bar. 😛
It's a wee bit snug in that Hammond chassis.
Love the open top config. 😀

Fiddling with front panel layout tonight. The volume control is where it is, but I did have some flexibility with the output jacks. I mounted them fairly high on the panel to make opamp rolling a little easier. I’ll have to remove the knob and retaining nut from the volume control and take the front panel off to more easily access the opamp socket. And, of course no tall devices because of the balanced jack placement. That’s okay, though. Plenty of regular-height devices that will fit.
As noted earlier, the balanced jack is there for convenience, not function. It’s not a balanced output. I took the cue from dB’s amp and like the feature. Screws are temporary, as some will no doubt notice they aren’t tapered flat head. Seems like you never have the hardware you need.
Debating on power light location still. Probably upper right of the volume control tangent to the top/right edges of the knob. Small blue LED will look lovely.
I see you already installed C2 and C7. But they are optional and depend on opa used. In my case I did not need any.
I see you already installed C2 and C7. But they are optional and depend on opa used. In my case I did not need any.
Thanks for letting me know. I’ll dig into the main discussion and see where the dependencies are.

Chris,
Sometimes these oversights are a nidus for invention. In example, you might come up with your own chassis design that is tidy and diy too! Enjoy!
Best,
Anand.
Sometimes these oversights are a nidus for invention. In example, you might come up with your own chassis design that is tidy and diy too! Enjoy!
Best,
Anand.
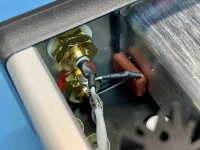
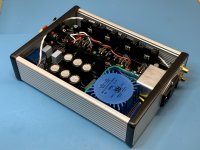
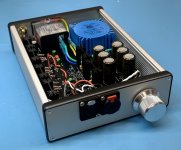
A bandsaw, belt sander, and a little high-temp black paint to seal up the ends and it’s good to go. Finished soldering connectors and performed final assembly (minus lid for now). I’ll test the unit and try a couple of opamps before I button it up. Turned out very nicely, I must say. Cool piece of kit, this one. Looking forward to listening to it. But had to leave for the holiday weekend before I could test it. Power checked it with variac with no smoke and good rail voltages. Good start.
Attachments
-
 66D4CC83-1898-4271-BB5B-1A3E20285DFD.jpg836.8 KB · Views: 152
 -
 B199BBE9-1BB9-4BC6-B541-1F632F8BD3E9.jpg741 KB · Views: 232
 -
 8FB9B14A-D627-481F-B577-05DB4DBD0580.jpg828.1 KB · Views: 147
 -
 87A7F29B-D628-4174-AE99-AB7FD291F8C0.jpg839.1 KB · Views: 148
 -
 65C6447E-1B0C-47EF-AC78-A991C8B1CC3C.jpg544.4 KB · Views: 154
 -
 688CB265-8F40-4862-B840-E9F5E389C830.jpg670.1 KB · Views: 163
^
Nice. Clean. Tight. Safe.
That's what I like about your builds. It pays respect to Wayne & Jim who designed the board.
Happy listening!
Best,
Anand.
Nice. Clean. Tight. Safe.
That's what I like about your builds. It pays respect to Wayne & Jim who designed the board.
Happy listening!
Best,
Anand.
- Home
- Amplifiers
- Pass Labs
- WHAMMY Headphone Amp Build from Wisconsin