I am looking for steel covers for my output transformers.
I have a 211 amp with pretty large output transformers and in my search so far I can't find anything to fit.
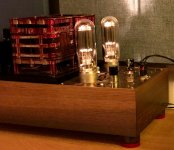
The real reason I am thinking of doing this is because I think they look beautiful...so if there is any benefit in sound quality great, BUT if there might be any compromise from doing this then I will think again 🙂
Any ideas where to look for cans, and should I consider potting or leave this in the too difficult category?
Thanks
I have a 211 amp with pretty large output transformers and in my search so far I can't find anything to fit.
The real reason I am thinking of doing this is because I think they look beautiful...so if there is any benefit in sound quality great, BUT if there might be any compromise from doing this then I will think again 🙂
Any ideas where to look for cans, and should I consider potting or leave this in the too difficult category?
Thanks
Attachments
found these but they are too small
150*140*140mm Black Iron Hifi Audio Transformer Protect Cover Enclosure Case Box | eBay
150*140*140mm Black Iron Hifi Audio Transformer Protect Cover Enclosure Case Box | eBay
Even if you did find two bigger cans there isn't much clearance between them there to fit, no? Id fabricate an aluminum box for both OPTs together the same width as the wooden case. But then you have to think of heat too enclosing the OPTs, its not too hard to fabricate an aluminum box with a mu metal lining, and some vent holes on the top and along the bottom side edges to get some convection cooling.
Could you give an overview of how you would construct a cover like that, please. I need to build something like that too.
User "professor" may have a nice solution: Небольшая галерея с фотографиями процесса сборки - mymegahobby Jimdo-Page!
Wooden cover + mesh for ventilation
Wooden cover + mesh for ventilation
Even if you did find two bigger cans there isn't much clearance between them there to fit, no? Id fabricate an aluminum box for both OPTs together the same width as the wooden case. But then you have to think of heat too enclosing the OPTs, its not too hard to fabricate an aluminum box with a mu metal lining, and some vent holes on the top and along the bottom side edges to get some convection cooling.
Yeah - but the ONLY reason to do this (as it works and sounds fine in the current form) is because I really like the aesthetic of Tango type transformers and if you saw my metal work skills......not pretty 🙂
UNLESS there is some sonic gains to be had with a cover?
Attachments

As an audio transformer, winder and prototyper for 4 years now and done over 100 prototypes, I'd say the transformer covers are the hardest part to get right in order to have a well made range of products. 😀
All my future "commercial" transformers will be "done around" standard commercial covers.
All my future "commercial" transformers will be "done around" standard commercial covers.
Could you give an overview of how you would construct a cover like that, please. I need to build something like that too.
I'd form the two left/right sides and top with two bends. So first cut a rectangle out of the stock, cut the V grooves on back side of aluminum on router table perfectly square using the router table fence and a V bit. Depth of bit should leave 1/32 of an inch short of full penetration. Its easier to drill the holes and sand before bending. Drill cooling holes in a nice pattern. Then sand out the stock before bending it. I do that with a random orbital sander starting out at 800 grit and ending at 1000 grit. Go below 800 and the aluminum gets too many deep scratches, when I go over 1000 then the aluminum loses a nice patina and approaches being a mirror, its hard to work a mirror finish like that. I also sand with WD40 sometimes as a cutting oil. Always pull the sander off the work while moving to an edge, not in the middle or you'll scuff it. Now do your bends with your bare hands, they will come out perfectly square assuming the V grooves left only about 1/32 of an inch of aluminum to be bent.
Then for the front and back sides I'd cut two wood panels from 1/2 inch thick stock like walnut or mesquite (mesquite is very stable). I'd groove them on the router table so that the bent aluminum U fits right in the groove. Insert the U shaped aluminum into the grooved front and back, fasten with a through long machine screw or epoxy the aluminum into the groove, under weight overnight to harden. (I like JB Weld epoxy). Then you have your box! Top/left/right are aluminum and front/back are wood bottom is open. The wood sides make it easy to attach to the chassis with a threaded insert in the wood.
Almost forgot, drill a few cooling holes in a line along the bottom of the wood. Air enters at bottom then exits at the top through the aluminum cooling holes.
Look for an electrical enclosure used in automation or industrial power.
https://www.automationdirect.com/ad...MI_onNoI2u7wIVT1XVCh0lLwnaEAsYAiABEgJzRfD_BwE
A fab shop can knock them out pretty quickly also. Welded flat pieces. But they are not going to have radiused edges. Those are deep drawn.
https://www.automationdirect.com/ad...MI_onNoI2u7wIVT1XVCh0lLwnaEAsYAiABEgJzRfD_BwE
A fab shop can knock them out pretty quickly also. Welded flat pieces. But they are not going to have radiused edges. Those are deep drawn.
Last edited:
Use 1/16" bar stock or plate and use small pieces of wood in the corners to attach the aluminum to. I build all my chassis that way. Use nice screws with heads of your choice.Could you give an overview of how you would construct a cover like that, please. I need to build something like that too.
(Chassis photo to show how I attach the panels.)

Last edited:
Wood corners work but angle metal (same metal as the panels) is much sturdier and makes the electric and magnetic connection btween panels.
Here is the idea I was trying to explain in post #12 above. Basically it is a U shaped aluminum with two side "slabs" the slabs can be wood or metal. if you groove the side slabs to the dimensions of the U then it all holds together perfectly straight then from the inside just low temperature braze the sides to the U. I described above how to get perfectly square bends in aluminum by V grooving the backside and how to make a groove in aluminum on the router table.

I'd form the two left/right sides and top with two bends. So first cut a rectangle out of the stock, cut the V grooves on back side of aluminum on router table perfectly square using the router table fence and a V bit. Depth of bit should leave 1/32 of an inch short of full penetration. Its easier to drill the holes and sand before bending. Drill cooling holes in a nice pattern. Then sand out the stock before bending it. I do that with a random orbital sander starting out at 800 grit and ending at 1000 grit. Go below 800 and the aluminum gets too many deep scratches, when I go over 1000 then the aluminum loses a nice patina and approaches being a mirror, its hard to work a mirror finish like that. I also sand with WD40 sometimes as a cutting oil. Always pull the sander off the work while moving to an edge, not in the middle or you'll scuff it. Now do your bends with your bare hands, they will come out perfectly square assuming the V grooves left only about 1/32 of an inch of aluminum to be bent.
Then for the front and back sides I'd cut two wood panels from 1/2 inch thick stock like walnut or mesquite (mesquite is very stable). I'd groove them on the router table so that the bent aluminum U fits right in the groove. Insert the U shaped aluminum into the grooved front and back, fasten with a through long machine screw or epoxy the aluminum into the groove, under weight overnight to harden. (I like JB Weld epoxy). Then you have your box! Top/left/right are aluminum and front/back are wood bottom is open. The wood sides make it easy to attach to the chassis with a threaded insert in the wood.
Almost forgot, drill a few cooling holes in a line along the bottom of the wood. Air enters at bottom then exits at the top through the aluminum cooling holes.
Nice plan, great description.
What gauge of aluminum do you use? I've got a pair of Lundahls that need covers, because they are just plain ugly.

What gauge of aluminum do you use? I've got a pair of Lundahls that need covers, because they are just plain ugly.
Oh yeah that's important the alloy. I only use 3003 alloy because it bends nicely. Don't use 6061 because it is tempered too hard for bending work, the outside radius will show cracks when you bend it. As for thickness I use .1 inch 1/10 th inch for chassis. But for something like this I'd go much thinner down to .05 inch because it's just a cover it doesn't carry any weight like a chassis. Another attractive option for the side slabs is to get some solid surface countertop remnants, hundreds of colors and it machines beautifully and it's not organic like wood so it won't burn or warp. There is a guy on ebay that sells counter top remnant material or find a local kitchen cabinet maker shop for free remnant cut offs. Also when routing aluminum on a router table you have to go slow and in multiple passes on at about 18000 RPM. For a square groove use a single flute upcut bit made for aluminum, I like Amana. Same for the V bit but one rated for cutting aluminum. Place a board on top as you push it to keep everything flat. For aluminum single flute bits are best as mentioned don't use a two or three fluted bit that won't extract the chips, Practice on scrap.
Last edited:

- Home
- Amplifiers
- Tubes / Valves
- Source of cans/covers + potting for output transformers