Nutube B1 + SIT-3
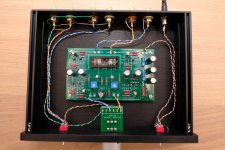
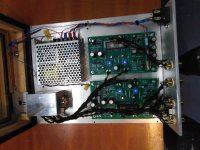
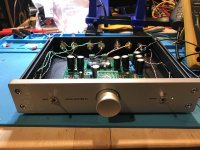
I've just finished building my Nutube B1 kit just before X'mas, and thanks to papa Nelson making it accessible. Attached is the picture of my build.
I believe it is sensible to build the kit as-is and listen to how it sounds like before even attempting any mods. I know a lot of you like to change the coupling caps, adding bypass caps, use bigger PSU filter caps, etc. I like to play with that too, but it is important to get a frame of reference.
I'm feeding the B1 into the SIT-3 amp I bought new around the end of this summer. For music source, I've an unmolested Sony 557ESD CD Player and a highly modded Logitech Transporter. I'm just driving a pair of ProAC Tablette Anniversary. I do have a pair of floor standing Elac (FS249) and I'll swap them in later to hear how the Elac sound.
I set the voltage to 9.5v after the unit has warmed up for about an hour. So far I'm really liking how it sounds. However, the bass is less taut, but I'm more than satisfied with the mid-range, which is unlike anything I've heard before. It is very rich in harmonics and overtones, even some of the Audio Notes tube amps I've listened to before don't have quite as much overtones as the B1 + SIT-3 combo. Is it too much of a good thing when paired with the SIT-3? I don't think so 😉
Setting the voltage to 9.75v immediately gets me tighter bass, but lesser harmonic overtones. It makes the sound stage less deep, and overall, it does not sound special. I suppose if you're into orchestral music or rock music, 9.75v maybe your cup of tea.
I've some Nichicon Muse ES caps on order (10uF 25v) and I'll try them as coupling caps first. I'm thinking about trying Auricap XO, no idea how good they are when used in the B1. But they're priced sensibly, so I may try them next. I do have some Black Gate N caps, 4.7uF 50v. Maybe I can replace the 2 input caps with BG N and see how the sound change and whether I like them.
Thanks again to papa for a wonderful piece of kit 🙂
Attachments
Last edited:
dito here about BG caps.
I´m too numb and not experienced enough to notice a good cap, but i was disappointed with a BG cap in Aleph J and B1 which i replaced with a ordinary (but better sounding) wima.
best
st
I´m too numb and not experienced enough to notice a good cap, but i was disappointed with a BG cap in Aleph J and B1 which i replaced with a ordinary (but better sounding) wima.
best
st
to Kuro #5723
Hello Kuro,
you've built a nice B1 Nutube-pre!
You have 'played' with the voltage ( I am most often around 9.7V in my B1 Nutube). You can try to reverse polarity at speakeroutput of your poweramp. Some like it more - some less.
Have fun! Enjoy the sound


Greets
Dirk
Hello Kuro,
you've built a nice B1 Nutube-pre!
You have 'played' with the voltage ( I am most often around 9.7V in my B1 Nutube). You can try to reverse polarity at speakeroutput of your poweramp. Some like it more - some less.
Have fun! Enjoy the sound
Greets
Dirk
Twice as nice?
Hi there. First off, best of wishes for '21 to you all. May it bring lotsa happy tinkering!
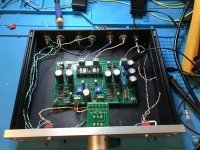
Well, thought I'd share some pics of my latest build: a 4 channel preamp. Reason: my 'other' speakers require some DSP for optimum performance and subwoofer intergration; Xover @ 100Hz. So stereo into a MiniDsp HD, gives 2 * stereo output. Thus a 4 channel pré comes in handy. Off course, there's other advantages such as easy bi-amping etc.
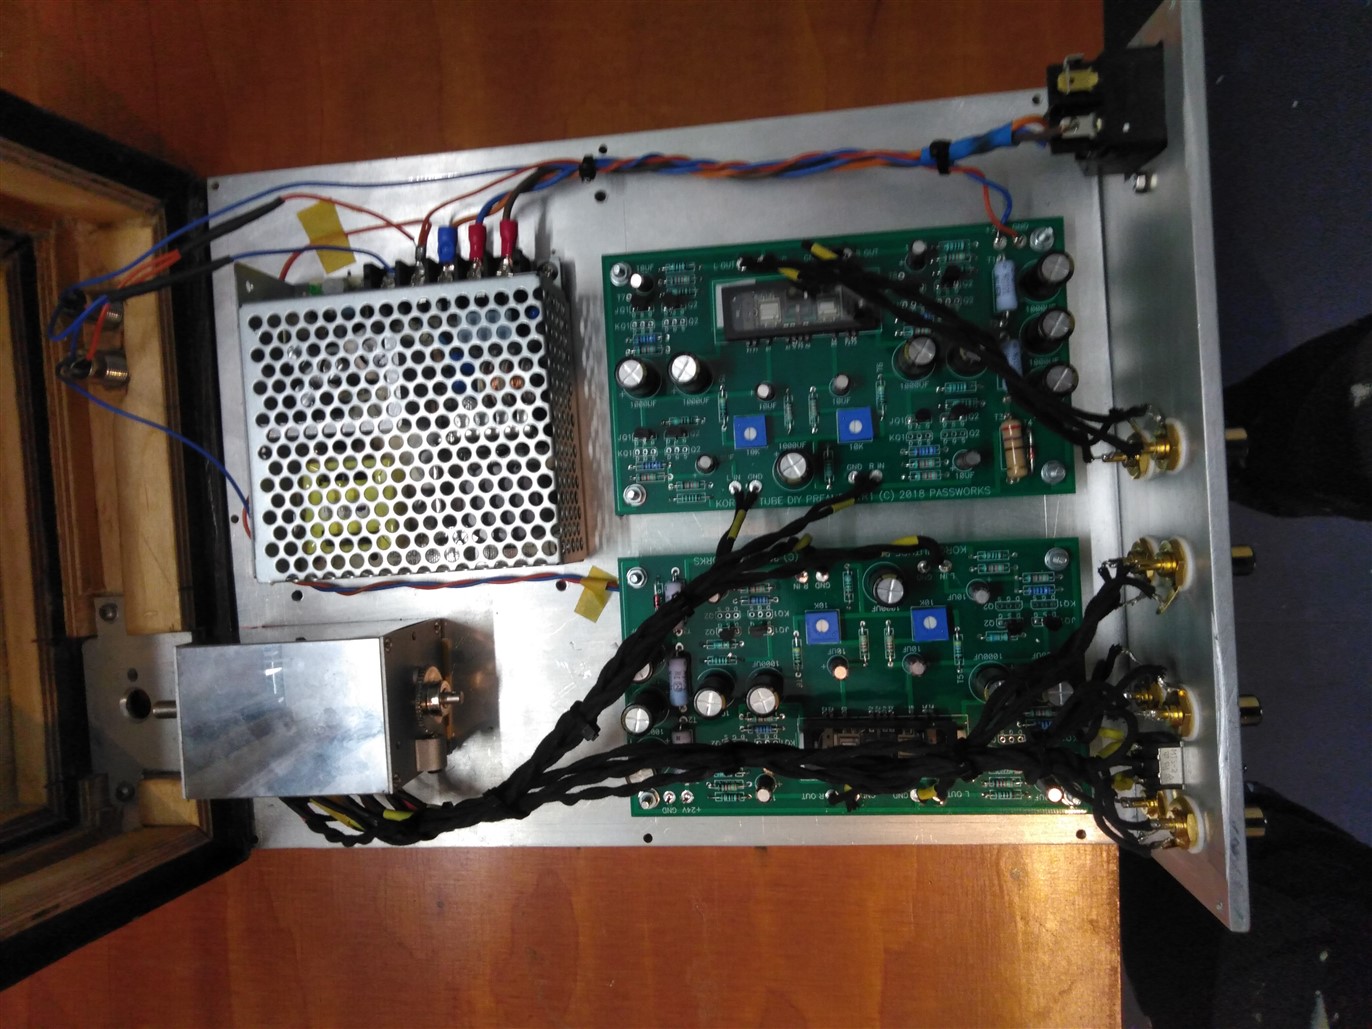
Internals. Volume pot I sourced from Acoustic-Dimensions. 4-Gang 41-step attenuator. Bit expensive, but well worth the money imho. Channel separation and balance are top notch. To my ears this is a step up from Alps Blue Velvet. Internal wiring is Duelund DCA 20 GA.

Enclosure. Dark wood is Wengé. Top and sides are maple -originally meant for building acoustic guitars... Bottom and back are 5 mm aluminum.

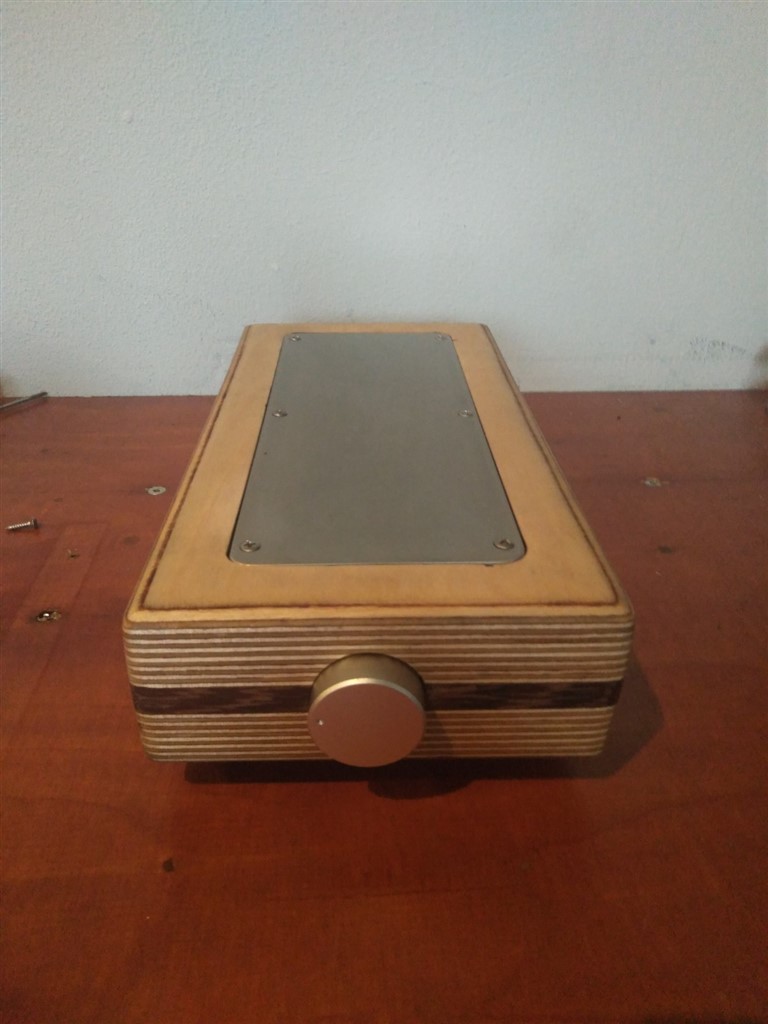
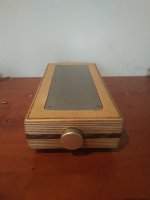
Anyway, I now own 3 Korg B1's. Planning to turn one into an integrated amp, so the enclosure I build for that one I no longer need. Built with the standard "full kit" parts, but with Duelund signal wiring. For sale as finished product without the B1 board, so just mount your own, solder the signal and power cables and you're good to go. Pic below. Has worked flawlessly for 3 months. Dead quiet, no ringing.
Lastly, @ Mr. Pass: thank you so much. this sweet little thing has given me so much joy and happiness. Truly amazing imho.
Greetings, Bart.
Hi there. First off, best of wishes for '21 to you all. May it bring lotsa happy tinkering!
Well, thought I'd share some pics of my latest build: a 4 channel preamp. Reason: my 'other' speakers require some DSP for optimum performance and subwoofer intergration; Xover @ 100Hz. So stereo into a MiniDsp HD, gives 2 * stereo output. Thus a 4 channel pré comes in handy. Off course, there's other advantages such as easy bi-amping etc.
Internals. Volume pot I sourced from Acoustic-Dimensions. 4-Gang 41-step attenuator. Bit expensive, but well worth the money imho. Channel separation and balance are top notch. To my ears this is a step up from Alps Blue Velvet. Internal wiring is Duelund DCA 20 GA.
Enclosure. Dark wood is Wengé. Top and sides are maple -originally meant for building acoustic guitars... Bottom and back are 5 mm aluminum.
Anyway, I now own 3 Korg B1's. Planning to turn one into an integrated amp, so the enclosure I build for that one I no longer need. Built with the standard "full kit" parts, but with Duelund signal wiring. For sale as finished product without the B1 board, so just mount your own, solder the signal and power cables and you're good to go. Pic below. Has worked flawlessly for 3 months. Dead quiet, no ringing.
Lastly, @ Mr. Pass: thank you so much. this sweet little thing has given me so much joy and happiness. Truly amazing imho.
Greetings, Bart.
Twice as nice, pictures
See above; link to pictures doesn't seem to work. Retry.
See above; link to pictures doesn't seem to work. Retry.
Attachments

Help! Mixed up jfets...
All,
I mixed up my jfets during my B1 build 😡. Is there any way to figure out which ones go together? I have the kit jefts (J113).
Thanks for any help.
All,
I mixed up my jfets during my B1 build 😡. Is there any way to figure out which ones go together? I have the kit jefts (J113).
Thanks for any help.
to Vomisa
Hello Vomisa,
another nice B1 Nutube- build! I like your woodwork and the selected kinds of wood.
Have fun and listen to the beautiful sound!
Greets
Dirk
Hello Vomisa,
another nice B1 Nutube- build! I like your woodwork and the selected kinds of wood.
Have fun and listen to the beautiful sound!
Greets
Dirk
All,
I mixed up my jfets during my B1 build 😡. Is there any way to figure out which ones go together? I have the kit jefts (J113).
Thanks for any help.
Attachments
avoid Black Gate , if you don't want to wait 3 months, that some music emerges through them
I've used BG before, I know they do take awhile to break-in, as I recall, after 2 weeks or so, the changes will be minimal. But during the first 2 weeks, things can go from good to bad and from bad to good.
Wonder if anyone here has used BG N as coupling caps for this project.
Hello Kuro,
you've built a nice B1 Nutube-pre!
You have 'played' with the voltage ( I am most often around 9.7V in my B1 Nutube). You can try to reverse polarity at speakeroutput of your poweramp. Some like it more - some less.
Dirk
Hi Dirk,
Thanks! I have already reversed the polarity on my speakers to get the correct phase and negative H2, which gives me the illusion of bigger sound stage and richer mid-range. Bass is less taut, but I can live with that.
I tried 9.75v, but apparently, it is not my taste. At the end of the day, it is what you set it to make you happy.
Enjoy!
@Kuro what did you use for internal hook up wire ?
I'm just using the wires that came with the full kit. I believe those are just twisted pairs from a network cable. I know in the past that good sound usually comes from solid copper core hookup wires instead of multi-stranded wires. So my guess is that the twist pairs should give me decent performance, since they have solid copper core.
I think the only downside to the wires is the dielectric, probably not the best, and I suspect that actually contributes to the slower speed and less tautness of the bass. Or it could be my SIT-3 amp 😉
Last edited:
All,
I mixed up my jfets during my B1 build 😡. Is there any way to figure out which ones go together? I have the kit jefts (J113).
Thanks for any help.
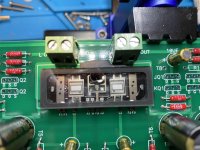
The Q2 Fets which are with the Source resistors have a higher Idss and
higher Vpp
Easy way to check Vpp is +10V on Drain, Gate at ground, and measure
the Source voltage with voltmeter.

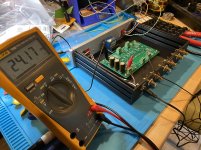
I‘m using my Nutube for 10 months now and am/was very happy. Today I did a comparison today WITHOUT the Nagra and linked my DAC directly to my Hypex Amp. In comparison there were WAY less distortion. Something I did not notice over the time. I now checked the Voltage on T7 and T8 and found it to be 7,5 V. I‘m pretty sure I left it at 9,5V when I built the Nutube at the beginning of the year. What is causing this? Something to worry about? Is it a burn-in-process that took several weeks after building and I did not notice?
Last edited:
Another B1K is Born
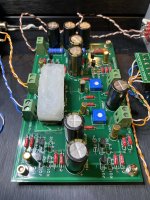
I finally got my B1K (silver face) kit about a week ago and finished it in about 4 hours (front to back). I've audioned a diverse set of tunes played only from my iPad/Spotify as a source and ran the output into both a 1.8 ACA and a big Sunfire.
The sound at the 12v bias setting was nice and smooth except for some very top end, especially on female vocals which had some sort of annoying quality during dynamics. Reverb decay on well recorded piano was pleasant and clear. Frequency response was perceptible as flat, although I did notice some oddities I mentioned until I started playing with the bias voltage. So I began to explore Nelson's discussion about adjusting the bias for different distortion levels/harmonics and settled on the 9.5v setting as that was most pleasant and realistic to my ears on my setup. I can also confirm Nelson's comments that adjusting for negative phase second harmonic distortion results in a deeper sound stage and a clear placement of instruments in that depth. Positive phase second harmonic distortion also sounded more up close to me but not any more detailed than the flipped phase.
I settled on his recommendation from the article of 9.5V.
Thanks again 6L6 for a fantastic build guide and putting together a really cool looking chassis. Of course the biggest Thank You goes to Papa Pass for another brilliant project that brings joy to my ears.
--Tom
Attachments
Dealing with NuTube's Microphonics
As you saw in the last post, I built my B1K. I've built enough kits and projects like this now that I often skip what appear to be optional recommendations or steps in the build guide. So when I installed the NuTube, I ignored 6L6's build guide recommendations for dampening on the NuTube. Wrong. The first time I connected it to an amplifier and moved the volume pot a half millimeter high-frequency feedback started to come from the speakers. I also could hear an audible hum like a ground loop. Back to the bench...
After looking around at available materials, I first tried using liquid silicone to "glue" a few neoprene washers cut in half, under the NuTube. That had almost no effect on the feedback or hum. Back to the bench.
Next I tried Jim's suggestion of a latex eraser taped above the NuTube. This definitely dampened the high-frequency microphonics but did nothing for the hum. It also would feedback a little when the volume was up past about 9 o'clock. Back to the bench...
The previous week I'd looked at a few guitar pedals that were being made with the NuTube like the Ibanez NuTube Screamer. It turns out NuTube make a kit form of a similar overdrive pedal, so I reviewed the build guide and viola. They tape some thick neoprene onto both sides.
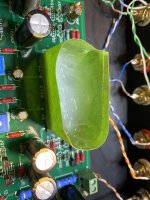
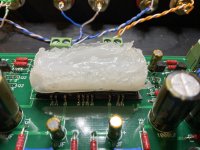
I didn't have any neoprene tape so I looked around at available materials and realized that making a mold on top of the NuTube and filling it with liquid silicone would have the same effect - and if not, I could easily peel it off. It tuns out my creativity was rewarded in that not only did the microphonics disappear at listening levels as loud as I could muster, but the hum disappeared too!
The basic idea of what I did was get some painter's tape and made a box around the NuTube, and then just filled it up. Once it dried, I peeled the tape off and went off listening. It was that simple. The only caveat here is that the sticky side of the painter's tape still stuck a bit to the silicone, so next time I'd either add some kind of oil to the top part of the tape that touches the silicone, or just put another layer of tape over that.
--Tom
As you saw in the last post, I built my B1K. I've built enough kits and projects like this now that I often skip what appear to be optional recommendations or steps in the build guide. So when I installed the NuTube, I ignored 6L6's build guide recommendations for dampening on the NuTube. Wrong. The first time I connected it to an amplifier and moved the volume pot a half millimeter high-frequency feedback started to come from the speakers. I also could hear an audible hum like a ground loop. Back to the bench...
After looking around at available materials, I first tried using liquid silicone to "glue" a few neoprene washers cut in half, under the NuTube. That had almost no effect on the feedback or hum. Back to the bench.
Next I tried Jim's suggestion of a latex eraser taped above the NuTube. This definitely dampened the high-frequency microphonics but did nothing for the hum. It also would feedback a little when the volume was up past about 9 o'clock. Back to the bench...
The previous week I'd looked at a few guitar pedals that were being made with the NuTube like the Ibanez NuTube Screamer. It turns out NuTube make a kit form of a similar overdrive pedal, so I reviewed the build guide and viola. They tape some thick neoprene onto both sides.
I didn't have any neoprene tape so I looked around at available materials and realized that making a mold on top of the NuTube and filling it with liquid silicone would have the same effect - and if not, I could easily peel it off. It tuns out my creativity was rewarded in that not only did the microphonics disappear at listening levels as loud as I could muster, but the hum disappeared too!
The basic idea of what I did was get some painter's tape and made a box around the NuTube, and then just filled it up. Once it dried, I peeled the tape off and went off listening. It was that simple. The only caveat here is that the sticky side of the painter's tape still stuck a bit to the silicone, so next time I'd either add some kind of oil to the top part of the tape that touches the silicone, or just put another layer of tape over that.
--Tom
Attachments
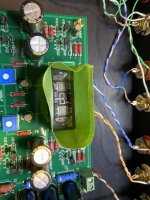
I wonder if your hum was caused by the nutube touching the circuit board.
That is what I suspected too as it went away as soon as I applied the silicone. It is hard to see, but I left the neoprene washer/silicone under the NuTube when I applied the silicone to the top and there is still no hum, so it must be the top coat that really isolates the microphonics.
--Tom
- Home
- Amplifiers
- Pass Labs
- B1 with Korg Triode