Hello everybody,
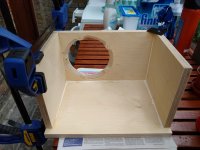
The story: I had a pair of (normal) Pensil 12.2P birch ply cases made for me by a local social (social reintegration + job training) woodshop. I asked them to cut the driver opening inwards to 45°, but they refused, saying they would cut as much as possible.
It turns out they dit cut the inside edge, but just a little bit.
Now I'm:
1) wondering if the result is enough?
2) if not, how could I improve things ...
(Without any knowledge or tools)
Attachments
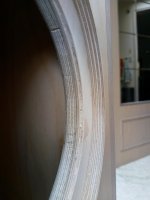
De driver opening initially was too deep, they added a piece of wood to have the driver level with the front.
Good show. It's always nice to hear about programmes like that.
Well, you can't do much without tools 😉 but if you can stretch to a high quality file (a rasp may cause a bit too much splintering, though I defer to the woodworking experts -I can use a hammer on a good day) you should be able to put a bit of a chamfer on the inner lip. It's not catastrophic with the 12 as it has a reasonable amount of breathing room, but probably worth doing.
Well, you can't do much without tools 😉 but if you can stretch to a high quality file (a rasp may cause a bit too much splintering, though I defer to the woodworking experts -I can use a hammer on a good day) you should be able to put a bit of a chamfer on the inner lip. It's not catastrophic with the 12 as it has a reasonable amount of breathing room, but probably worth doing.
Thank you, Scott! (You might know where I found the 12p drivers 😉 )
Maybe time to buy a dremel tool?
Or be lazy and leave things as they are ... 😀
Maybe time to buy a dremel tool?
Or be lazy and leave things as they are ... 😀
Even if you do chamfer it a bit do remember to leave enough wood around the driver fixing screw holes.
Something like the following bit and a budget router will do it for you:
https://www.homedepot.com/p/DIABLO-Chamfer-45-Degree-Router-Bit-DR40106/202563329
https://www.homedepot.com/p/Porter-Cable-1-3-4-HP-Router-690LR/203162807
https://www.homedepot.com/p/DIABLO-Chamfer-45-Degree-Router-Bit-DR40106/202563329
https://www.homedepot.com/p/Porter-Cable-1-3-4-HP-Router-690LR/203162807
If the enclosure is already glued up, access to route the chamfer on rear side of through hole will be “kinda tricky”. That was something I would always perform as part of the test fit before wetting any of the joint contact surfaces with glue.
Something like the following bit and a budget router will do it for you:
https://www.homedepot.com/p/DIABLO-Chamfer-45-Degree-Router-Bit-DR40106/202563329
https://www.homedepot.com/p/Porter-Cable-1-3-4-HP-Router-690LR/203162807
Yep, gotta have the right tools.
I mounted my Craftsman router to a custom made table with an adjustable guide fence.
Comes in quite handy for cabinetwork.
That's true.If the enclosure is already glued up, access to route the chamfer on rear side of through hole will be “kinda tricky”. That was something I would always perform as part of the test fit before wetting any of the joint contact surfaces with glue.
So, if already assembled, you may be able to do a little from the front of the baffle with one of these Freud(R) Dovetail Router Bits - 1/4" Shank but will need to make a circle template to put over the baffle so as to guide the router (gets complicated but not insurmountable) -
Alternately, you may get lucky and be able to get one of these
Freud Top Bearing Dovetail Bit with 1/4" Shank
to work then no need for a template, or only need to use one of these Rockler Circle Cutting Jig to make a smaller circle template for the top bearing bit to follow.
Last edited:
Never used one of those, but from reading the specifications, I don’t imagine the maximum angle of 14dg would provide sufficient relief for airflow to make it worth the effort.
Thanks to all of you for the suggestions!
The back of the boxes is removeable.
I'll either go with Scott's sugestion (try to chamfer a bit more with a hand tool) or keep it as it is now (shouldn't have too much influence on the sound?), to avoid having tools laying around that have been used just once.
The back of the boxes is removeable.
I'll either go with Scott's sugestion (try to chamfer a bit more with a hand tool) or keep it as it is now (shouldn't have too much influence on the sound?), to avoid having tools laying around that have been used just once.
That's an option too. I could try to borrow my brother in law's sander machine, something like this: Bosch 06033B8070 PSM Primo Multi-Sander by Bosch: Amazon.de: Baumarkt . No idea how it would work on multiply though.
I used a rasp to create a chamfer on the backside. Worked fine with baltic birch on my A12Pw build.
Never used one of those, but from reading the specifications, I don’t imagine the maximum angle of 14dg would provide sufficient relief for airflow to make it worth the effort.
Then this one 85-384 | Router CNC | Solid Surface | Under Rounding for Bull Nose - Freud Tools would be better then nothing.
or (getting into more cost and complication),
The top half of the convex bit of this pair would probably do it (using a circle jig atop the front baffle to guide the router or attach one to the inside of the baffle for the bearing to follow) - Rockler Edge V-Groove Router Bits - 1/2" Shank
Last edited:
Only you did it prior to assembly. Would be difficult to do on the assembled box due to little distance from speaker cutout to the top panel and 2 side panels.I used a half round rasp as well, they can be obtained cheaply from your local DIY store. The cheap ones don't last but that's OK for your use. See picture. In my experience the multi-sander highlighted won't work in this application.
That “under-rounding” bit does look kind interesting, but:
1) Freud and other high quality carbide router bits are not inexpensive;
B) Neither is the router with 1/2” collet required. As profile bits of that size have a lot of mass rotating at upwards of 20,000 RPM, I’d not want to use anything lighter and lower powered than something like the Porter Cable 690, etc. The solid surface fabricators’ weapon of choice where I used to work was the 3 1/2 HP 7518 Speedmatic - not quite so prone to chattering, and I can’t remember ever hearing of a armature burning out - cracked bases, yes 😱
This particular step - the chamfering of rear of driver opening - is certainly one you want to perform before assembly. If you’re fortunate enough to have access to CNC machining, it’s a relatively simple procedure with the right tooling and programming to pull back to retain full thickness at screw mounting spots, but I always did mine by hand. Actually the relatively small amount of material you need to remove can be accomplished in a couple of passes with a small laminate trim router and much lighter / cheaper bit.
^ Could also buy the bit and rent the router. Good to hear about the PC 680, I was under the impression 1/2" shaft bits sould be used with a router table. I posted links of what I could find via a quick net search, no doubt there are other options.
Whether to use 1/2” shank bits only on a table very much depends on the rotational mass and diameter of the bit - i.e. a 1” cutting length two flute flush trim bit is much easier to control than a 2 1/2” round over or 45dg. chamfer. That’s where the approx 20lbs of the big 3HP Porter Cable helps a lot - just be sure to securely clamp the work piece, and do not try to one hand it.
Now, back to your regularly scheduled programming.
Now, back to your regularly scheduled programming.
- Home
- Loudspeakers
- Full Range
- Pensil 12.2p driver opening inside corner 45° ?