Nice job on the SECFA build guide, Borko. I’m sure it will be very helpful. It already cleared up how to adjust VR6 🙂
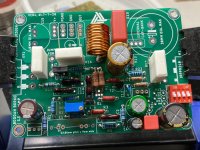
The parts arrived today and I made a bit of progress on the first board.
So far, all the components picked in the Mouser project cart fit perfectly 😉
I couldn’t resist sneaking a couple red PRP’s in!
The parts arrived today and I made a bit of progress on the first board.
So far, all the components picked in the Mouser project cart fit perfectly 😉
I couldn’t resist sneaking a couple red PRP’s in!
Attachments

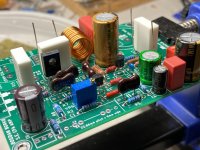
Nice work so far Vunce, what wire diameter did you use to wind the inductor and what did you wind it on? Looks like 10 turns.
Nice job on the SECFA build guide, Borko. I’m sure it will be very helpful. It already cleared up how to adjust VR6 🙂
The parts arrived today and I made a bit of progress on the first board.
So far, all the components picked in the Mouser project cart fit perfectly 😉
I couldn’t resist sneaking a couple red PRP’s in!
Nice progress Vunce. Are those feedback resistors on your pcb 390 ohms?
Hello Bogdan,
Congratulations on the comprehensive write-up!, Surely it will be very useful to every builder.
To Vunce,
Incorrigibly fast and beautiful build . Like the PRPs and silver mica's . Inductor also from mouser cart or you woundup something on your own. looks perfect.
from pcb i see that it was designed on 7th July and in 9 days already pcbs are almost completely populated!
regards
prasi
Congratulations on the comprehensive write-up!, Surely it will be very useful to every builder.
To Vunce,
Incorrigibly fast and beautiful build . Like the PRPs and silver mica's
. Inductor also from mouser cart or you woundup something on your own. looks perfect.from pcb i see that it was designed on 7th July and in 9 days already pcbs are almost completely populated!
regards
prasi
Last edited:
Most of the resistors are rated at 0.6 watts. Is it really necessary or 0.25 watts will suffice?I can build it from parts already in my stock. Other higher power resistors are understandable.
Thank you Gary!
I'm sad to say that I spend my flagging energies building only my own amps, I finished four in the last two months and are up to my eyeballs building my new creations!!
It would be wasted on me, but it doesn't stop me appreciating what others do on this forum.......
Hugh
I'm sad to say that I spend my flagging energies building only my own amps, I finished four in the last two months and are up to my eyeballs building my new creations!!
It would be wasted on me, but it doesn't stop me appreciating what others do on this forum.......
Hugh
Does anyone have spare PCBs for sale to build this amp? I would love to try it out and compare it to some of my amps. It has been a real joy reading this thread and the manual (truly impressed with the work that went in it and collaboration between pros).
Thanks for the kind words fellas 🙂
@r_jik45,
Good eyes!! Since the BPR58 resistor legs are radial, these added test leads will make for easy DMM attaching points.
@gary s,
Yup, 10 turns/1.5mm/AAA battery
@bogdan_borko,
2//392 = 196R, it’s within 1% tolerance of 195R.
@prasi,
There is a CoilCraft inductor listed in the Mouser cart, but it’s backordered so I wound my own.
Maybe an updated version of the pcb could include these test points, even simple vias nearby the resistors.
Will you cut the leads after the settings or do you plan to leave them like that?
Will you cut the leads after the settings or do you plan to leave them like that?
I will shorten and bend them to create a small loop to hook “pincher” leads to. I’ll leave them for measurement at any time.
Most of the resistors are rated at 0.6 watts. Is it really necessary or 0.25 watts will suffice?I can build it from parts already in my stock. Other higher power resistors are understandable.
Yes 0.25W is fine, except for 2 parallel 390R feedback resistors, they shod be 0W6 and higher quality if possible.
Thanks for the kind words fellas 🙂
@bogdan_borko,
2//392 = 196R, it’s within 1% tolerance of 195R.
No, tolerance is not a problem, never used these resistors, I wonder why are they coded that way, for caps 392 usually means 3900?
Btw I noticed that you placed 3 pins instead of VR20? That trimm pot is not optional
it is used as a RB for max idle current and RB1-4 are used in parallel connection to VR20 for lower idle current settings.
Last edited:
In the first post, Bogdan wrote that there is "no noise or hum of any kind with sensitive speakers 97dB".
Does it mean that this amplifier is better coupled with sensitive speakers? What about 'less sensitive' ones around 90dB?
Does it mean that this amplifier is better coupled with sensitive speakers? What about 'less sensitive' ones around 90dB?
If the procedure of assembling and adjusting from the article is not clear, let me know to update what is needed.
In the first post, Bogdan wrote that there is "no noise or hum of any kind with sensitive speakers 97dB".
Does it mean that this amplifier is better coupled with sensitive speakers? What about 'less sensitive' ones around 90dB?
No I just wanted to say that there is no hum or buzz on sensitive speakers, easier to hear than on 85dB ones...
Hi efficiency speakers are better for this amp in therms of power needed, haven't tried but I don think there will be the power shortage even on 90>dB speakers for home listening. 🙂
Well done, Borko, designed beautifully and thoroughly documented. I thought your use of the Hiraga drive to the upper output device was impressive, and the cascoded input stage was original and clever.
A great addition to the DIYaudio stable of fine amplifiers.
We wait the reviews....
Hugh
Thanks Hugh, nothing original here, just one of many variations no one tried, as far as know. I wanted it to be as simple as possible and with lower distortion then the popular low power class A amps retaining same harmonic structure. I'm also curious how it compares with some other small class A amp, I hope someone will write a word or two.
Last edited:
- Home
- Amplifiers
- Solid State
- Single Ended CFA