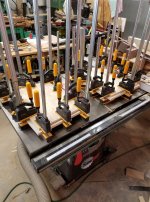
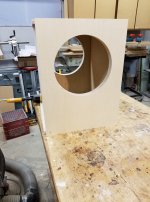
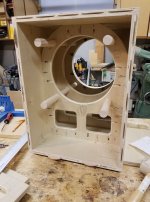
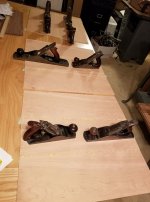
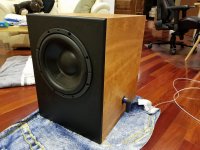
Here are a few pics of my dual 12" subwoofer build. The box is 2.6 cubic feet made out of 3/4" ply with a double front baffle. I left off tonight working on the bracing.
Attachments
-
 29064592_10155579140352741_6671171409053797883_o.jpg209.3 KB · Views: 929
 -
 29354984_10155597169647741_4295582489639252586_o.jpg301.9 KB · Views: 862
 -
 29872561_10155597728512741_4730728537267030550_o.jpg213.1 KB · Views: 859
 -
 29871998_10155600666182741_1329385985070282637_o.jpg258 KB · Views: 863
 -
 29662437_10155600818777741_2578287576537077472_o.jpg244.8 KB · Views: 851
 -
 29872172_10155603687697741_7998791661902107981_o.jpg209 KB · Views: 463
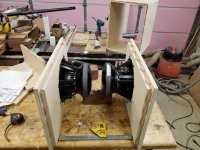
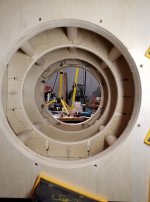
Here is how I decided to connect the front and rear baffle. The dowels will be glued and screwed into "pocket blocks". The interior braces are biscuited to the sides. The kreg screws are really there to clamp the sides to the braces while the glue dries. The dowels are also glued and screwed to the braces. Should be a very strong box and it does not weigh very much at all.
Looking at it though, I think I will add a 5th dowel at the bottom of the circle tomorrow.
Looking at it though, I think I will add a 5th dowel at the bottom of the circle tomorrow.
Attachments
Here is how I decided to connect the front and rear baffle. The dowels will be glued and screwed into "pocket blocks". The interior braces are biscuited to the sides. The kreg screws are really there to clamp the sides to the braces while the glue dries. The dowels are also glued and screwed to the braces. Should be a very strong box and it does not weigh very much at all.
Looking at it though, I think I will add a 5th dowel at the bottom of the circle tomorrow.
Nice job man. This thing is going to be insane. Careful lifting it when you're done!
Looks great! Will sound great too! I have a single SDX10 and it sounds amazing. Can't wait to hear how the 2 12s work out for you.
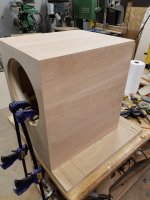
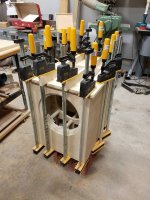
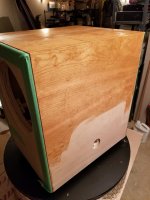
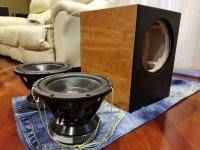
Here are some updates shots of the cabinet. I resawed some cherry to make 3/32" veneer and covered three sides of the cabinet. Will post more as I go along.
Attachments
One of the most difficult parts of any woodworking project, speakers or otherwise, is how to finish it. Brushed finishes often turn out badly. Gloss poly looks like saran wrap. Spraying is not practical for most people.
A finish I have used again and again is a home made wiping varnish (called a long oil varnish due to its heavy oil content).
It is a mix of 1/3 satin oil poly, 1/3 turpentine and 1/3 boiled linseed oil.
Anyone can achieve a wonderful finish with this mixture.
Brush the mixture on. Wait ~30 minutes. Wipe it off with clean rag. If you are using a porous wood like oak, you should go back 1-2 hours later and wipe off any that bled out of the pores.
Repeat 2 more times, lightly sanding with 220g between coats. Allow 24 hours between coats for drying/curing.
That's it.
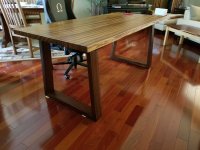
I have also attached a photo of my zebra wood and walnut desk I finished with the same process so you can see the finished look.
*Note* *Note* *Note* Dispose of rags safely. Boiled Linseed Oil is a "drying oil" and generates heat as it cures. If you ball up the rag and toss it in the corner, fully expect it to catch fire! I hang my rags in the backyard until they are stiff and dry, then dispose of them.
A finish I have used again and again is a home made wiping varnish (called a long oil varnish due to its heavy oil content).
It is a mix of 1/3 satin oil poly, 1/3 turpentine and 1/3 boiled linseed oil.
Anyone can achieve a wonderful finish with this mixture.
Brush the mixture on. Wait ~30 minutes. Wipe it off with clean rag. If you are using a porous wood like oak, you should go back 1-2 hours later and wipe off any that bled out of the pores.
Repeat 2 more times, lightly sanding with 220g between coats. Allow 24 hours between coats for drying/curing.
That's it.
I have also attached a photo of my zebra wood and walnut desk I finished with the same process so you can see the finished look.
*Note* *Note* *Note* Dispose of rags safely. Boiled Linseed Oil is a "drying oil" and generates heat as it cures. If you ball up the rag and toss it in the corner, fully expect it to catch fire! I hang my rags in the backyard until they are stiff and dry, then dispose of them.
Attachments
Very nice design feature with the dowels. Will probably borrow that.
I am just working with cherry veneer w linseed oil too. I got very pleased w the dynamic it gave to the shades of the cherry.
I am just working with cherry veneer w linseed oil too. I got very pleased w the dynamic it gave to the shades of the cherry.
What a beauty! I too am into oil finishes, very nice look and so easy to apply and maintain. You will be very pleased with the sounds as well. Enjoy.
your setup
Hi !
you setup your SDX12 in push-pull subwoofer ?
what's your box size and the sound is amazing or !?
thanks 😉
nicK
Hi !
you setup your SDX12 in push-pull subwoofer ?
what's your box size and the sound is amazing or !?
thanks 😉
nicK
Push-push if i properly recall the discussion from the Canuk Audiomart forum. These drivers are linear enuff that push-pull gives little.
dave
dave
Awesome build, you are clearly highly skilled in the wood working department. Great to see these drivers being used. That specs look excellent. I noticed them as soon as they appeared on parts express, as they have a high Xmax. Looks like this driver and the Stereo Integrity 12s are in a league of their own, for high performance home 12 inch drivers. Hoping Peerless will release a 12" STW which will be similar specs. What are you using to drive them?
Good start!
I am jealous of your workshop lol
+1 and the skills to use it!
GM
- Status
- Not open for further replies.
- Home
- Loudspeakers
- Subwoofers
- Started dual CSS SDX12 - XBL^2 12" Subwoofer Build.