I'm building a ST35 tube power amplifier.
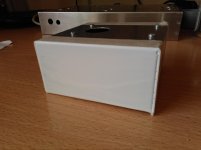
Just finished my first chassis. I used a Hammond 1444 (aluminium), 12"x 8".
I find hard to completely remove all the aluminium tiny bits from the drilling/cutting. As this is a high voltage amplifier, it is very important not to leave any small piece of metal.
Can I use water (even dipping the whole chassis) to safely remove all the residue? I know that aluminium oxidizes easily.
I don't plan painting.
Thanks for advices and help!
I find hard to completely remove all the aluminium tiny bits from the drilling/cutting.
Can I use water (even dipping the whole chassis) to safely remove all the residue?
Use a dry, old toothbrush instead, and then masking tape to pick up some of the smaller bits.
Or, tap the chassis with a rubber hammer to jar them loose.
Vacuum cleaner?
Mostly the chps fall to the bottom, may do no harm. However I did once "fix" a flaky PC by opening and stripping it, then beating it. Some factory flakes fell out. After that it was rock solid.
Mostly the chps fall to the bottom, may do no harm. However I did once "fix" a flaky PC by opening and stripping it, then beating it. Some factory flakes fell out. After that it was rock solid.
Thanks for the tips. Done!
Now I'm thinking about painting. I have a small hammond chassis used in a much smaller project, to test with.
I got an aluminium epoxy primer, and polyurethane resin paint (for exterior use, and which is sold as being very resistant).
My plan is:
- Sand the surface with a soft sandpaper.
- Apply 1+1 vinegar/water solution until surface darkens.
- Dry using a hairdryer.
- Apply the epoxy primer.
- Let dry.
- Apply two coats of paint.
Please, any suggestion / caution ?
I didn't want to paint, but this is why:

The chassis is so easily scratched.
And it is not even finished.
What would it be some years later... 😀
Any recommendation?
The chassis is so easily scratched.
And it is not even finished.
What would it be some years later... 😀
Any recommendation?
Painting my first aluminium chassis
As nobody replied, I just tested my plan on the small chassis, and it seemed to work quite well.
The exact steps are:
- Sand the surface with a soft sandpaper.
- Sand the surface with a coarser sandpaper (I bought it as "recommended for aluminium", whatever this means).
- Apply pure white vinegar on the surface. Let it dry. Then apply two more times. The surface didn't darken, but I carried on.
- Apply an alkyd resin based primer (sold "for aluminium" specifically).
- Let dry.
- Apply two coats of paint (polystyrene based enamel, not the cheapest one), letting paint dry between them.
The outcome is nice! It seems stiff and solid.
I have read that painting on aluminium is easy, but hard for the paint to stay on it. If I hadn't read it, I wouldn't say the result is fragile at all.
Is there something I can do to test it?
It would be great if other people share their experiences. I haven't found much (detailed, easy and affordable) information about this particular topic.
Attachments

Why did you do it this way? Sanding and polishing usually proceeds from coarse to fine grains.- Sand the surface with a soft sandpaper.
- Sand the surface with a coarser sandpaper (I bought it as "recommended for aluminium", whatever this means).
Best regards!
Why did you do it this way? Sanding and polishing usually proceeds from coarse to fine grains.
Best regards!
You're right. Anyway, it came out pretty good.
I just repeated the process on the final chassis, just inverting the order of sanding.
- Sand the surface with a coarse sandpaper.
- Sand the surface with a soft sandpaper.
Pay atention to the corners.
I applied the vinegar with a paint brush. Letting it fully dry. Three times. The surface seemed to darken a little bit under some angles of view.
Then, right before the primer, clean with nail polish remover (it will remove a lot of dirt; the cloth will come out nearly black 😀 ).
I was wearing nitrile gloves all the time, to avoid touching the metal surface.
Today I'll paint the chassis. Hopefully I'll post the result.
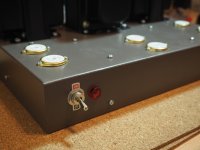
Finished!
The amp sounds wonderful. Clean, and no hum or noise whatsoever.
I painted after making drills, but before mounting components.
After several weeks, the paint is still in place. There're a few little scrathches, probably made while mounting things and working on the soldering, exposing a very tiny area (less than 1 mm size) of aluminium (or primer). It could be painted again with a fine brush.
Definitely not perfect. It has to be treated with some care. But the paint procedure I used seems like a reasonable alternative to more complex or expensive ones.
My next project is going to be using a steel chassis, though. Never worked neither painted steel before. I expect a much harder to work material (drilling is not of concern to me, but cutting definitely is) and easier to paint.
Attachments
Yes, compared to Aluminum, steel will be a bitch to fabricate by hand. Any commercial powder coaters nearby? For either material, I've found the extra few bucks over the raw cost of material for aerosol paint products is easily justified by the reduced prep time, and durability of finish. The local shop I use pre-washes to remove any residues that could impede adhesion, and they have a great range of stock colors and textures.
- Status
- Not open for further replies.
- Home
- Design & Build
- Construction Tips
- My first stereo PA