So this has been me the last few days, repairing a coolant leak (successfully) and attempting to get the AC going (unsuccessfully, bought the wrong compressor->condenser hose) on my wagon. Finally got the car back together about 11pm last night.

This was done in a bit of a panic, I'm heading to newfoundland early tomorrow AM for a vacation and friend's wedding. I'll be away for 2 weeks.
Right now I've got about a dozen Pro cards built, and loafimus's bare card order packed and ready to mail - but sitting in the door pocket of my car. I haven't started the standard stereo/PBTL wiener assembly yet, I've been knocking off the Pro's first as I've got all my parts organized for those. Don't have thermal kits put together yet.
I'll run through the list of orders tonight, anyone that's ordered a bare Pro or two but no thermal kit (basically, anything I can quickly throw in a bubble mailer and mail out), I'll mail out before I leave.
And reminder to self: post the most recent BOM for the Pro. Two resistors changed value since the original post/mouser order - a 22.1k became a 10k on the power supply sensing, and a 22.1K became a 75K on the +-12V regulator.
Gotta love modern automobile assembly methods. You know you're in for trouble when the first step reads "remove front bumper, headlight assemblies and all trim."
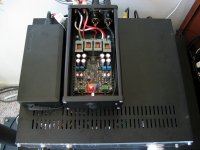
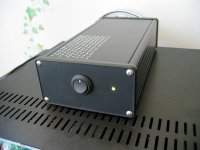
Found a temporary home for the Wiener Pro in a repurposed Hammond enclosure. Managed to fit everything on the back panel - amazing. Front Panel Designer has become my new best friend for mocking up and transferring hole positions. Powering with a very large Lenovo 170W 20.5V laptop brick. Moved to the main system and feeding with a Buffalo II Legato - balanced outputs of course. Sounds quite good and ZERO hum/buzz or other funny business!
BK
Attachments
@ bk856er
Very neat indeed!
How does your PRO handle heat in such a small and un-ventilated enclosure?
Not even an issue?
BR/ Anders
Very neat indeed!
How does your PRO handle heat in such a small and un-ventilated enclosure?
Not even an issue?
BR/ Anders
Welcome to the world of Audi ownership, this is a 2004 A4 Avant. Passat owners (same platform) deal with the same thing.Gotta love modern automobile assembly methods. You know you're in for trouble when the first step reads "remove front bumper, headlight assemblies and all trim."
Where it's a longitudinal engine driving the front wheels off the transmission, the engine's pushed forward as much as possible so the front of the engine is about 1cm from the back of the radiator. Changing the serp belt, alternator, or pretty much anything requiring access to the front of the engine requires putting the car in "service position".
Service position: Remove headlights, unbolt bumper trim from fenders and belly pan, remove 2 bolts holding bumper to front carrier. Thread in 2 long bolts where the front carrier bolts to the frame, remove front carrier bolts, and slide the front carrier (holding the radiator, AC condenser, fog lights, etc...) forward about 4 inches.
I've done it a few times now, it's actually a pretty quick job to get the car in/out of service position. And from here, doing jobs like the timing belt on the engine is a piece of cake.
Compare that to the same 1.8T engine in my Golf, where changing the timing belt involves removing 1000 things, supporting the engine, removing motor mounts and a bunch of other crap... that job's coming up soon, not looking forward to it.
I'm hauling the car apart tomorrow night in a friend's garage, got the right AC hose and other parts, and he's got all the tools to evac/recharge the system.
Looks good! I love the Hammond 1455 cases, I use them for tons of things.Found a temporary home for the Wiener Pro in a repurposed Hammond enclosure. Managed to fit everything on the back panel - amazing. Front Panel Designer has become my new best friend for mocking up and transferring hole positions. Powering with a very large Lenovo 170W 20.5V laptop brick. Moved to the main system and feeding with a Buffalo II Legato - balanced outputs of course. Sounds quite good and ZERO hum/buzz or other funny business!
BK
If you want to make front/rear panels on the cheap, you can use PCBs instead of Front Panel Express. Check this out:
https://www.youtube.com/watch?v=Yj0Bv4UEFSs
@ bk856er
Very neat indeed!
How does your PRO handle heat in such a small and un-ventilated enclosure?
Not even an issue?
BR/ Anders
Heat is a non-issue. I'm using the pad and only 20.5V, plus some vent holes. Will post pic. I already had the holes, otherwise I might not have bothered. Of course there's the opamps, but got to love the efficiency of Class D!
BK
Looks good! I love the Hammond 1455 cases, I use them for tons of things.
If you want to make front/rear panels on the cheap, you can use PCBs instead of Front Panel Express. Check this out:
https://www.youtube.com/watch?v=Yj0Bv4UEFSs
That's a super smart way to do panels!!
The free FPE designer is an awesome panel CAD tool, even if you don't use their CNC services. Do your layout, tweak, print, transfer, cut. Bingo. I also learned that my Greenlee punch does plastic just as well as aluminum - nice holes for my Neutrik XLRs.
BK
I didn't add a DC power switch to my enclosure, just the enable switch.
I get a decent "thump" from my powered subwoofer when I power off my DAC with the Pro powered on but dis-abled.
A rotary or toggle switch with progressive off-on-on would be an elegant solution. First "on" would be DC amp power, second "on" would be enable continuity. Think family friendly here.
I found one such toggle I think, but they seem to be few and far between. Anyone have a switch recommendation?
BK
Any thoughts on the TI reference design 200W SMPS for Class D amps?
Am I insane to consider getting some PCBs made up and slapping one together?
BK
Nice. Looks hardcore. If you get some boards ran off, let me know. I'll buy a couple off you. It would fit the "deliciously overkill" theme of the wiener pro.
Nice. Looks hardcore. If you get some boards ran off, let me know. I'll buy a couple off you. It would fit the "deliciously overkill" theme of the wiener pro.
I've never had a PCB made, so I may do it for that reason alone. I uploaded the Gerbers to a couple places. 5 boards was ~$85 with conventional specs, and more than double that for 2mm and 2oz. copper - which I think (?) is wise for something like this. Would love to hear from folks more experienced in these matters. Happy to share the boards, etc.
BK
So at this rate the Wiener boards won't be ready until what, Novemeber? Not complaining, just assessing.
I didn't add a DC power switch to my enclosure, just the enable switch.
I get a decent "thump" from my powered subwoofer when I power off my DAC with the Pro powered on but dis-abled.
A rotary or toggle switch with progressive off-on-on would be an elegant solution. First "on" would be DC amp power, second "on" would be enable continuity. Think family friendly here.
I found one such toggle I think, but they seem to be few and far between. Anyone have a switch recommendation?
BK
Solved this with a simpler solution. I realized I had a DPDT round rocker switch stashed away. Wired one pole to DC in and the other to the enable - problem solved.
Also finally got my 2-color LED in place - perfect.
The adjustable gain resistors turned out to be very useful for integrating with my powered sub. I use my DAC's balanced outputs for the Pro and the SE outputs for the sub, but the outputs have different gain. Some of that can be dealt with using the sub's level knob, but then auto turn-on can be hit or miss. Now it's perfect.
Sorry I'm the only one enjoying the Pro at this point. I assure you it'll be worth the wait!
BK
Received boards. Thank U!
Gmarsh, received the boards. It's been a long wait but arrived fine. Thanks.
Mailing out tomorrow: bk856er and apotelyt.
Actually intended to mail them out today, but didn't get a chance to get to the post office after work.
Gmarsh, received the boards. It's been a long wait but arrived fine. Thanks.
Apologies. This is a hobby project, I've got a day job and other things going on, I work on it when I can. I'm on vacation for another week, I'll be back home on Labor Day.So at this rate the Wiener boards won't be ready until what, Novemeber? Not complaining, just assessing.
Thanks everyone for your patience.
Apologies. This is a hobby project, I've got a day job and other things going on, I work on it when I can. I'm on vacation for another week, I'll be back home on Labor Day.
Thanks everyone for your patience.
No worries. Like I said not complaining just guesstimating. You've got a lot of orders.
Hope you guys don't mind my many posts.
Pic of the new front and the top vents. At 20V not sure it even needs them - drilled them for another project.
Pic of layout for the rear - outer edge is the interior of the Hammond extrusion and represents useable space. I just print it out, glue it on and drill away to get 1mm precision with hand tools.
After I decide on a power supply and voltage, I'll put everything in a single chassis.
BK
Attachments

There's a pot to adjust the PLIMIT value on the classic Wiener (stereo/PBTL) cards.
The TPA3250 doesn't have the feature so it's absent on the Pro.
The TPA3250 doesn't have the feature so it's absent on the Pro.
Hi, just wondering what is the progress right now. I understand you are quite busy, but since my group order is quite large and it would nice to have some idea so I could pass on to my group buy members. Thanks.
Just arrived home last night. Caught a bacterial pinkeye infection on the ferry. Good times.
Resuming work on this when I'm able. Same status as before, have a number of Pro boards built, haven't started the stereo or PBTL cards yet. I'll probably put Pro's aside and start building classic cards for a while.
Resuming work on this when I'm able. Same status as before, have a number of Pro boards built, haven't started the stereo or PBTL cards yet. I'll probably put Pro's aside and start building classic cards for a while.
- Home
- Group Buys
- "The Wiener" TPA3118 amplifier, group buy #3 + "Wiener Pro" prototypes.