The standard gauge channel is pretty wimpy - move up to 20 gauge channel-studs-track.
Do you mean metal studs? I've only used wood while building this room. They're inexpensive (probably around 3 dollars per stud) but the wall seems to be very solid, save for when I start thumping some music.
I think what I'm going to do for now is cut some 15" ~ bracing to go between the studs, as I have some left over, and the wall that's irritating me is open to the utility room on the other side, maybe shoot a few tubes of liquid nails in all the stud -> drywall mating surfaces.
Hi All,
The industry has been testing and building sound partitions for a while. Check out this gypsum wall board. It is stronger denser and designed to stop sound, including constrained layer and all.
http://www.nationalgypsum.com/products/..\File\111029.pdf
Also check out this page for STC (sound rated) partitions.
STC Ratings
Follow the installation instructions!
DT
Might we be getting carried away with the advice for advanced sound control walls ?
Frankly if it was me, and I didn't mind the couple of hours and cost of material to trash all existing drywall and start over, I'd take Evan's advice and glue/screw a underlayment of 1/2" plywood (not PB or MDF - and use Lo-Root / deck screws for the plywood NOT drywall screws), As he says it'll stiffen that wall up like crazy, and the added bonus of providing sturdy support for any wall hanging cabinets, etc. - and definitely a webbing of construction adhesive for the drywall as well.
Note that you'll need to either remount electrical outlet boxes or use extender sleeves to stay within code for all but LV wiring.
Metal, yes form the diagram. The metal keeps getting thiner (what a surprise there) it's hard now to set a screw down in the drywall (standard gauge is beer can thickness).
I think you are on the right track, glue studs before drywall. If you have a helper you can always get the 5/8" thick board, more work (heavy) but it is stronger.
Good point Chris about the switches/outlets, DD, do you have plastic boxes or metal?
*probably going to need helper anyway.
I think you are on the right track, glue studs before drywall. If you have a helper you can always get the 5/8" thick board, more work (heavy) but it is stronger.
Good point Chris about the switches/outlets, DD, do you have plastic boxes or metal?
*probably going to need helper anyway.
to clarify my post above - I meant - "strip all gyproc and glue/screw the 1/2" ply directly to studs" - you won't need any more bridge bracing than that!
Hey Chris, I wonder how that wall with the funky hat track compares to a party wall for sound isolation?
Hey Chris, I wonder how that wall with the funky hat track compares to a party wall for sound isolation?
well considering the number of layers and careful sealing / isolation of all joints, I'd imagine well enough for most of us not blasting at or beyond THX levels of 105dB
of course if one wanted to get fully carried away:
6moons audio reviews: The Room
page 5 is mostly the details of how this particular system ( IsoDamp) works
take it in context as to the total cost of the room / system - which I gave up trying to estimate - but must be well into the high 6 digits
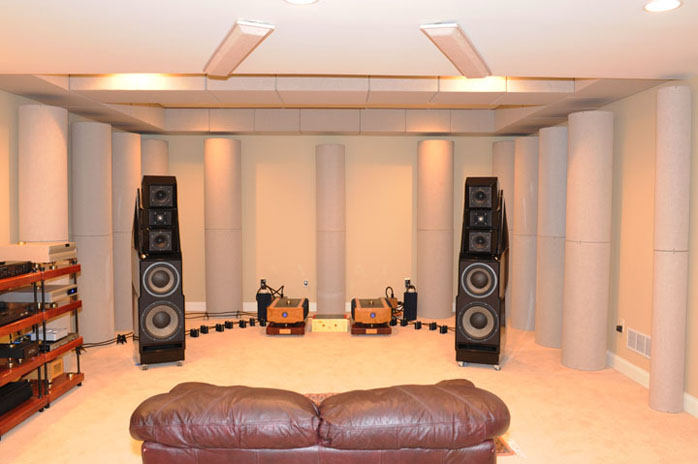
I don't even want to think about what Mike would do for a "little home cinema"
Good idea for an existing adaptation and if you were starting new you could always begin with a party wall and do it the same way. Thanks for the link.
Hello All,
All the electronics should go on the other side of the party wall in a dedicated environmentally controlled room where all the fan and mechanical noise can be isolated from the party room and all the party animals.
All for Fun
DT
All the electronics should go on the other side of the party wall in a dedicated environmentally controlled room where all the fan and mechanical noise can be isolated from the party room and all the party animals.
All for Fun
DT
Metal, yes form the diagram. The metal keeps getting thiner (what a surprise there) it's hard now to set a screw down in the drywall (standard gauge is beer can thickness).
I think you are on the right track, glue studs before drywall. If you have a helper you can always get the 5/8" thick board, more work (heavy) but it is stronger.
Good point Chris about the switches/outlets, DD, do you have plastic boxes or metal?
*probably going to need helper anyway.
There's only one electrical box in there at the moment, for the vacuum cleaner. All the components are mounted in the wall in this room where my pc is. Just the faceplates stick through and the speaker terminals are surface mount, so it wouldn't be too terrible to re-do it.
It'll probably be a project for later in the year once it starts to cool down, it's been over 100 degrees here for the past few days, lugging around sheets of drywall and OSB would probably be terrible!
Thanks for the advice guys, I think what my plan is going to be is to pull the drywall, put up some OSB, trowel in a thin layer of liquid nails and then drywall over that and run some 3" deck screws through the whole mess.
<snip>
Thanks for the advice guys, I think what my plan is going to be is to pull the drywall, put up some OSB, trowel in a thin layer of liquid nails and then drywall over that and run some 3" deck screws through the whole mess.
Be careful with the big screws. You may be better off using more of the standard screws. Also be careful not to over tighten them to the point of breaking the screw head through the paper surface. Just below flush is the trick. Any deeper and the wallboard is broken and weaker.
DT
Maybe jump to 1 -5/8" or 2" long screws.
OSB layer, well it will help with decorating; can hang picture anywhere you want.
Oh that's right, won't be hanging pictures on that wall.
btw, they sell a "lightweight drywall" it looks the same, a bit easier.
OSB layer, well it will help with decorating; can hang picture anywhere you want.
Oh that's right, won't be hanging pictures on that wall.
btw, they sell a "lightweight drywall" it looks the same, a bit easier.
I would use sub floor glue on the studs when mounting the OSB and then...I think what my plan is going to be is to pull the drywall, put up some OSB, trowel in a thin layer of liquid nails
I would use Green Glue to mount the drywall to the OSB. Both those glues are made for what you are trying to do.and then drywall over that and run some 3" deck screws through the whole mess.
Yes, for the reasons described. Use the fluted drywall screws. There's a reason they're made that way. They activate the clutch or your driver properly with little to no overdrive.Be careful with the big screws.
I would use sub floor glue on the studs when mounting the OSB and then...
I would use Green Glue to mount the drywall to the OSB. Both those glues are made for what you are trying to do.
Yes, for the reasons described. Use the fluted drywall screws. There's a reason they're made that way. They activate the clutch or your driver properly with little to no overdrive.
Thanks Cal, this will be the plan then.
- Status
- Not open for further replies.
- Home
- Design & Build
- Construction Tips
- Drywall screws - Not enough?