Hello Guys,
first, i'm new here, and this is my first thread - hello! 😀
i recently built P03 from Elliot Sound Projects
http://sound.westhost.com/project03.htm
but it ... well, doesn't amplify but kinda conducts the signal 😕
do you guys have any idea of what's happening here?
greets
first, i'm new here, and this is my first thread - hello! 😀
i recently built P03 from Elliot Sound Projects
http://sound.westhost.com/project03.htm
but it ... well, doesn't amplify but kinda conducts the signal 😕
do you guys have any idea of what's happening here?
greets
you surely want to kill me if i do so ... it's not awful. it's worse ...
well, here we go ...

the PSU is a Lab PSU (EMG18135), which is to be replaced by a PSU as soon as the amp works as it should.
the PSU showed that it wasn't drawing any current ... and due to poor equipment (i am still a student ^^ ) and use of that PSU i only had +- 15V on the rails. Anyway, decreasing it didn't have any effect on the volume ... should it?
edit: I'm sorry, but i don't have any pic of the downside, as it is completely ... well, integrated. but it does just contain two tracks wihich do not cross ...
another edit: the white'n'black wire goes to the speaker, the three copper wires go to a 10k pot (which doesn't have any effecet to the volume either), the blank copper wire on the left is +V, the insulated one is -V. the thin wire between them is GND.
well, here we go ...
the PSU is a Lab PSU (EMG18135), which is to be replaced by a PSU as soon as the amp works as it should.
the PSU showed that it wasn't drawing any current ... and due to poor equipment (i am still a student ^^ ) and use of that PSU i only had +- 15V on the rails. Anyway, decreasing it didn't have any effect on the volume ... should it?
edit: I'm sorry, but i don't have any pic of the downside, as it is completely ... well, integrated. but it does just contain two tracks wihich do not cross ...
another edit: the white'n'black wire goes to the speaker, the three copper wires go to a 10k pot (which doesn't have any effecet to the volume either), the blank copper wire on the left is +V, the insulated one is -V. the thin wire between them is GND.
Last edited:
I'm sorry but you are going to be lucky if that works at all. You simply cannot make a power amp in such a haphazard fashion. This is especially true of the P3A due to the output stage being a CFP type - careful layout is needed or it will simply oscillate.
well, i expected something like that ... anyway, maybe an amp without gain CAN become useful one day 😀
Check the resistors that set the gain of the voltage amplification stage.
Or should i just say check all those soldering points.
If it can "conduct" signals, so forward it with no gain then most probably for some intresting reason it does not oscillate, witch is a good news.
Or should i just say check all those soldering points.
If it can "conduct" signals, so forward it with no gain then most probably for some intresting reason it does not oscillate, witch is a good news.
An easy way to accidentally make a buffer out of that amp is to lose a connection between the 1k resistor, 22u cap, or ground from the inverting input node. Better circuits have looked as bad at the prototype stage. I wouldn't let that bother you.
Last edited:
Nevermind the nasty comments. Just because she's ugly, doesn't mean she can't sing.😀
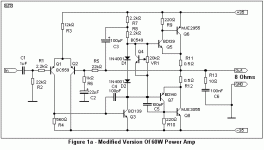
Is this the circuit you built? (I've just labeled all the parts so we know what we're talking about).
As Andrew mentioned, the lack of gain is probably due to a bad connection on R6 or C2, or the bottom of C2 not being connected to ground.
There's another problem if you're running it on a supply of only +-15V. The bias is going to be all wrong, so there will probably be more distortion and DC offset than there should be.
You can fix that by reducing R3 from 12K to 4.7K. It would also be a good idea to reduce R7 and R8 from 2.2K to 1K. Just remember to change them back to their original values when you get her a decent power supply.
Attachments
Last edited:
It would probably be a better idea to change R3 for a current source - see the P3A amp for an example.
godfrey, layout is critical when you are dealing with a CFP output stage. It would be doing him a disservice to not point that out. It is not a "nasty" comment, just a statement of fact.
godfrey, layout is critical when you are dealing with a CFP output stage. It would be doing him a disservice to not point that out. It is not a "nasty" comment, just a statement of fact.
Fair enough. My point was just that good layout doesn't have to look pretty. Conversely, I've seen a fair number of PCB designs on the forum with very bad layout, that get praised because they "look beautiful".
Looking at the photo and the description, there's a couple of things that concern me about the layout:
Looking at the photo and the description, there's a couple of things that concern me about the layout:
- I can't see where the output transistors (Q6 and Q8) are. They should be mounted on a heatsink close to the PCB, and connected to it with short wires. They need to be insulated from the heatsink, and the heatsink should be earthed.
- Is the potentiometer connected to the three copper wires the one marked VR1 on the diagram? Ideally that should be a trimmer mounted on the PCB. It is not a user control, but is just used to set the output stage bias current after the amp is built, but before it is used.
- Are there any supply decoupling capacitors on the PCB? It's not shown on the circuit diagram (bad Rod, bad😀), but there should be a cap or two from each power supply rail to ground.
firstly, i want to thank you all for your replies 🙂
godfrey: yes, this is the circuit.
i didnt hear any distortion or offset, the sound was the same, if i used the "amp" or directly connected the speaker to the sound source ...
i'll try and check that connections ASAP.
the output transistors are mounted on a heatsink right beneath the board, about 10-20mm long wired connect them to the pcb.
yes, it is vr1 which is connected to the three copper wires - but shouldn't turning it have any effect to the output? simply ... any?
i am using 2x4700uF for a capacitive voltage divider - shouldn't that be enough? well, i can still add some caps 😀
P3A
And i may build it again, using a TIP2955 and a TIP3055 just because these transistors are not suitable for audio and the CFP topology beeing old, outdated and generally bad, thus it should work out pretty well, making a bad sounding amp that can be played around with without feeling bad if it explodes.
And i may build it again, using a TIP2955 and a TIP3055 just because these transistors are not suitable for audio and the CFP topology beeing old, outdated and generally bad, thus it should work out pretty well, making a bad sounding amp that can be played around with without feeling bad if it explodes.
If you turn it too far one way the distortion will be much higher than necessary. That's relative though. Since the distortion is quite low anyway, you may not notice the difference.yes, it is vr1 which is connected to the three copper wires - but shouldn't turning it have any effect to the output? simply ... any?
If you turn it too far the other way, the output transistors will get hotter than necessary, but not dangerously hot.
The idea is to set it to a position where the distortion is very low, but the transistors are not too hot.
Plan B is to just cut the wires and leave the trimmer out altogether. The sound quality should then be good, with very low distortion. The transistors will just run a bit warmer than normal
- Status
- Not open for further replies.
- Home
- Amplifiers
- Solid State
- Amp not amping? o.O