Temperature and DC Offset protection: done.
Time to look at the digital potentiometer...or maybe to go home.
D.
Time to look at the digital potentiometer...or maybe to go home.
D.
Another thing: the DC offset sees also the signal. Can I filter it out if I put an opamp between the arduino and the "thing", feeding the + with all the output of the board, and the - with the output filtered through a DC blocking capacitor ?
Thanks,
Davide
Thanks,
Davide
Temperature and DC Offset protection: done.
Time to look at the digital potentiometer...or maybe to go home.
D.
Oh well you will find many easy examples to do that as well as alllready completed libraries etc...
Oh well you will find many easy examples to do that as well as alllready completed libraries etc...
Not really worried about that part, more tricky will be the algorithm to change the bias.
Just doing things step by step.
D.
Yes, a few resistor changes would fix that but you probably want to improve the circuit anyway because...1) I was mistaken, my arduino reads voltages between 0 and 3.3V as I have a 3.3V processor. So I think I have to replace some resistors to account for that.
Oops! I was aiming for simplicity rather than absolute accuracy, just to show the idea. It can be improved a lot though without much extra complexity.2) The calibration is a bit tricky, and one issue that I see is that the readings depends also on the rail voltages.
No3) If I want to use the circuit with Toshiba mosfet, that have 0.22R for degeneration, should I change anything ? (beside the calibration)
Yes. I catered for that in the improved version, explained below.4) What about if rail voltages are lower, like 16 V should I change anything ?
Sorry, I don't use LTspice. IMO the user interface is terrible. Simetrix is much easier to use.Can I have the LT spice file of the circuit, it would help me to understand how it works (still not 100% clear to me, poor ignorant).
Understanding would be good though. I'll try to explain how it (and the improved version)works step-by-step. Since the circuit consists of three parts joined together, it will be easier to tackle them one at a time in separate posts.
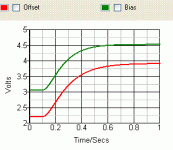
Hmm.... it is already filtered; that's what the capacitors are for. I chose a second order roll-off above about 1.6Hz, so even low bass notes around 32Hz are reduced about 400 times. It's a compromise because the filtering inevitably introduces a delay in the measurements. The pic below shows the outputs for a step change in the inputs at 0.1 seconds.Another thing: the DC offset sees also the signal. Can I filter it out...
So even with this filtering, there's about a half second delay for the output to be fairly accurate.
Anyway, there's three different ways (that I can think of) to reduce the signal feed-through:
A) Use bigger capacitors. e.g. Increasing the capacitors 10-fold will reduce the signal at all audio frequencies by a factor of 100, but will also slow down the response 10-fold.
B) Use higher order filtering. This allows better signal attenuation without hurting the response time. You could even get better Attenuation of the audio signal AND better response time this way. Unfortunately it also means extra circuit complexity.
C) Same as (B), but do most of the filtering in software in the microcontroller, instead of in the circuit.
Cheers - Godfrey
Edit: will explain later - need to sleep a bit now.
Attachments
Last edited:
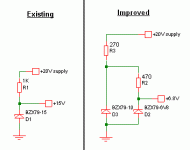
The first part of the circuit just has to provide a constant reference voltage, to be used by the other parts of the circuit. The easiest way to do that is with a zener diode. I arbitrarily chose a 15V zener, thinking that would be well below the lowest supply voltage that would be used.
In the existing circuit, current flows from the positive supply rail, through the resistor and zener, to ground. When current flows through a zener, there is a constant voltage across it. So when the supply voltage varies, the current through the resistor and zener changes, but the voltage across the zener stays constant at 15V.
~~~~~~~~~~~~~~~~~~~~~~~~~~~~~~~~
Well, almost constant. Unfortunately zeners aren't perfect so the reference voltage does vary slightly depending on the current through it. This is one of the causes of the variations you get.
Another problem is that you mentioned wanting to reduce the supply voltage to 16V or so. In the original circuit this would result in the zener being starved of current and not working well.
~~~~~~~~~~~~~~~~~~~~~~~~~~~~~~~~
Ideally what's wanted is a precision voltage reference of some sort. I don't know much about those, though, so I'll stick to simple stuff. In the improved circuit, I'm aiming for good regulation with supply voltages anywhere between +-15V and +-35V, using a two-step regulator.
This time we're using a 6.8V zener (D2) to get a reference voltage of 6.8V. The improvement comes from reducing the variation of current through the zener. Instead of R2 being connected to the positive supply rail, it is connected to a constant(ish) +10V provided by D3 and R3.
So, the first regulator (D3+R3) is powered by the positive supply and gives a fairly constant 10V. The second regulator (D2 and R2) is powered by that 10V and gives a very constant 6.8V.
~~~~~~~~~~~~~~~~~~~~~~~~~~~~~~~~
One small warning: The value of R3 was chosen to ensure that there's enough current flowing even at low supply voltages (e.g. 15V). With high supply voltages (e.g. 35V), the current drawn (and the power dissipated) is much higher. R2 should be able to dissipate up to 3W and D3 should be able to handle up to 100mA of current and 1W dissipation.
Attachments
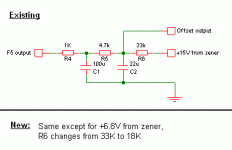
The second part of the circuit is to measure the DC offset at the output of the amplifier. R4 and C1 form a low pass filter that passes DC but filters out most of the audio AC signal. R5 and C2 form a second low pass filter that reduces the AC even further.
If that's all there was to the circuit, then the DC voltage at the output would be exactly the same as the DC offset at the output of the amplifier. There's a slight problem with that though because the DC offset could be positive or negative, but the microcontroller can only measure positive voltages.
To get around that problem, we need to raise the output voltage by a constant amount so it's always positive but still tracks the DC offset. This is done by adding R6. As far as DC is concerned, R4, R5 and R6 form a simple resistive divider between the DC offset at the amp's output and the 6.8V reference.
The final output is approximately +1.6V + 76% of the DC offset. Since the microcontroller can measure anything between 0 and 3.3V, it will be able to cope with DC offsets of about +-2V.
Attachments
I managed a dc offset check using 4 resistors.
2 resistors per micro input for measuring +ve and -ve phases.
If the dc offset was there for more than 500ms the micro switched off the speaker relay.
It also had a 4 second power up delay on the relay.
2 resistors per micro input for measuring +ve and -ve phases.
If the dc offset was there for more than 500ms the micro switched off the speaker relay.
It also had a 4 second power up delay on the relay.
An externally hosted image should be here but it was not working when we last tested it.
Last edited:
The third part of the circuit is to determine the current in the output stage of the amp. To do this, we need to measure the voltage across one of the 0.47Ohm source resistors. So, in the existing circuit below, we want to measure the voltage between point A and the negative supply rail.
The current flowing through R7 keeps the LED lit. There is a 1.7V drop across the LED, so the voltage at point B is 1.7V higher than the voltage at point A.
R8 and C3 form a low pass filter to get rid of most of the audio frequency signal voltage, so the DC voltage at point C is the same as at point B, but most of the AC has been removed.
There is a voltage drop of about 0.7V between the base and emitter of Q1, so the voltage at point D is about 0.7V lower than at point C. This means that the voltage at point D is about 1V higher than at point A.
So, for example, if the amp's idling current increases, the voltages at points A. B, C and D will all increase by the same amount and the current through R9 will also increase. The increase in current through R9 will be proportional to the increase in the amp's idling current.
The current through R9 flows through Q1, so the increase in that current causes an increase in the current through R10 and R11, and a reduction in the output voltage.
C4, in combination with R10 and R11 form another low pass filter to further reduce the AC ripple. R11 is connected to the positive voltage reference to lift the output voltage above zero for the benefit of the microprocessor.
~~~~~~~~~~~~~~~~~~~~~~~~~~~~~~~~~
The main problem with this circuit is that when the power supply voltage changes, the current through R7 and the LED also change. This causes a slight change in the voltage across the LED, and thus a slight change in the output voltage.
To fix this, we need the current through the LED to be independent of the supply voltage. In the improved circuit below, this is accomplished by adding another resistor and a zener.
Now when the supply voltage changes, the current through R12 and the zener will change, but the current through R13 and the LED will remain the same.
Attachments

Thank You so much. Really very instructive for me. I have all the parts and I will assemble the "thing V2" as soon as I can, that could be not so soon, as I will be traveling in the next weeks.
For the DC filtering, how about my idea to do it subtracting AC with an opamp ? I think it is good to have a fast response, and the suggestion to do a filter in the software is not bad. I'll try it. The signal should almost average to zero.
Davide
For the DC filtering, how about my idea to do it subtracting AC with an opamp ? I think it is good to have a fast response, and the suggestion to do a filter in the software is not bad. I'll try it. The signal should almost average to zero.
Davide
Doing it the way you suggested would actually give the same results as a single RC filter ( the existing circuit has two RC filters per output). As mentioned in post 25, you could get better results with a higher order filter, using opamps. I didn't want to use opamps, though, because then you'd need a separate power supply for them.For the DC filtering, how about my idea to do it subtracting AC with an opamp ?
No matter how you do the filtering, there's always going to be some delay.I think it is good to have a fast response, ...
Let's forget theory for a moment and think about what you're trying to do. Say you're looking for DC offset at the amp's output and to start with the output is exactly zero volts. Then the voltage starts increasing. How do you know if that's "DC" drift (e.g. due to temperature change) that you might want to correct, or if it's just the start of a musical note? There's no way to tell straightaway.
So the filter design is always a compromise, bearing in mind that slowly changing "DC" is actually AC, just at a very low frequency. The filters could be a lot better than they are, though.
I think a good compromise would be a simple electronic filter first (mostly to avoid overloading the microcontroller's input), then do the rest of the filtering in software....and the suggestion to do a filter in the software is not bad. I'll try it. The signal should almost average to zero.
- Status
- Not open for further replies.
- Home
- Amplifiers
- Pass Labs
- F5 Micro (A useless but funny project)