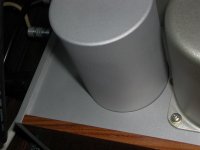
This is what a bead blasted motor run cap looks like..
I bead blast my aluminum chassis parts. They look good even after they oxidize, and they don't rub black onto your skin when you handle them. The pic is from one of my amps that was built about 6 months ago.
My first setup was a large rubbermaid container, and some harbor freight blasting cabinet gloves fastened to the container with toilet rough plumbing rings, a scrap plexi window and a cheapie gun. I snagged a real cabinet (with a light! yes!!) from work a few months ago that was headed for the dumpster. Glass beads from McMaster.
I've used both 6061-T6 and 5052 1/8" sheet stock, and I've noticed that one of the materials takes a bit longer to bead blast, although I haven't paid much attention to which one.
I tried some aircraft DIY AL surface conversion stuff that Peter Daniels uses (or used), but the stuff was so nasty/hazadous/carcinogenic that I took it to our local household hazardous waste place after one or two uses.
Attachments
Last edited:
I bead blast my aluminum chassis parts. They look good even after they oxidize, and they don't rub black onto your skin when you handle them.
How do you ensure that they oxidize evenly? In my experience a fingerprint on freshly blasted or sanded aluminum will show forever.
I don't get the mumbling about paintability of aluminum. I've painted aluminum for decades and never had issues. The trick I've found is to use coarser sand paper. No finer than 220 grit. Sand the aluminum, prime it (I use Rustoleum primer), paint it. Done. Follow the destructions on the rattle can.
Alternatively, swing by a place that deals in automotive paint and get a rattle can with etching primer. Prime, dry, sand lightly with some 2000 grit and top coat.
~Tom
Hi Tom
I haven't had trouble painting alloy before either .Just use a quality etch primer don't mix different products and follow direction's .
5mm alloy plate etched and painted
An externally hosted image should be here but it was not working when we last tested it.
Cheers
How do you ensure that they oxidize evenly? In my experience a fingerprint on freshly blasted or sanded aluminum will show forever.
Well, I demand it!!! I require the oxide particles to stand upright in perfectly straight rows........heck if I know, no fingerprints around here. Getting the initial bead blast even can be a bit tricky; I usually shoot further away when I'm almost done and blend the blasted areas together. That's the part where either the 5052 or the 6061 is easier......I think the 6061 is easier to get a uniform surface finish.
The trick I've found is to use coarser sand paper.
or a good bead blastin'.......
I have seen somebody in AudioXpress recommended Wilton Aluminum baking sheet to use as chassis for tube amp.
http://www.amazon.com/Wilton-Decorative-Preferred-Sheet-Cake/dp/B00096ZTRO/ref=sr_1_2?ie=UTF8&qid=1307507714&sr=8-2
Anybody tried it?
http://www.amazon.com/Wilton-Decorative-Preferred-Sheet-Cake/dp/B00096ZTRO/ref=sr_1_2?ie=UTF8&qid=1307507714&sr=8-2
Anybody tried it?
The trick I've found is to use coarser sand paper. No finer than 220 grit. Sand the aluminum, prime it (I use Rustoleum primer), paint it. Done. Follow the destructions on the rattle can.
Same process I use. Sand blast, Clean with lacquer thinner, Rustoleum, bake in the "solar oven", Spray gloss black or "stonecraft", bake in solar oven.
The solar oven used to be the camper on the back of a pickup truck parked in the Florida sun. Even in January it will hit 140F. Now I use my Honda Element. It is blue and black and gets real hot inside. 2 or 3 hours will make paint very hard. I leave the stonecraft stuff inside for a few days of thermal cycling and it is quite durable.
Nothing like driving around with the remnants of VOCs in your car after a paint job. 😀
The important part is to remove the aluminum oxide that forms quickly on all aluminum before painting. For small parts sanding works, but is too slow for my use. A quick wipe or dip in lye solution is much faster. The special primer gives better adhesion. I have tried the rustoleum primer and it does not work as well the nasty stuff, but you can buy it in small quantities for much less money. Of course I paint more aluminum than most here. I do have the paint booth, masks, gloves and spray equipment. Since my work usually hangs at least 100 feet in the air touch up work is quite expensive!
Even so most of the aluminum ends up getting anodized.
Even so most of the aluminum ends up getting anodized.
Nothing like driving around with the remnants of VOCs in your car after a paint job.
I tend to use the car that I don't plan on driving for a few days. The paint smell goes away rather quickly, but the Tung oil finish that I use on wood leaves a lingering aroma.
Ok, so I bit the bullet and ordered the chassis. What is everyone's thoughts on metal thickness on a chassis that is 12.5"x8"x2.5" that will have 10 lbs. of iron.
Thanks
Thanks
Ok, so I bit the bullet and ordered the chassis. What is everyone's thoughts on metal thickness on a chassis that is 12.5"x8"x2.5" that will have 10 lbs. of iron.
Thanks
If you put the transformer in the middle and bounce it around a lot, then it is too thin. If you put the transformer near a corner and use it a home, it should be fine.
My thought was to mount the transformer near the rear edge and have the P-P tubes in the middle and the driver board in front of the P-P tubes.
My thought was to mount the transformer near the rear edge and have the P-P tubes in the middle and the driver board in front of the P-P tubes.
That should be fine.
- Status
- Not open for further replies.
- Home
- Design & Build
- Construction Tips
- Chassis thickness