Your boards are very nice for homemade stuff. How do you do the silkscreening, is that actually the top-side copper?
Those pots look like the ones they use in Europe, I mean, non-standard, like metric style. I like that actually!
Those pots look like the ones they use in Europe, I mean, non-standard, like metric style. I like that actually!
I can't see how a 16ohm speaker gives the amplifier a hard time anyway.
A 16 Ohm cabinet will let you run the amp higher to get the same volume as an 8 ohm cabinet will. So it sounds hotter. I said that is my theory. All I know for sure is to me a 16 ohm cabinet sounds better than an 8 ohm cabinet FOR GUITAR. I know a lot of heavy metal guys like 8 ohm cabinets with celestion 75 watt speakers. I like 16 ohm cabinets with Celestion 25 watt speakers.
Most good 12" guitar speakers ( Emminence & Celestion) are between 98db and 103db. That's not exactly low efficiency.
The Celestions I like for guitar are 97dB.😉
Your boards are very nice for homemade stuff. How do you do the silkscreening, is that actually the top-side copper?
Those pots look like the ones they use in Europe, I mean, non-standard, like metric style. I like that actually!
The silkscreen is etched into the copper of the double sided board. I bought a stack of double sided board a couple years ago cheap, so using it like this is better than just etching the whole layer off.
The pots have 1/8" shaft, so standard knobs don't fit. I have ordered these:
An externally hosted image should be here but it was not working when we last tested it.
from Digikey. $3.50 each is a bit steep, especially since I need 15. They are solid aluminum, excellent quality.
A 16 Ohm cabinet will let you run the amp higher to get the same volume as an 8 ohm cabinet will. So it sounds hotter. I said that is my theory. All I know for sure is to me a 16 ohm cabinet sounds better than an 8 ohm cabinet FOR GUITAR. I know a lot of heavy metal guys like 8 ohm cabinets with celestion 75 watt speakers. I like 16 ohm cabinets with Celestion 25 watt speakers.
If it's a valve amp you should select the speaker tapping to match your speaker, so it will sound identical regardless of the speaker impedance. Historically valve amps always used 16 ohm (not guitar amps though), 8 ohm came about to suit transistor amps.
If you're feeding a 16 ohm speaker with the amp set to 8 ohm, then you will seriously drop the power (more than half) and also strain the output transformer and valves due to the mismatch. Presumably this drops the quality even further, and is perhaps the effect you're looking for?.
Yes. I pretty much figured all that out about 30 years ago. I use 2 16 ohm cabinets and set the switch on 8. The 16 ohm cabinets sound different because they have different speakers not just different impedance speakers. The 8 ohm Marshall cabinets have 75 watt Celestions in them and the 16 ohm Marshall cabinets have Celestion 25 watt speakers. You have to crank the amp up more with the 16 ohm cabinets but I do understand that it is not because of the impedance difference. Those 8 ohm cabinets are a lot louder. I have about 5 different kinds of Celestions. One or two of them I have never seen anywhere else.
I am not actually looking for anything. I am good with my tone right now. It is never perfect but it is good.
I am not actually looking for anything. I am good with my tone right now. It is never perfect but it is good.
Yes. I pretty much figured all that out about 30 years ago. I use 2 16 ohm cabinets and set the switch on 8. The 16 ohm cabinets sound different because they have different speakers not just different impedance speakers. The 8 ohm Marshall cabinets have 75 watt Celestions in them and the 16 ohm Marshall cabinets have Celestion 25 watt speakers. You have to crank the amp up more with the 16 ohm cabinets but I do understand that it is not because of the impedance difference. Those 8 ohm cabinets are a lot louder. I have about 5 different kinds of Celestions. One or two of them I have never seen anywhere else.
Right, you didn't make that clear - because you can buy identical speakers with different impedance voice coils - you simply order them with the impedance you want. Often a 4x12 will have four 16 ohm speakers in parallel, to give 4 ohms - or for eight ohms, it will use four identical 8 ohm speakers, in series/parallel.
Celestion have made a LOT of different speakers over the years, and many of them were specifically made for particular manufacturers, so you couldn't ever buy them. I like Celestion gear, and they are pretty good at supplying spares as well, I bought repair kits for a couple of blown tweeters from them a couple of years back.
EDIT: Just found the email about it - it was Jan 2006, and they supplied me two 'diaphram units'. Never delete an interesting email 😀
Last edited:
Gentlemen, we have chorus!

After a few minor snags (the main one was where I had the output polarity reversed - the stupidest thing, it took forever to find that one) it's running. A bit tricky to adjust yet, with the trimpots where single turn pots should be but it is clearly working. Next I need to connect the FG and scope to make sure I'm getting the correct waveforms and voltages, according to the chart on the original schematic.
After that is verified, I'll connect the reverb tank and give that a go.
Looks good for working up a final layout for the chorus board. Getting closer to getting this installed in the cab.
Good choice on the knobs, John. A little Fendery looking but without the cheap plastic and big numbers. That's actually a cheap price for a quality knob. It just don't seem so cheap when you have to buy 15 of them.
Don
Don
50 bux for knobs sure hurts.
Some problems: the MN3101 clock generator has stopped oscillating. I pulled the IC, thinking it was dead and tacked on enough components to try it out of the circuit. It oscillates fine. Put it back in and no go. Something is up and I can't pinpoint it.
Back at it tomorrow.
Some problems: the MN3101 clock generator has stopped oscillating. I pulled the IC, thinking it was dead and tacked on enough components to try it out of the circuit. It oscillates fine. Put it back in and no go. Something is up and I can't pinpoint it.
Back at it tomorrow.
Could be as simple as a little piece of sire shorting out something. Or a short in the bbd chip caused by the polarity reversal, it was damaged and finally dies after a few hours of operation.
kudos for doing chorus the analog way.
And I LOVE those KNOBS!
kudos for doing chorus the analog way.
And I LOVE those KNOBS!
My favorite amp was a Silvertone 100w 4 X 6L6GC with a Silvertone 6-10" jensen alnico cab....I like all my signal modification outboard. I have about 100lbs of ancient Iron p/s and output transformers mainly Fender and a few Ampeg P/S , I am thinking of building an amp of somekind maybe something on the line of a 50W bassman with an extra gain stage and a master volume.
E
E
This will have some folks out there in TV land shaking their heads...:
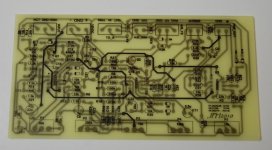
Fresh from the etchant. A new preamp board.
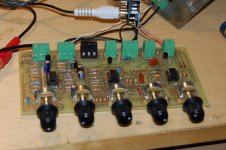
All dressed up and playing it straight.
I had too many problems on the (original) massive VH140 clone. I spent most of the day yesterday messing with it, messing it up and getting very frustrated. Part of the problem is the way it was laid out - in 3 pieces spliced together with ribbon cable and duct tape. In the beginning, I should have taken the time to capture the schematic and made some sensible decisions regarding its layout.
Today, I started again (not really, I had started to capture the schematic of the preamps months ago but gave up) and separated the B channel (clean) on its own board. That is what is shown above.
I spent some quality time considering the eventual structure and included some of the "housekeeping" circuitry on this board - the selection circuit to switch between channel A and B, the A/B footswitch jack, the input buffer with the input jacks (high and low) and the output buffer. The row of terminal blocks across the back are for all of these connections plus power input (+/-15VDC).
With this channel finished and tested (sounds sweet!), my next move is to do channel A. "A" is the distorted channel but is nearly identical to "B", circuit wise.
After channel B, I'll do the reverb board and then finally the chorus board.
For all intents and purposes, this still is a one-for-one clone of the VH140c, just better laid out and easier to test and assemble.

Fresh from the etchant. A new preamp board.

All dressed up and playing it straight.
I had too many problems on the (original) massive VH140 clone. I spent most of the day yesterday messing with it, messing it up and getting very frustrated. Part of the problem is the way it was laid out - in 3 pieces spliced together with ribbon cable and duct tape. In the beginning, I should have taken the time to capture the schematic and made some sensible decisions regarding its layout.
Today, I started again (not really, I had started to capture the schematic of the preamps months ago but gave up) and separated the B channel (clean) on its own board. That is what is shown above.
I spent some quality time considering the eventual structure and included some of the "housekeeping" circuitry on this board - the selection circuit to switch between channel A and B, the A/B footswitch jack, the input buffer with the input jacks (high and low) and the output buffer. The row of terminal blocks across the back are for all of these connections plus power input (+/-15VDC).
With this channel finished and tested (sounds sweet!), my next move is to do channel A. "A" is the distorted channel but is nearly identical to "B", circuit wise.
After channel B, I'll do the reverb board and then finally the chorus board.
For all intents and purposes, this still is a one-for-one clone of the VH140c, just better laid out and easier to test and assemble.
Among the advantages to redoing this (again!) is that by capturing the schematic, I can simulate it and see how it is performing, thus pretesting the circuit before it becomes physical reality.
Simulating the straight preamp B, I see how effective the tone controls are and at what frequencies. Interesting to see just how much distortion that even the 'clean' preamp imparts.
The A preamp is a different animal and distortion is WAY up there. Midband boost and cut are in the 20db range with low and high giving a meager 5db.
The board layout for A is nearly done:
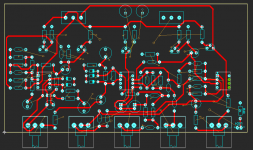
just a few more finishing touches. It uses the same size board as B but has less circuitry. I could have packed things in tighter but why bother?
It should be ready for etching very soon. Hopefully, I can get it stuffed and give it a listen later.
Simulating the straight preamp B, I see how effective the tone controls are and at what frequencies. Interesting to see just how much distortion that even the 'clean' preamp imparts.
The A preamp is a different animal and distortion is WAY up there. Midband boost and cut are in the 20db range with low and high giving a meager 5db.
The board layout for A is nearly done:

just a few more finishing touches. It uses the same size board as B but has less circuitry. I could have packed things in tighter but why bother?
It should be ready for etching very soon. Hopefully, I can get it stuffed and give it a listen later.
Ok, as seen HERE, I've got the electronics done.
It's on to the nuts and bolts.
First, I had to do a little surgery:
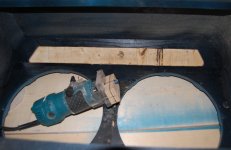
With a mod to my wee router I cut a recess in the back slopping panel for the preamp tray. The panel was 3/4" thick and that wasn't any good.
The preamp tray:
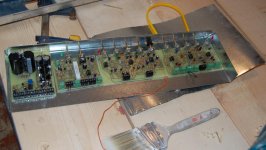
Just thin sheet metal. It will get stiffened by attaching to the front panel and a piece of 1/4" hardboard that will double as standoffs for the PCBs ( a pic later will illustrate it better than I can explain it).
I put the tray in place with a speaker in the cab (Eminence woofer, not a guitar speaker) to check for clearance:
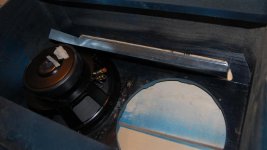
Looks good, should be ok.
It's on to the nuts and bolts.
First, I had to do a little surgery:

With a mod to my wee router I cut a recess in the back slopping panel for the preamp tray. The panel was 3/4" thick and that wasn't any good.
The preamp tray:

Just thin sheet metal. It will get stiffened by attaching to the front panel and a piece of 1/4" hardboard that will double as standoffs for the PCBs ( a pic later will illustrate it better than I can explain it).
I put the tray in place with a speaker in the cab (Eminence woofer, not a guitar speaker) to check for clearance:

Looks good, should be ok.
As it turns out, there wasn't enough room on the preamp tray for the power supply board, so I'll need to mount that elsewhere. Lucky I didn't do the chorus - it would not have fit in the front panel.
I got all of the mounting holes drilled in the preamp tray and the front panel and mounted the boards and the tray:

I would have preferred the pots to be a bit lower. Routing the recess to fit the tray was tricky enough,
I marked and drilled the holes for the stainless steel overlay:
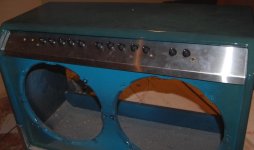
It looks like some of the knobs are out of line but that is because not all of the pots are bolted yet. Should straighten out when I get that done.
Lots more to do but I'm beat now and I probably won't get a chance to work on this again until the weekend.
I got all of the mounting holes drilled in the preamp tray and the front panel and mounted the boards and the tray:

I would have preferred the pots to be a bit lower. Routing the recess to fit the tray was tricky enough,
I marked and drilled the holes for the stainless steel overlay:

It looks like some of the knobs are out of line but that is because not all of the pots are bolted yet. Should straighten out when I get that done.
Lots more to do but I'm beat now and I probably won't get a chance to work on this again until the weekend.
Last edited:
wow, looking good! Nice to see another picture of that beautiful blue cabinet.
So it is stereo, right? (two speakers, I figure, the chorus would justify making the amp stereo)
So it is stereo, right? (two speakers, I figure, the chorus would justify making the amp stereo)
- Status
- Not open for further replies.
- Home
- Live Sound
- Instruments and Amps
- Groovy Guitar Amp