Me too. Nothing against this thread, great links and pics. The idea of getting some type of consensus about asthetics is what bugs me.
I started this thread to get ideas and inspiration. There's no right or wrong and thanks to everybody who has contributed so far.

Conconance Cyber 211 Monoblock
You are right stockdam; You can not not communicate. What ever you do, say, wear or build communicates something. I think it is better to try to understand what amps work better and how. It is a relative art and the only way to do it is to look at lots of amps.
Last edited:
Stixx:
Your amp (Post 93) is truly inspirational....For the "Classic" look it is the best here so far...attention to detail, as I said..way up close, nose to it close, is paramount.
I'm having the distinct impression that releasing you amp to a professional Woodworker/Craftsman would be the best option.
All of us has his/her specialty.........As I don't have the skill levels nor tools to accomplish such detailed work...the wisest choice would be to draw out the "vision" each one of us has.....& let the pro take it from there.
______________________________________________________________Rick....
Some of the excellent quality shown is hightime for me to rethink my chassis policy and perhaps drift away from visible nuts and bolts. Daresay my stuff is constructed tough to withstand transport and be banged about.
What about the underwiring quality ? I'm detecting some relax on this:
I place more emphasis on component placment as it is somewhat related to performance.
Traditionally, exactly 50 yrs ago is when I was first taught where to put components in a chassis.
richy
What about the underwiring quality ? I'm detecting some relax on this:
I place more emphasis on component placment as it is somewhat related to performance.
Traditionally, exactly 50 yrs ago is when I was first taught where to put components in a chassis.
richy
Attachments
What about the underwiring quality ? I'm detecting some relax on this:
I place more emphasis on component placment as it is somewhat related to performance.
Many of todays younger builders never had the opportunity to learn the old standards of construction the way some of us did. By dismantling a vintage TEK scope, some WWII vintage military gear or even some older HP stuff.
I still have a 300 watt SS amplifier that I built in high school. It looks like a teenager built it, and it blew up a lot. After I got a real job at a big electronics plant (I still work there) I learned how MIL spec and "mission critical" stuff was built. Some of the guitar amps that I built then (70's) are still kicking. Some of them even used parts from old TEK scopes!
Now, I make a PC board for almost everything. That way it is a lot easier to make more the same way, even if I am not doing the building.
What about the underwiring quality ? I'm detecting some relax on this:
I place more emphasis on component placment as it is somewhat related to performance.
Wiring quality isn't essential.....however for me it's one of the details that I look for. I worked for an aircraft company and the quality of the wiring was very high.
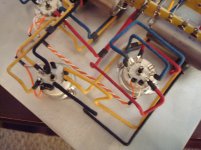
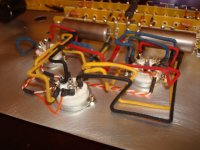
Here's a guitar amp that I consider to be slightly sloppy.....
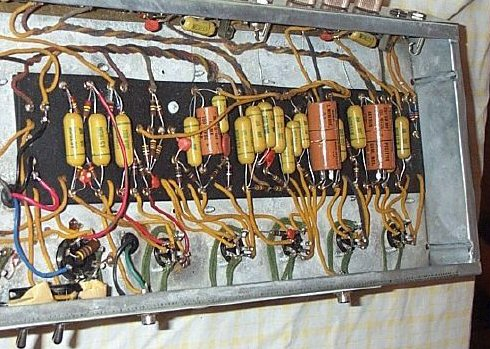
This is much better:
Stockdam:
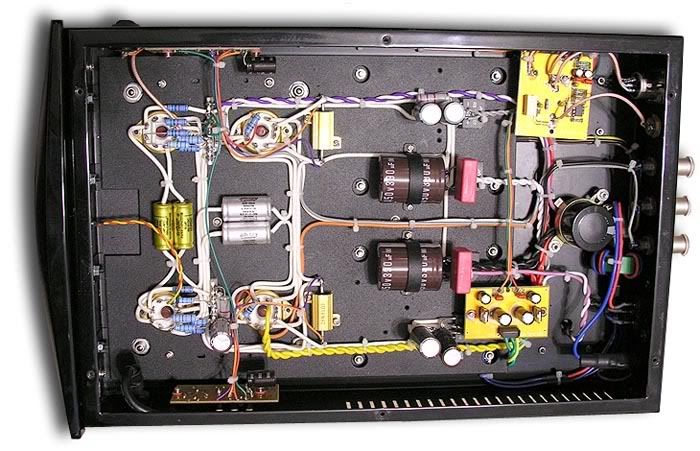
I would take issue with your noted "neat" wiring arrangement. Note the wiring is bundled together....some with the twisted heater wiring!
Quoting Morgan Jones:.."Good layout in a valve amplifier means low stray capacitances........"
Further:..."The best way....is to cross them at right angles".
This would make for increased capacitances if we bundle them together for a better looking amp.
This photo starts to look SS in layout....two dimensional....as in a PCB.
Since our amps use large bulky components....think three dimensionally.."Can I make a straight shot from this socket to that cap if I mount this cap like....so"
___Morgan Jones, Valve Amplifiers, First Edition, P. 341___
___________________________________________________________Rick...
I agree with Mr. Ellis. I have seen many circuits wired like the 'improved' illustration above, and to me they look like crosstalk nightmares. I keep the DC and ground, the signal, and AC such as heaters away from each other, and keep the wire paths as short as practicable observing separation and orthonogal routing of the three circuit types. The resultant wiring looks a little chaotic unless you're a builder and see what's going on. All that rectangularly routed, bundled and laced wiring looks verry kewl unless you're a builder. Pretty, but noisy.
I do agree, though, that the wiring must be well secured against the vagaries of the physical universe; in our case, mostly the shipping apes.
Aloha,
Poinz
AudioTropic
I do agree, though, that the wiring must be well secured against the vagaries of the physical universe; in our case, mostly the shipping apes.
Aloha,
Poinz
AudioTropic
Interesting debate. I've seen it done neat and done short and sweet. Which one IS better?
Had an old radio from 1930s Austria. The most beautiful wiring job I've ever seen! A true gem. Even the resistors were works of art. Can't say it worked great, tho....
Had an old radio from 1930s Austria. The most beautiful wiring job I've ever seen! A true gem. Even the resistors were works of art. Can't say it worked great, tho....
Just to go back to the Audiotropic/Poindexter stuff from earlier. Amp and preamp . I've had them grace my living room a few times. What really blows your mind when you see them in person is: "How does he get the wires from one side to the other?" Never have figured it out.
Sure can't see them.
Sure can't see them.
Just to go back to the Audiotropic/Poindexter stuff from earlier. Amp and preamp . I've had them grace my living room a few times. What really blows your mind when you see them in person is: "How does he get the wires from one side to the other?" Never have figured it out.
Sure can't see them.
Holes through the wood core is my suspicion.
(I too stared at a pic of one of his creations for a couple of hours before decucing that as the only logical method and how it would be accomplished simply)
Cheers!
Your amp (Post 93) is truly inspirational....For the "Classic" look it is the best here so far...attention to detail, as I said..way up close, nose to it close, is paramount.
I'm having the distinct impression that releasing you amp to a professional Woodworker/Craftsman would be the best option.
All of us has his/her specialty.........As I don't have the skill levels nor tools to accomplish such detailed work...the wisest choice would be to draw out the "vision" each one of us has.....& let the pro take it from there.
Thanks Richard

To be honest I didn't do all of the craftsmanship myself... the wooden frame was indeed the work of a professional and cost me quite a bit ... ouch!
And I am lucky enough to have friendly people at work who can contribute this and that... did you notice my (trademark) white delrin volume knob? 😉
Does anyone understand what is going on with the second picture in post 107
(the "better" wiring arrangement)? There seems to be some sort of substrate on the left that the components are attached to. It seems to be separated from the chassis, but then the tube sockets are bolted right to it. Is this non-conductive, or just a second sheet of steel? What is the point?
(the "better" wiring arrangement)? There seems to be some sort of substrate on the left that the components are attached to. It seems to be separated from the chassis, but then the tube sockets are bolted right to it. Is this non-conductive, or just a second sheet of steel? What is the point?

no hum or noise issue at all.
Very neat, but yours aren't bundled together.
dave
Does anyone understand what is going on with the second picture in post 107
(the "better" wiring arrangement)? There seems to be some sort of substrate on the left that the components are attached to. It seems to be separated from the chassis, but then the tube sockets are bolted right to it. Is this non-conductive, or just a second sheet of steel? What is the point?
All the components seem to be mounted to a sheet of metal with two "windows" left and right (across the entire lenght of the chassis). This second sheet is then attached to the top plate... maybe on rubber pads or something similar..?
Stockdam:
I would take issue with your noted "neat" wiring arrangement. Note the wiring is bundled together....some with the twisted heater wiring!
I wasn't suggested that the layout was good but the neatness is much better than the mess I have seen. Yes wiring segregation is important so good design is important; however that can be visually let down by poor wiring that sometimes looks lazy.
In short, what I was taught as a professional designer about aesthetics in electronics:
1) Ergonomics is the first thing. The equipment first of all must be convenient in usage. If it is made for people, it must be safe and convenient for people.
2) Functionality of all details. Some spoilers look very odd, like a saddle on a caw, when they don't reflect functionality.
3) Properties of materials. Plastic mold, sheet metal stamped details, wooden parts, look nice if they reflect properties of materials.
4) Proportions and rhythmic rows. Symmetry and asymmetry. It is up to the designer to use symmetry or asymmetry to reflect some specific properties of functionality, either to design a fresh attractive look, or to remind some already accepted by customers forms. New style or some established one. All depends
The rest means variations. But if the thingy is ergonomically designed and all details are functional it looks nice, even when out of some fashionable proportions.
- Status
- Not open for further replies.
- Home
- Amplifiers
- Tubes / Valves
- Aesthetics